Juniper associate JNCIA Learning Notes
Juniper associate JNCIA Learning Notes#
2. JunOS Fundamentals#
Common language across routing, switching and security device.
- Modular design.
- One process failing does not break other processes.
- Build on open source: modified FreeBSD or Linux
All platforms use the same source code base. Core features work consistanly on all platforms running Junos OS.
Single Operating system - with a singel release track.
Some junos code bases release at a faster rate - the X releases that have service enhancements for security devices - the SRX.
The R release are bug fixes with no new enhancements.
The F release has bug fixes and new features.
Format is m.NZB
- m: major
- N: minor
- Z: Release type
- B: Build Number
Seperation of Control and Forwarding Plane#
- Control plane: routing engine (RE)
- Forwarding plane: packet forwarding engine
RE:
- x86 or PowerPC Architecture
- maintains routing table, bridging table and primary forwrding table
- Connects to Packet Forwarding Engine (PFE) using internal link
- contains JunOS
- brain of the platform (protocol updates and system management)
- Chassis, system and usermanagement
- sits on top of Junos kernel
PFE:
- runs on seperate hardware
- uses ASICs (Application specific integrated circuits)
- Recieves the forwarding table from the RE via internal link - has a copy
- forwards frames and packets
Other services provided by the PFE:
- policers- rate limiting
- stateless firewall filters
- class of service
Makes possible:
- GRES - Graceful routing engine switchover
- NSR - Non-stop Active Routing
- ISSU - In-service Software Upgrades
Transit traffic
- all traffic entering ingress network port is compared against the forwarding table entries and is forwaredd out an egress network port
- Never sent to or passes through the control plane
- Can be:
- unicast: enters one ingress and sent out 1 egress
- multicast: enters one ingress and sent out multiple egress
Exception traffic
- does not pass through local device - needs to contract the RE
- packets addresses to the chassis - telnet sessions, pings, traceroutes
- IP packets with IP Options set
- traffic that requires ICMP (Internet Control Message Protocol) message generation - no entry present for destination in routing table, TTL expired
Traffic sent to RE is rate limited to prevent denial of service attacks Gives preference to local and control traffic Built-in rate limiter is not configurable
Simplified:
- transit traffic - forwarded through PFE
- exception traffic - processed locally by RE or PFE
- protocol and management traffic - sent directly to the RE
Devices#
Routing devices:
- PTX - packet transport routers up to 460Tbps (super core)
- MX - up to 80 Tbps, provider edge services and aggregation
- ACX - simplified end-to-end provisioning
Switching devices:
- EX - Up to 13.2 Tbps - access, aggregation and core
- QFX - layer 2/3 with 10, 25, 40 or 100 GbE
Security devices:
- SRX - Up to 2Tbps firewall
SDN (software defined networking) products
- NFX - customer premises equipement
- Contrail cloud - utilises openstack for cloud storage and networking
- Northstar controller - automates traffic engineering paths increases utilisation
- WANDL IP/ MPLS view - network management system, simulates large MPLS networks and design
JunOS can be run as a VM:
- Run on top of VMware or KVM (kernel-based virtual machine)
- vSRX
- vMX - ASICS are compiled into x86 instructions - carrier grade
Disaggregated JUNOS - seperating RE and PFE into their own VM:
- Improves performance
- Better use of CPU cores
Core functions of legacy OS attached to FreeBSD kernel - have been designed to run independently of the kernel
3. User Interface Options - Junos CLI#
2 Interfaces provided:
- Junos CLI - text based command shell - an out-of-band serial option of in-band with telnet or ssh
- J-web itnerface - web based GUI
Logging in requires a username and password - default is root with no password
If a hostname has not been setup the system will show Amnesiac
Two modes of the cli:
- configuration mode - shown by
#. Configure the device. - operational mode - shown by
>character. Monitor and troublesheet (monitor,ping,how,test,traceroute)
Getting help: just type
?
Getting help for a specific command clear ? will display possible options
In depth help:
help topic ?- usage guidelines for the statementhelp reference ?- summary informationhelp apropos ?- displayssetcommands that reference a specific variable - relevant to your current configuration hierachy
Command completion - press <space> to complete commands
press <tab> to complete commands and variables…gives a list of possible completions
Turn off with:
set-cli complete-on-space off
Editing command lines:
ctrl + b- back onectrl + f- forward onectrl + a- beginning on commandctrl + e- end of command
Using Pipe |:
re0> show route | ?
Possible completions:
append               Append output text to file
count                Count occurrences
display              Show additional kinds of information
except               Show only text that does not match a pattern
find                 Search for first occurrence of pattern
hold                 Hold text without exiting the --More-- prompt
last                 Display end of output only
match                Show only text that matches a pattern
no-more              Don't paginate output
refresh              Refresh a continuous display of the command
request              Make system-level requests
resolve              Resolve IP addresses
save                 Save output text to file
tee                  Write to standard output and file
trim                 Trim specified number of columns from start of line
Available filters (in config mode):
compare <filename>orcompare rollback n- compares changesdisplay changed- show changed lines onlydisplay detail- additional infodisplay inheritance- show inherited configdisplay omit- omit statements with omitdisplay set- show set commands only
Available filters:
count- number of lines in outputdisplay commit-scriptsdisplay xml- show output of XML/Netconf formatexcept <regular-expression>-find <regular-expression>ormatch <regular-expression>hold- hold text without exiting the--More --promptlast- displays the last screen of informationno-more- displays output all at oncerequest message- display output to multiple userssave <file>- save the output to a file or urltrim- trims number of columns from start of line
CLI operational mode is hierachical - from less specific to more specific
clear,configure,help,monitor,set…arp,configuration,ospf,version…database,interface,neighbour…
Operational capabilities:
- moving in and out of config mode
- Monitor and troubleshoot
- copy files
- restart software processes
- perform system level operations
Active vs Candidate Configuration#
Configuration changes do not take effect immediately - allowing you to group changes and apply in a batch.
- active configuration - currently running config
- candidate configuration - temporary config - created from active config + configure
The configure command populate the candidate configuration from the active config. You then modify the candidate config with your changes - then you commit - junOS checks syntax then applies to active config.
You can retrieve previous configurations with rollack n command.
A maximum of 50 configurations are saved.
rollback 0 is the current active configuration.
Only after a commit will the the rollback be applied.
Entering configuration command#
Use:
configure
If you enter it while someone else is in it - it will display.
Use the configure exclusive to ensure only you can enter it.
Uncommited changes are discarded when you exit.
You can change configuration privately with configure private.
When users issue a commit it is applied to the global config - rollback 0 discards only the private user’s changes.
2 users in private mode both making a change on teh same config - only the first change will be commited.
It will only be applied if user 2 commit again.
Configuration Hierachy#
THe configuration hierachy is indepenent of the operation model hierachy.
editbgp,isis,mpls,vrrp…area,graceful-restart,overloadarea-range,interface,nssa
show commands will show the condidate configuration
Terminating statements are shown with a trailing ;, the hierachy is shown with the {}
# set services ssl traceoptions level brief

# show services

ssl {
    traceoptions {
        level brief;
    }
}
Moving Between Levels#
edit- function like change directory - sets the current hierachy level you want to move toup- move 1 level up in the hierachyup n- move upnnumber of times in teh hierachytop- move to the top of the configuration hierachyexit- return to most recent level
Modify Configuraiton#
Use the set command to modify configuration
set ftp
Use delete to remove statements:
delete telnet
You can wildcard delete:
wildcard delete interfaces ge-1/*
Deactivating:
deactivate interfaces <interface-name>
activate interfaces <interface-name>
rename-rename interface ge-0/0/10 to ge-0/0/11replace-replace pattern ge-0/0/10 to ge-0/0/11copy-copy interfaces ge-0/0/10 to ge-0/0/11insert-insert term before term twoannotate-annotate name-server "adding new name servers"
Showing Config#
Configuration mode show command shows candidate configuration
show system services
is the same as:
edit system services
show
View set commands to build a configuration
show system services | display set
Commiting config#
Use commit
For configure private - commit needs to be issued at the top hierachy
On devices with redunant routing engines you can do a
commit synchronize
Alternatively make it default
set system commit synchronize
validate the syntax of a candidate configuration with:
commit check
For remote setup where you might make the device inaccessible use a commit confirmed to temporarily rollback the config if another commit is not issued within 10 minutes
Scheduled Commits#
Schedule a commit at a specific time
commit at 21:00:00
Add a comment to a commit
commit comment "Change BGP config"
Commit and exit configuration
commit-and-quit
Comparing Configuration#
Compare candidate and active
show | compare
Compare active and archive
show configuration | compare rollback n
show configuration | compare file
Arbitrary file compare
file compare files file1 file2
Rollback
rollback ?
Change amount of rollbacks on smaller junos devices
set-max-configurations-on-flash ?
Save a candidate configuration (only at current hierachy and below)
save filename
Saves to users home directory by default
Loading complete or partial configuration
load ?

re0# load ?
Possible completions:
factory-default      Override existing configuration with factory default
merge                Merge contents with existing configuration
override             Override existing configuration
patch                Load patch file into configuration
replace              Replace configuration data
set                  Execute set of commands on existing configuration
update               Update existing configuration
Run oeprational commands in config mode:
re0# run ping 1.1.1.1
Lab Exercsies#
Find the down interfaces
show interfaces | match down
Count the number of interfaces that are down
show interfaces | match down | match Physical | count
Get detailed info about a system hostname
help reference system host-name
Navigate to interfaces part of hierachy
configure
edit interfaces
Move to protocols ospf
top edit protocols ospf
Get chassis hardware (it is operational)
run show chassis hardware
Just changing to different hierachies creates the empty stanza meaning - configuration has changed
4. User Interface Options: J-web Interface#
Web-based gui access with http or https
- Dashboard tab - glance at system status, ports, alarms, security information
- Configure tab - configure system with point and click or text config
- Monitor tab - view results of config entries - like routing table
- Reports tab - generate reports on demand
- Administration tab - network tools (ping, traceroute), software upgrades
Same authnetication as CLI - remote access http and https must be enabled. Can use external authnetication like radius.
edit systems services
Is pre-installed on SRX adn vSRX devices
Wizard to setup device
Configure -> Device settings -> Basis settings
- Identity details - hostname, root password, configure DNS servers
Management Access Configuration#
- Configure ip and maangement port
- Access methods
- Systems services enabled - telnet, SSH, Netconf etc.
- Ports for HTTP and HTTPs
Date and Time Details#
- NTP servers (recommended)
Press Commit after changing
Gettings Started#
- Interfaces configuration
- Security Zone Creation
- Configure Firewall Policies
- Network Address Translation policies
- License Management
Packet Capture#
- Packet capture lets you capture traffic destined for or originating from routing engine
- Does not capture transit traffic
- You can capture control traffic
-
Find specific traffic
monitor trafficAdministration -> Tools -> Packet Capture Start
Upgrade JunOS#
Administartion -> Device -> Software -> Uplaod Package
New USers#
Use the user management page
Configure -> Users -> User Management
Login name, password and class must be added
Interface Configuration#
Add interface, edit on fast logical interfaces on fast ethernet or gigabet ethernet interfaces
Configure -> Intefaces -> Ports -> Edit logical Interface
Lab#
View routing engine information
Monitor -> Device -> Chassis Information
View Alarms
Monitor -> Alarms -> Alarms
Examine routes
Monitor -> Routing -> Route Information
View logins for the system:
configure
show system login
5. Initial Configuration#
All Junos devices have a factory default configuration, with a root account with no password.
Setting a password is required.
set system root-authentication plain-text-password
commit
System logging is enabled to track events
View default logging configuration
# show system syslog
Switches (like EX series) operate at layer 2 out of the box RSTP (Rapid Spanning Tree Protocol) and LLDP (Link Layer Discovery Protocol)
Return a device to factory default configuration#
load factory-default
You must set the root password
set system root-authentication plain-text-password

commit
Powering on a Device#
- Follow safety guidelines
- The device will always power back up when power is lost
Always gracefully shutdown
request system halt ?
To schedule at a time
For device with multiple routing engines
request system halt both-routing-engines
For ex switches halting all members:
request system halt all-members
Initial Configuration Checklist#
- Hostname
- System time
- System services (remote access)
- Management interface and static route for management
Steps:
- Login as root - initially
rootwith no password (Amesiacindicates factory-default) - Start cli - start in unix shell - type
cli(only root user has this) - enter config mode - type
configure -
set identification params - set root password (the password is always encrypted in config)
edit system set host-name router set root-authentication plain-text-password
-
set time params
set time-zone Africa/Johannesburg
-
set management access params - using a default static route for management traffic is discouraged
set services ssh set cli idle-timeout 0 # disable idle timeout set login message “Warning…” commit
-
set mangement network params
Using a default static route for management traffic is highly discouraged - you should be as specific as possible and use
no-readvertiseThe
no-readvertisemarks the route as inelligible for advetisement through the routing policyStatic route configuration is only available when routing process is running (rpd) - ensure a backup router is directly connected to the primary on the same subnet.
A backup router is needed
-
activate configuration
commit and-quit
View the full configuration with the operation command:
show configuration
Rescue Configuration#
Designed to restore basic connectivity in the event of configuration problems. Recommended to contain the minimum needed for basic connectivity. It must include a root password. By default - no rescue configuration is defined.
Save the active configuration using oepration mode:
request system configuration rescue save
If a rescue already exists - it replaces it
Manually delete a rescue
request system configuration rescue delete
To rollback (in configuration mode):
rollback rescue
commit
Interfaces#
Interfaces are primarily used to connect a device to a network
Some interfaces are used to provide a service or a function for the system it operated
On junOS serveral types exist:
- management interfaces - connect junos device to a management network eg.
fxp0andme0 - internal interfaces - control and connect the forwarding plane eg.
fxp1andem0 - network interfaces - media specific network connectivity eg.
Ethernet,SONET,ATM,T1andDS3 - services interfaces - more user-configurable services (encryption, tunneling, etc.)
- loopback interfaces - hardware independent interface eg.
lo0
service interfaces:
es- encryption interfacegr- generatic route encapsulation tunnelip- IP-over-Ip encapsulation tunnells- link services interfaceml- multilink interfacemo- passive monitoring interfacemt- multicast tunnel interfacesp- adaptive services interfacevt- virtual loopback tunnel interface
Interface Naming#
- Interface media type:
ge,so,atgeis a physical interface which runs at 1gig speedxeis a physical interface which runs at 10gig speedetis a physical interface which runs at 40gig speed- you can aggregate them into an ae interface - to get more capacity and more redundancy
- Line card (FPC slot number)
In typical port numbering the slot begins with 0 and increments based on the system hardare configuration.
ge-0/2/3 = physical port 4 of a gigabit ethernet PIC in slot 3

type - FPC Slot / PIC / Port
Examples:
lo0- loopbackae- aggregated ethernet interface (physical interfaces are aggregated for max traffic reasons)as- aggregated SONETvlan- vlan interfaceirb- integrating routing and bridging
Internally generated non-configurable:
gremtunipiptap
Logical Units#
Each physical interface descriptor can contain 1 or more interface descriptors. Map virtual interfaces to a single physical device. (Similar to subinterfaces of other vendors)
Useful in ATM and frame relay networks
A logical unit is always required
Some encapsulations support only 1 logical unit (and unit must be 0):
- PPP (Point to point protocol)
- HDLC Cisco
Some support multiple logical interfaces:
- frame relay
- ATM
- Tagged Ethernet
Unit number vs Circuit Identifier
- circuit identifier - identifies the logical tunnel or circuit
- unit - identified logical partician of physical interface
best practice to keep both the same
Multiple Devices#
Junos devices can have more than 1 address on a single logical interface
Issuing a second set command does not overwrite the previous address:
set family inet address 10.1.1.1
The rename command is used to address this mistake
rename family inet address 10.1.1.1/32 to address 10.1.1.1/24
Interface Properties#
Everything under the interface-name are the physical properties of that interface
unit-number indiciates a logical unit / sub interface
interfaces {
    {{ interface-name }} {
        physcial properties;
        unit {{ unit-number }} {
            logical properties;
        }
    }
}
A single logical unit does support mulitple protocol families - such as
inetandinet6- you cannot configure another protocol with theethernet-switchingfamily
preferred is used when multiple ip addresses belonging to the same subnet on the same interface. this options lets you set which will be used as the source address.By default the numerically lowest address is chosen.
family inet {
    address 172.19.102.1/24
    address 172.19.102.2/24 {
        preferred;
    }
}
primary is used by default as the local address for broadcast and mulitcast sourced locally. Useful for selecting the local address used for packets sent out on numbered interfaces with multiple 127 addresses are configured on lo0. By default the numberically lowest address on the interface is used.
lo0 {
    unit 0 {
        family inet {
            address 192.168.100.1/32;
            address 192.168.200.1/32 {
                primary;
            }
        }
    }
}
show interfaces lo0.0 | find addresses
Will flag the second as primary
tracking Interface State#
show interfaces terse
For a specific interface
show interfaces ge-0/0/2 terse
Physcial properties:
- Maximum Transmission Unit (MTU)
- Link Mode
- Clocking
Logical properties:
- Protocol family
- Virtual Circuits
- Addresses
Lab#
Load factory defaults:
configure
load factory-default
View the configuration:
show
commit
Edit root authnetication:
edit system root-authentication
set plain-text-password
top
commit and-quit
List the files:
file list /var/tmp
Set the hostname:
set system host-name vSRX-1
Set the time-zone (in config mode):
set system time-zone Africa/Johannesburg
Set date:
run set date YYYYMMDDhhmm.ss
Create a rescue config:
request system configuration rescue save
Show rescue config:
file show /config/rescue.conf.gz
Delete system services:
configure
delete system services
commit
Show and rescue:
show system services
rollback rescue
Delete rescue:
request sytem services rescue delete
file show /config/rescue.conf.gz
Configure interfaces: unit 0 on ge-0/0/4 which is to be vlan tagged to vlan 300:
configure
edit interfaces
set ge-0/0/4 vlan-tagging
set ge-0/0/4 unit 0 vlan-id 300 family inet address 172.18.1.2/30
set ge-0/0/3 unit 0 family inet address 172.20.66.1/30
set ge-0/0/2 unit 0 family inet address 172.20.77.1/30
set lo0 unit 0 family inet address 192.168.1.1/32
set lo0 unit 0 description "Loopback interface for main routing instance of vSRX-1"
commit and-quit
Show interfaces
show interfaces terse
6. Secondary System Configuration#
User Authentication#
- Local password authentication
- RADIUS
- TACAS+
Local Password auth#
- local username and password
- home directory is generated
set cli directory <directory>- change directory
RADIUS and TACAS+#
- Distributed client and server systems
Authentication Order#
show system authentication-order
inactive: authentication-order [ tacplus password ];
- If there is no response from the other auth methods - local authentication is used
- If there is responses and rejected - local authentication is not used
Authorization#
- Each command is subject to authorization
- applied to all non-root users
Hierachy
Users -> class -> permissions -> allow / deny overrides
- users - defines authorization parameters
- class - named container with permissino flags:
super-user,operator,read-only,unathorized - permissions - pre-defined set of related commands:
access,access-control,all, etc - allow / deny overrides - exceptions for commands
deny-commands,deny-configuration
System Logging#
- Unix syslog mechanism
- In
/var/log - syslog:
/var/log/messages - remote logging is available
hierachy: [edit system syslog] or [edit routing-options options syslog]
Interpreting Syslog Messages#
Jan 05 10:48:23 host mgd[4350]: UI_DBASE_LOGOUT_EVENT: User 'User' ....
timestamp: when the message was loggedname: configured system namepid(process name): name of processmessage-code: general nature of errormessage-text:
See message codes:
help syslog

Syslog tag                       Help
AAA_DUP_INSTANCE                 Duplicate request
AAA_HA_EVENT                     Switch over event
AAA_INFRA_FAIL                   Infra failure
AAA_INIT_FAIL                    aaad intialization failed
AAA_RADIUS_SERVER_STATE_CHANGE   State of the radius server has changed
AAA_TASK_CREATE_FAIL             AAA task creation failed
AAA_UNAUTH_USER                  Authorization failure
AAA_USAGE_ERR                    aaad usage error
ACCT_ACCOUNTING_FERROR           Error occurred during file processing
ACCT_ACCOUNTING_FOPEN_ERROR      Open operation failed on file
ACCT_ACCOUNTING_SMALL_FILE_SIZE  Maximum file size is smaller than record size
ACCT_BAD_RECORD_FORMAT           Record format does not match accounting profile
ACCT_CU_RTSLIB_ERROR             Error occurred obtaining current class usage statistics
ACCT_FILECOPY_ERR                Error copying file
ACCT_FORK_ERR                    Could not create child process
Tracing#
- Debugging
-
stored in
/var/log/or remote logging[edit system tracing] destination-override syslog host 1.1.1.1;
You can enable tracing without a drop in performance due to JunOS design - but always remember to turn it off
Trace a specific protocol
[edit protocols <protocol>]
traceoptions {
    file bgp_trace replace size 128k files 10 no-world-readable;
    flag event detail;
    flag error detail;
}
files- max number of tracefiles - logrotate
Use no-stamp for no timestamp
Can also add tracing to an interface
[edit interface <interface-name>]
- Kernel does the logging so you cannot specify a file in this case - it goes to
/var/log/messages
Analysing log and trace files#
Show log files
show log
Show file contents
show log
Press h to show help
Use a pipe for better search:
show log messages | match "support info"

show log message | match "error|kernel|panic"
Monitor log realtime
monitor start <filename>
See files being monitored
monitor list

monitor start messages | match fail
Stop monitoring
monitor stop
Disable all tracing at a hierachy
delete traceoptions
Truncate files
clear log <filename>
Delete a file
file delete <filename>
NTP Clock Synchronization#
-
Use a common accurate time source
configure edit system ntp show
If time diff between local device and remote is more than 128 ms - the clocks are slowly synchronised
More than 1000 seconds - a boot-server is used
Set a boot-server
> set date ntp <address>
Show synchronizations
show ntp associations
Further sync details
show ntp status
Archiving configuration files#
backing up to remote device
edit system archival
- ftp or scp
transfer-intervalstatement specifies how often backups happen (15 to 2880 minutes)transfer-on-commitbackup on each commit
Before sending the config is saved at /var/transfer/config directory
SNMP#
- JunOS work as SNMP agents
- Exchanges network informatation with a network managemetn system
Message types:
- get, getbulk, getnext - request info
- set requests - changing values
- notifications - informs management of significant notifications
Version 3 of SNMP has a user based security model and a view based access control
Management information base#
- defines managed objects
- hierachical
JUNOS OS Supports#
-
Supports 1, 2c and 3
configure edit snmp
description “” location “” community {
} trap-group {
}
Monitoring SNMP monitoring
Lab#
Create a login class with view, view configuration and reset permissions
configure
edit system login
set class juniper permissions [view view-configurations reset]
Create a read only uswr
set user nancy class read-only
set user nancy authentication plain-text-password

set user walter class juniper
set user walter authentication plain-text-password
Restart the routing process as walter
restart routing
Add clear permissions to read-only
set class read-only permissions clear
Set radius
set system radius-server xx.xxx.xx secret Juniper
set system authentication-order radius
commit
Rename the radius server
rename system radius-server 173... to 10.1.1.1
View current logging info
show system syslog
Log config changes in config-log with info severity and set the severity for default messages as any
edit system syslog
set file config-changes change-log info
set file messages any any
Configure to send to a remote
set host 172.25.11.254 authorization info
commit
View created log
run file list /var/log
Set the ntp server
set system ntp server 172.25.11.254
set system ntp boot-server 172.25.11.254
commit
View the log config-changes
> show log config-changes
Manually force synchronisation
set date ntp
Show ntp associations and uptime
show ntp associations
show system uptime
Enable snmp using a community value of junos
configure
set snmp community junos clients 172.25.11.254
Configure a trap group to send to the nms server - send when an interface goes down
set snmp trap-group interfaces targets 172.25.11.254
set snmp trap-group interfaces categories link
commit
Disable an interface to test
set interfaces ge-0/0/2 disable
commit

run show interfaces ge-0/0/2 terse
Reenable
delete interfaces ge-0/0/2 disable
commit and-quit
Verify a trap was issued
show log messages | match ge-0/0/2 | match snmp

show snmp statistics
The
Trapsvalue should not be 0
Perform an snmp walk
show snmp mib walk jnxOperatingDescr
Configure an archive
configure
edit system archival configuration
set archive-sites "ftp://ftp@172.25.11.254/archive" password ftp
set transfer-on-commit
commit and-quit
Verify a successful transfer
show log messages | match transfer
7. Operational Monitoring and Maintenance#
Monitoring Tools:
- Junos CLI
- Junos Space
- SNMP
- Hardware LEDs
- Front panel LCD
- JWeb
System Level Operations#
show system <keyword>
alarms- current system alarmsboot-messages- messages seen during last system bootconnections- status of local TCP and UDP connectionsstatistics- protocol statisticsstorage- current storage space
Do
show system ?
Monitoring Chassis#
show chassis <keyword>
alarms- chassis alarmsenvironment- environmenal statushardware- inventory of hardwarerouting-engine- operational status
show chassis ?
Monitoring Interfaces#
show interfaces ge-0/0/0 ?
Terse output
show interfaces terse
Interface               Admin Link Proto    Local                 Remote
ge-1/0/0                up    up
for verifying state information
Extensive output
show interfaces ge-1/0/0 extensive
Best for troubleshooting interfaces
Monitor an interface
monitor interface <interface-name>
Monitor all interfaces
moinitor interface traffic
Network Utilities#
General reachability and path packets take
traceroute <ip>
and
ping <ip>
ping <ip> count 5
ICMP - Internet Control Message Protocol
Monitor packets - decode packets and access to tcpdump originates or terminates on local RE
if you do not specify an interface - the management interface is used
Diagnose problems at layer 2 with layer2-headers
Caution with
write-fileit could file the space of the device
monitor traffic interface ge-1/0/0 layer2-headers no-resolve
There is also telnet, ssh and ftp
file copy ftp://ftp@..../myfile.tar.gz /var/.
Display release#
show version
Junos: 19.1R3-S3.2
Junos Naming Convention#
- prefix:
jinstall*(M, T, MX series),junos-srx*(SRX series) - release:
19.1R3-S3.2- major.minor[Release type] R - Standard, X- faster cadence, S- service -
edition: domestic or export
junos-srxsme-15.1X49-D70.3-deomestic.tgz
Upgrading JunOS#
- Download correct image
-
From Junos Support
request system software add
System will need to reboot
All binaries are digitally signed - protect system integrity and prevent unauthorised software
request system software add /var/tmp/image-name reboot
Check storage capacity before show system storage
Unified ISSU (in Service Software Update)#
- No disruption on control plain
- minimal disruption on operations
- GRES (Graceful Routing Engine Switchover) and NRS (Nonstop Active Routing)
- Enabled GRES and NSR - verify REs and protocls are synchronised
- Download new software package and copy to router
request system software in-service-upgrade
Password Recovery Process#
only using Console
Disable password recovery by setting:
edit system ports
show

console insecure;
- reboot: press
<space>andboot -s - enter recovery mode:
<enter>andrecovery - reset root password and commit change:
configureandset system root-authentication plain-text-password - exit configuration mode
Storage Cleanup#
request system storage cleanup
or
request system storage cleanup dry-run
Prepare for redeployment#
Remove existing stuff
request system zeroize
Scrub and make unrecoverable
request system zeroize media
Lab#
View the system processes and find the rpd (routing protocol process)
show system processes extensive
and:
show system processes extensive | match "pid | rpd"
View packets sent
show system statistics
Show space on a directory
show system storage
See uptime
show system uptime
See current users
show system users
Force a user to logout
request system logout user <name>
Check the CPU utilisation of the routing engine
show chassis routing-engine
See the location
show chassis location
Set options
set system location ?
Possible completions:
altitude             Feet above (or below) sea level
+ apply-groups         Groups from which to inherit configuration data
+ apply-groups-except  Don't inherit configuration data from these groups
building             Building name
country-code         Two-letter country code
floor                Floor of the building
hcoord               Bellcore horizontal coordinate
lata                 Local access transport area
latitude             Latitude in degree format
longitude            Longitude in degree format
npa-nxx              First six digits of phone number (area code plus exchange)
postal-code          Zip code or postal code
rack                 Rack number
vcoord               Bellcore vertical coordinate
Set the datacenter location
set system location building "Data Centre #3" floor 3
View chassis hardware
show chassis hardware
Verify interfaces are up
show interfaces terse
show interfaces fxp0 extensive
Clear interface statistics and view traffic
clear interfaces statistics fxp0
show interfaces fxp0 extensive | find "traffic"
Ping an ip with 500 bytes
ping 172.... size 500
Monitor fxp0:
monitor traffic interface fxp0
Just ICMP traffic:
monitor traffic interface fxp0 matching icmp
8. Interface COnfiguration Examples#
Interface properties#
Each interface has:
- physical properties - data link layer protocol and keepalives, link mode, speed, MTU (maximum transmission Unit), Clocking , scambling, FCS (Frame Check Sequence) and Diagnostic Characteristics
- logical properties - protocol family (iso, mpls, inet, inet6), addresses, virtual circuits (VPI, VCI, vlan-tag), inverse arp and traps
All directly under the interface name - is the physical properties. All directly udner the unit number - as the logical properties
IPv4 routing:
vlan-taggingphysical property gives way tovlanid 100;logical propertiesencapsulation frame-relayphysical property gives way todlci 202;logical propertiesatm-optionsgives way tovci 100;encapsulation pppgives way tofamily iso- for isis routing protocol andfamily mpls- traffic engineering
2 serial interfaces bundled as a multilink PPP: family mlppp
logical aggregated interface (lag) configuration: ae#
Creation of the physical aggregated interface is required
by default no aggregated interfaces exist:
run show interfaces terse | match ae
edit chassis
set aggregated-devices ethernet device-count 1
commit

run show interfaces terse | match ae
Needs at least 1 logical unit and interface
LACP - link aggregation control protocol - if LACP at least 1 side must be configured in active mode
Configuration Groups#
Enable groups containing config statements and direct inherititance
- smaller more logically constructed configuration files
wildcards can be used in groups - for inheritance
show groups
Display Inherited Configuration#
Need | display inheritance
show interfaces ge-1/0/0 | display inheritance
Without the ##
show interfaces ge-1/0/0 | display inheritance | except
9. Routing Fundamentals#
Routing - moving data between layer 3 (l3) networks
Routers are used to perform routing operations (some switches and security devices do routing)
The internet is a collection of many networks (not a single network)
requirements:
- an end-to-end communication path (physical path)
- all l3 devices within the communication path have the required routing information - must have gateway configured (router connecting to networks as well as the internet) - must determine the correct next hop for transit traffic
JunOS uses the forwarding table (a subset of routing table contents)
For any device to connect with another device outside of its directly connected subnet - a gateway is required (the ip address of the gateway) - the datacenter also needs a gateway
The router (the gateway device) requires sufficient routing informatino to determine the next hop The router learns the information - by way of the interface configuration - the router adds the networks to the routing and forwarding tables. The router consults the forwarding table to get the next hop.
The Routing Table#
Consolidates routes from:
- static routes
- routing protocols
- directly connected routes
Only a single route is selected at the active route
Junos OS supports multiple equal cost routes
The active route from the routing table is used to popualte the forwarding table
for each packet forwarded - this is determined:
- outgoing interface
- layer 2 read and write information
The primary routing table inet.0 stores IPv4 unicast routes
inet6.0 for IPv6 routing
inet.0- IPV4 unicastinet.1- multicast forwarding cacheinet.2- Multicast Border Gateway Protocol (MBGP) for Reverse Path Forwarding (RPF) Checksinet.3- Multipath Packet Label Switching (MPLS)inet.4- Multicast Source Discovery Protocol (MSDP)inet.6- IPV6 Unicast routesmpls.0- MPLS next hops
Route Preference#
- Differentiate routes from different protocols or sources
- Criterion for selecting active route
Default preference values:
- Direct: 0
- Local: 0
- Static: 5
- OSPF Internal: 10
- RIP: 100
- OSPF AS External: 150
- BGP (iBGP and eBGP): 170
route prefernce can range from: 0 to 4,294,…,…
Eg.
show route 192.168.36.1 exact
0.0.0.0/0 *[Static/5] 12w2d 12:22:54 > to 192.168.200.1 via ge-1/0/0.200 [BGP/170] 12w1d 22:18:44, localpref 200, from 192.168.48.1 AS path: I, validation-state: unverified > to 192.168.200.3 via ge-1/0/0.200, Push 0
Static is 5 whereas BGP is 170
You can modify route preference based on source (excpt direct and local)
If equal cost paths exist for the same destination - the
rpdrandomly selects the available path (load distribution)
Layer 2 switches do not have forwarding tables
View Routing table#
show route
- All active routes are marked with
* - Each route entry displays the source
- Shows summary of active (for forwarding traffic), holddown (pending state) and hidden routes (routes system cannot use - invalid next hop or route policy)
Can filter for protocol
show route protocol bgp
The forwarding table#
show route forwarding-table
Kernel adds some permanent forwarding entries - for example the default forwarding - if a packet matches it - the router discards the packet sending a ICMP unreachable
route types:
dest- directly reachable through interfaceintf- result of configurating an interfaceperm- installed by kernel at inituser- installed by routing protocol
next hop types:
bcst- broadcastdscd- discard without ICMPhold- next hop waiting to resolvelocl- local address on an interfacemcst- wire multicastrecv- receiverjct- rejectucst- unicastulst- list of unicast next hops
Determining Next Hop#
When a packet enters a device running Junos - it compares packet against entries in forwarding table.
- If it is destined to the local device - junOS processes packet locally
- destined to remote device - JunOS forwards to next hop
- if multiple destinations match - the most specific entry (longest match) is used
- If no matching entry exists - a destination unreachable is returned
For example:
172.19.0.0/16
172.19.52.0/24
172.19.52.16/28
The most specific destination to 172.19.52.101 is 172.19.52.0/24 -check the Netif column it must go there.
The most specific to 172.19.52.101 is 172.19.52.16/28
Overview of Routing Instances#
- Junos OS logically groups routing tables, interfaces and routing protocol paramters to creating routing instances.
- Logic is kept apart.
- A single device can imitate multiple devices.
The Junos OS creates a default routing isntances called master containing the inet.0 routing table.
show route instance
User defined routing instances
edit routing-instances
Uses of user defined routing interface
- fitler based forwarding (FBF)
- l2 and l3 VPN
- System virtualisatsion
Routing instance types:
forwarding- filter based forwardingl2vpn- layer 2 VPNno-forwarding- seperate large networks into smallervirtual-routers- non-VPN applications (system virtualisation)vpls- point to multipoint LAN implementationsvrf- layer 3 VPN implementations
Once the routing instance and device learns routing informations - Junos OS automatically generates a routing table.
Reference the table from a given instance:
show route table <instance-name>.inet.0
Test from a given instance:
show interfaces terse routing-instnace <instance-name>

traceroute 192.168.0.1 routing-instance <instance-name>
Static Routes#
Ideal for small networks
Manually configure the routing information on each router or switch in the network.
All done at edit routing-options
- default route for AS (Autonomous System)
- Routes in customer networks
Must have a valid next hop defined - often the neighboring router headed to ultimate destination
On PPP (Point to point protocol) interfaces you can specify the egress name instead of the ip address
The next hop value is teh bit-bucket (dropping the apcket off the network rjct or dscd)
By default the next hop must be reachable using a direct route (it does not perform recursive lookups like cisco by default) - static routes remains in the routing table until they are removed or made inactive. When the ip address used becomes unreachable.
Configuring Static routes#
[edit routing-options]
rib inet6.0 {
    static {
        route 0::/0 next-hop 3001::1;
    }
}
static {
    route 172.28.102.0/24 {
        next-hop 10.210.11.190;
        no-readvertise;
    }
}
no-readvertiseprevents directing routing out dynamically (on management)
Monitoring Static Routing#
show route protocol static
Use ping to check reachability
Junos OS needs next hop to be reachable using a direct route by default - no recursive lookups of next hops
{
    next-hop 172...;
    resolve;
}
The resolve and route to the next hop is also required
{
    next-hop 172.30.25.1;
    qualified next-hop 172... {
        preference 7;
    }
}
enables independent preferences - if next hop becomes unreachable - floating static route
Dynamic Routing#
- Best for large networks
- Configure network interfaces to participate in routing protocol
- dynamically learning routing
Benefits:
- lower administrative overhead - routes learnt automatically
- increased network availability - reroute failure automatically
-
Greater network scalability - dynamically learning routes and best path
-
IGP (interior Gateway Protocols) - operate within the same autonomous system. (RIP, ISIS and OSPF)
- EGP (Exterior gateway protocols) - current EGP used is BGP (operates among different AS’s)
OSPF Protocol#
- IGP
- link-state routing protocol within an AS
- LSA (Link State Advertisements)
- LSDB (Link state database) - stores LSA’s as records (shortest path determination)
- Dijstra (SPF) - shortest path algorithm
- Each area has a LSDB - backbone area is 0.0.0.0 - all other areas must connect to backbone
Provide connectivity among connected subnets and loopbacks - and no adjascencies are created.
show ospf neighbor
routes
show route protocol ospf
Routes installed as direct routes
Configuring IPv6#
- IPv6 Already enabled
- Must enabled IPv6 packet processing on an interface with
family inet6 -
Automatically configures link-local address (can be overriden)
[edit interface ge-1/0/0 unit 0] set family inet6 address xxxx:xxxx…
set family inet6 address xxxx:xxxx… eui-64 # automatically generate interface id
-
/64- multi-access networks /127- pt-pt links/128- loopback addresses
IPv6 Static Routes#
- Same as IPv4 static routes
- configured at
[edit routing-options] - Specify
rib inet6.0
OSPF(v3) for IPv6#
- Graceful restart and authentication
Lab#
View route table then show all route tables
inet.0is displayed withshow route
show route
show route all
Configure interfaces and loopbacks
edit interfaces
set lo0 family inet address 192.168.1.1/32
set ge-0/0/1 unit 0 family inet address 172.20.77.1/30
set ge-0/0/2 unit 0 family inet address 172.20.66.1/30
set ge-0/0/3 unit 0 family inet address 172.18.1.2/30
set ge-0/0/4 unit 0 family inet address 172.20.101.1/30
Verify the current state
show interace terse
Use ping to verify reachability
ping 172.18.1.1 rapid count 25
ping 172.20.77.2 rapid count 25
ping 172.20.66.2 rapid count 25
ping 172.20.101.10 rapid count 25
Configure ipv6
edit interfaces
set lo0 family inet6 address fda9::1/128
set ge-0/0/1 unit 0 family inet6 address fda1::1/126
set ge-0/0/2 unit 0 family inet6 address fda2::1/126
Check connectivity
ping fda9::1 rapid count 25
ping fda1::1 rapid count 25
ping fda2::1 rapid count 25
Ensure they are up
show interface terse
Show securty
configure
show security
Set forwarding in packet mode
edit security
set forwarding-options family inet6 mode packet-based
Define a static route
configure
edit routing-options
set static-route 0/0 next-hop 172.18.1.1
Run show route
run show route 172.31.15.1
Check reachability
run ping 172.31.15.1 rapid count 25
Add static route to loopback address
set static route 192.168.1.2/32 next-hop 172.20.66.2
set static route 192.168.2.2/32 next-hop 172.20.66.2
set static route 172.20.102/24 next-hop 172.20.66.2
Use the ip address on 172.20.77.0/30 subnet as a qualified next hop to the remote subnet and loopback addresses
set static route 192.168.2.1/32 qualified-next-hop 172.20.77.2 preference 6
set static route 192.168.2.2/32 qualified-next-hop 172.20.77.2 preference 6
set static route 172.20.102/24 qualified-next-hop 172.20.77.2 preference 6
See static routes
show route protocol static
Ping loopback addresses to verify reachability
ping 192.168.1.2 rapid count 25
ping 192.168.2.1 rapid count 25
ping 192.168.2.2 rapid count 25
Configure an ipv6 static-route for the loopback address
configure
edit routing-options
set rib inet6.0 static route fda9::2 next-hop fda1::2
Verify the route is active
show route fda9::2
ping fda9::2 rapid count 25
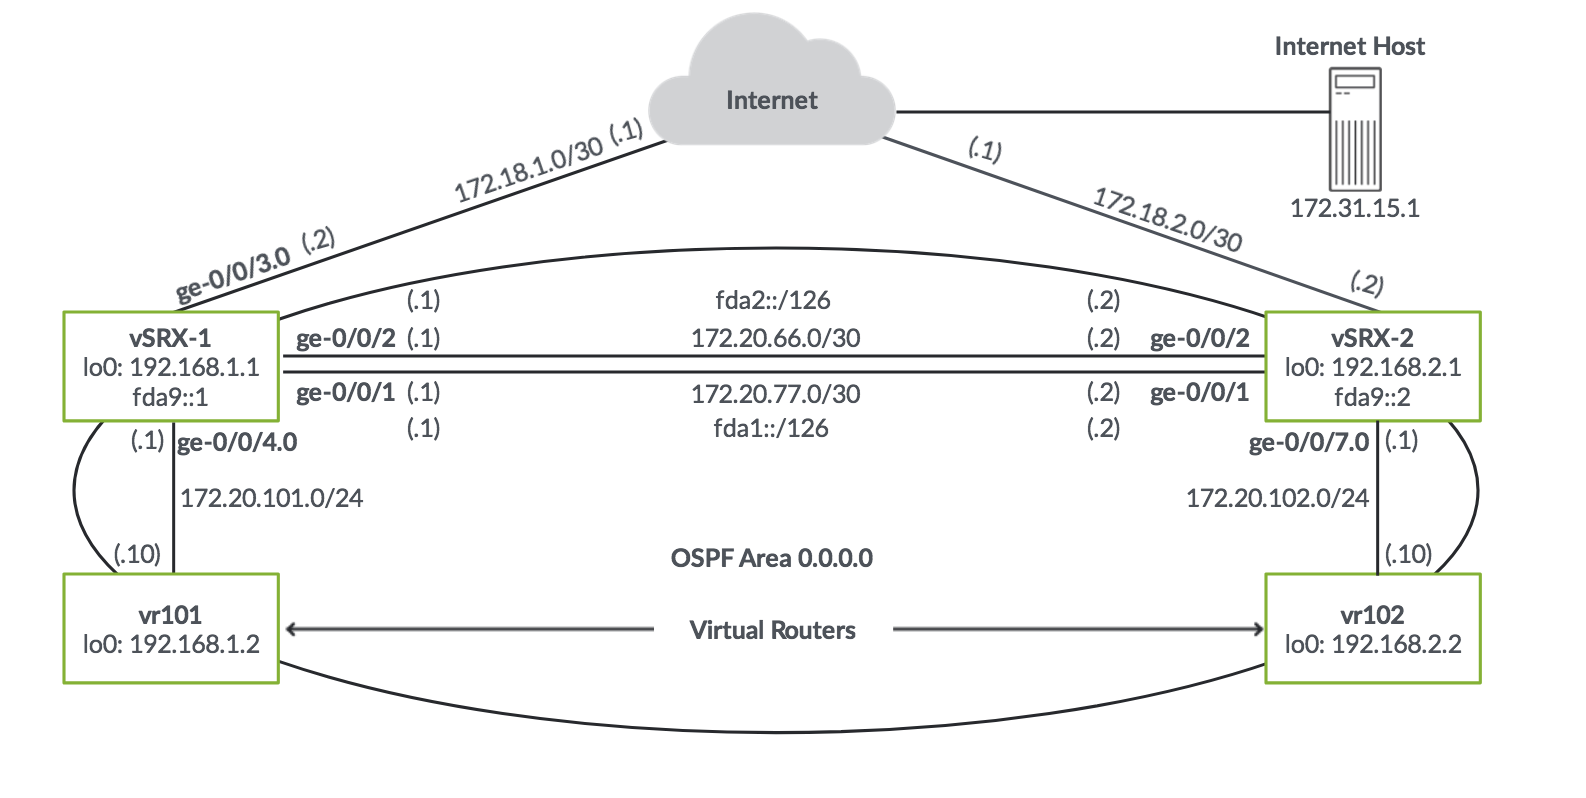
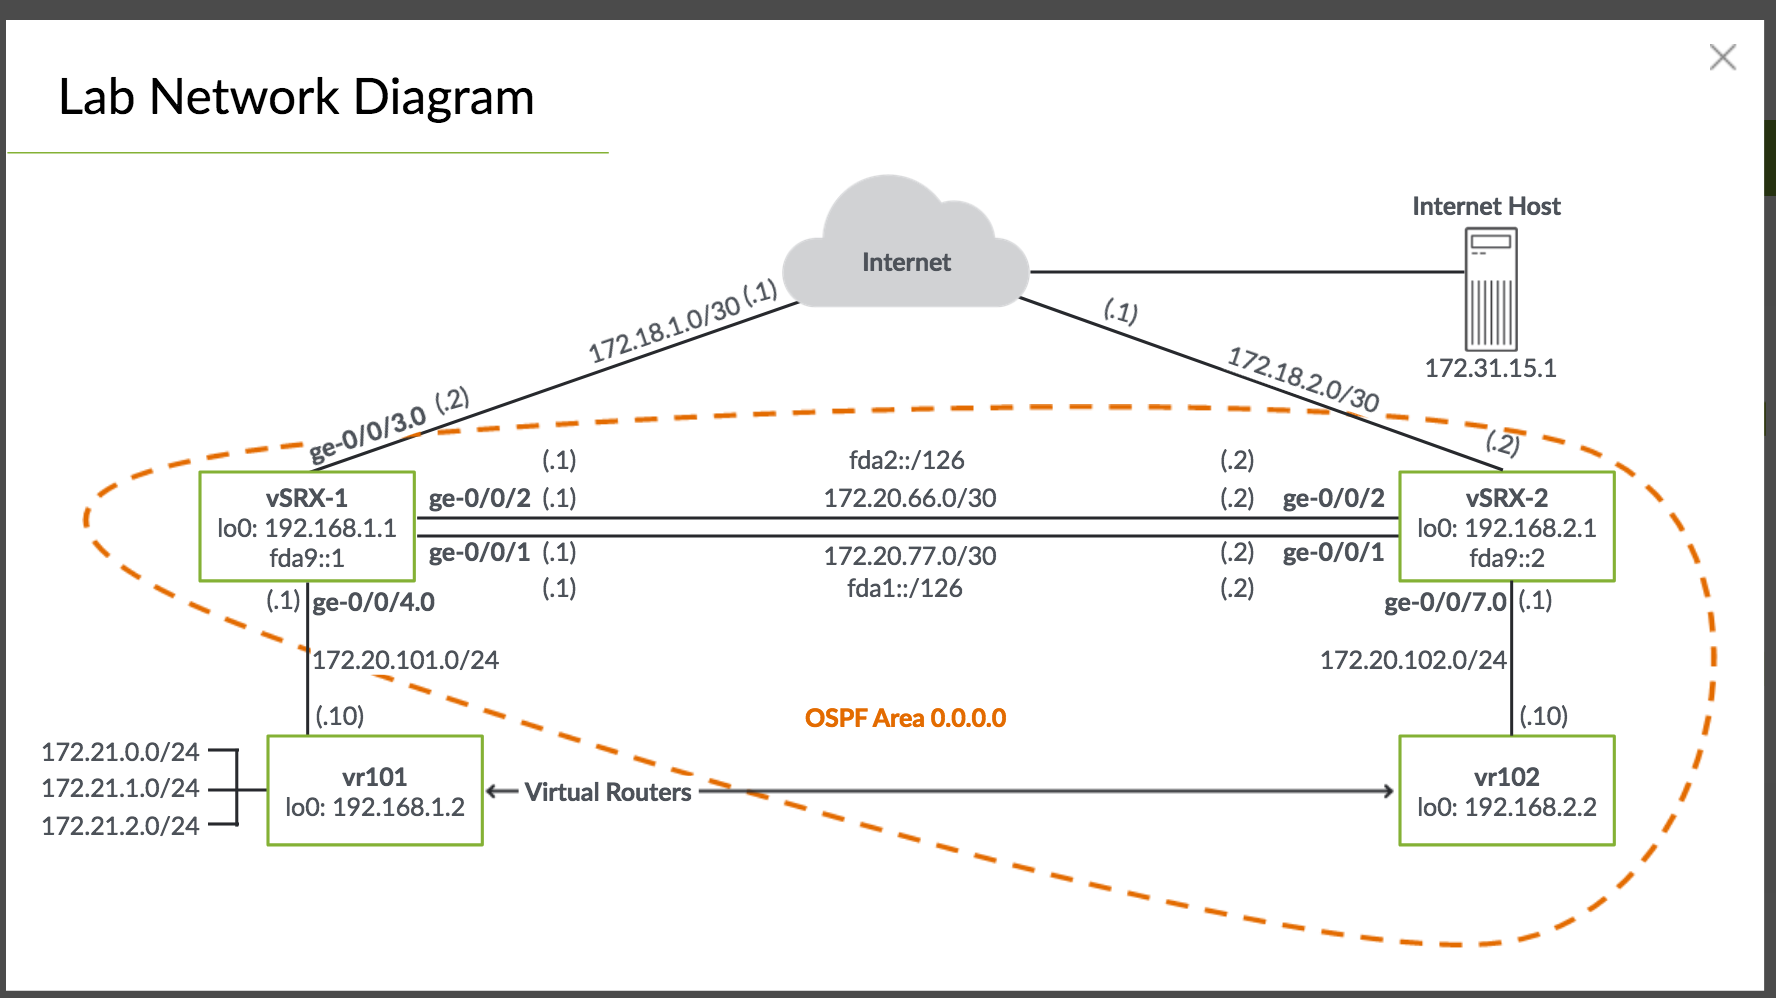
Configuring and monitoring OSPF
Define Area 0 and include all internal interfaces that connect on vSRX2 and directly connected vr101 virtual router. Also include lo0:
configure
edit protocol ospf
set area 0 interface ge-0/0/1.0
set area 0 interface ge-0/0/2.0
set area 0 interface ge-0/0/4.0
set area 0 interface lo0
activate the connfig and verify OSPF adjacency state config
commit
run show ospf neighbor
View activate OSPF routes
show route protocol ospf
Delete all static routes for internal connectivity - ensure the default static route to route traffic to the internet is not deleted
top edit routing-options
show
delete static route 192.168.1.2/32
delete static route 192.168.2.1/32
delete static route 192.168.2.2/32
delete static route 172.20.102.0/24
Commit and verify the routes are now active
commit
run show rotue protocol ospf
Ping the loopback addresses to ensure conenctivity via OSPF
ping 192.168.1.2 rapid count 25
ping 192.168.2.1 rapid count 25
ping 192.168.2.2 rapid count 25
Configuring OSPFv3 for IPv6
Add the ipv6 interfaces
configure
edit protocol ospf3
set area 0 interface lo0.0
set area 0 interface ge-0/0/1.0
set area 0 interface ge-0/0/2.0
Verify adjcencies
show ospf3 neighbor
Show routes received from ospf
show route protocol ospf3
Verify static route is taking preference and delete
show route fda9::2
edit routing-options
delete rib inet6.0 static
commit and-quit
show route fda9::2
ping fda9::2 rapid count 25
10. Routing Policy#
Control which routes the routing protocol store and retrieve from the routing table
- When routing infomration enters and exits the routing table
- Indicate which routes are accepted or rejected from neighbors
- Choose what routes you send
- Modify attributes on routes
- Choose which routes are installed in the Forwarding Table (Used by Packet Forwarding Engine)
Types:
- Import policies - how routes are imported into the routing table
- Export polcies - how routes are sent - only active routes are available to send.
Default policies#
Protocol Import Export
* BGP - accept all routes and import into inet.0 - accept all active BGP routes
* OSPF - accept all routes and import into inet.0 - reject everything
* IS-IS (Intermediate-system) - accept all routes and import into inet.0 - reject everything
* RIP (Routing Information protocol) - accept all RIP routes from explicitly set neighbors - reject everything
Building Blocks#
- They need a user-defined name
termare likeif - thenstatements- terms are evaluated in a sequence until it reaches a terminating policy
- If all matches in the
fromstatement are true or if nofromstatement is specified - all statements in thethenstatements are run
The from statements is a logical OR
termname can be user defined
Match criteria:
- prefix -
route-filterorprefix-list - protocol -
bgp,staticorospf - routing protocol attributes - OSPF area ID, AS path and community
- next-hop
If you omit the
from- all things inthenwill be run
Prefix Lists#
edit policy-options
show
prefix-list rfc1918 {
    10.0.0.0/8;
    172.16.0.0/12;
    192.168.0.0/16;
}
- They can be used in multiple places
- Used for both routing polciies and firewall filters
In a prefix-list-filter statement the exact, longer and orlonger
policy-statement policy-1 {
    term term1 {
        from {
            prefix-list rfc1918;
        }
        then reject;
    }
}
policy-statement policy-2 {
    term term2 {
        from {
            prefix-list-filter rfc1918 orlonger reject;
        }
    }
}
Route Filters#
List of prefixes
- Not reusable
Match types on route-filters:
exact- only routes matching exactly including subnetorlonger- routes matching exactly of more specific in the subnetlonger- only routes longer (more specific) will matchupto /24- match routes within that prefix lengthprefix-length-range /20-/24- prevides an upper and lower limit
Common actions:
- terminating actions:
acceptorreject - flow control:
next termornext policy - modifying attributes:
communityorpreference
Implementing a Routing Policy#
- Defining Route Policy:
edit policy-options - Apply routing policy: at neighbor, group or protocol level
export my-policy;
A policy chain can be build - evaulated from left to right in order of applying to a protocol Default policy is applied when no termianting actions occur Processing stops when a terminating action is found
Routing Policy Case Study#
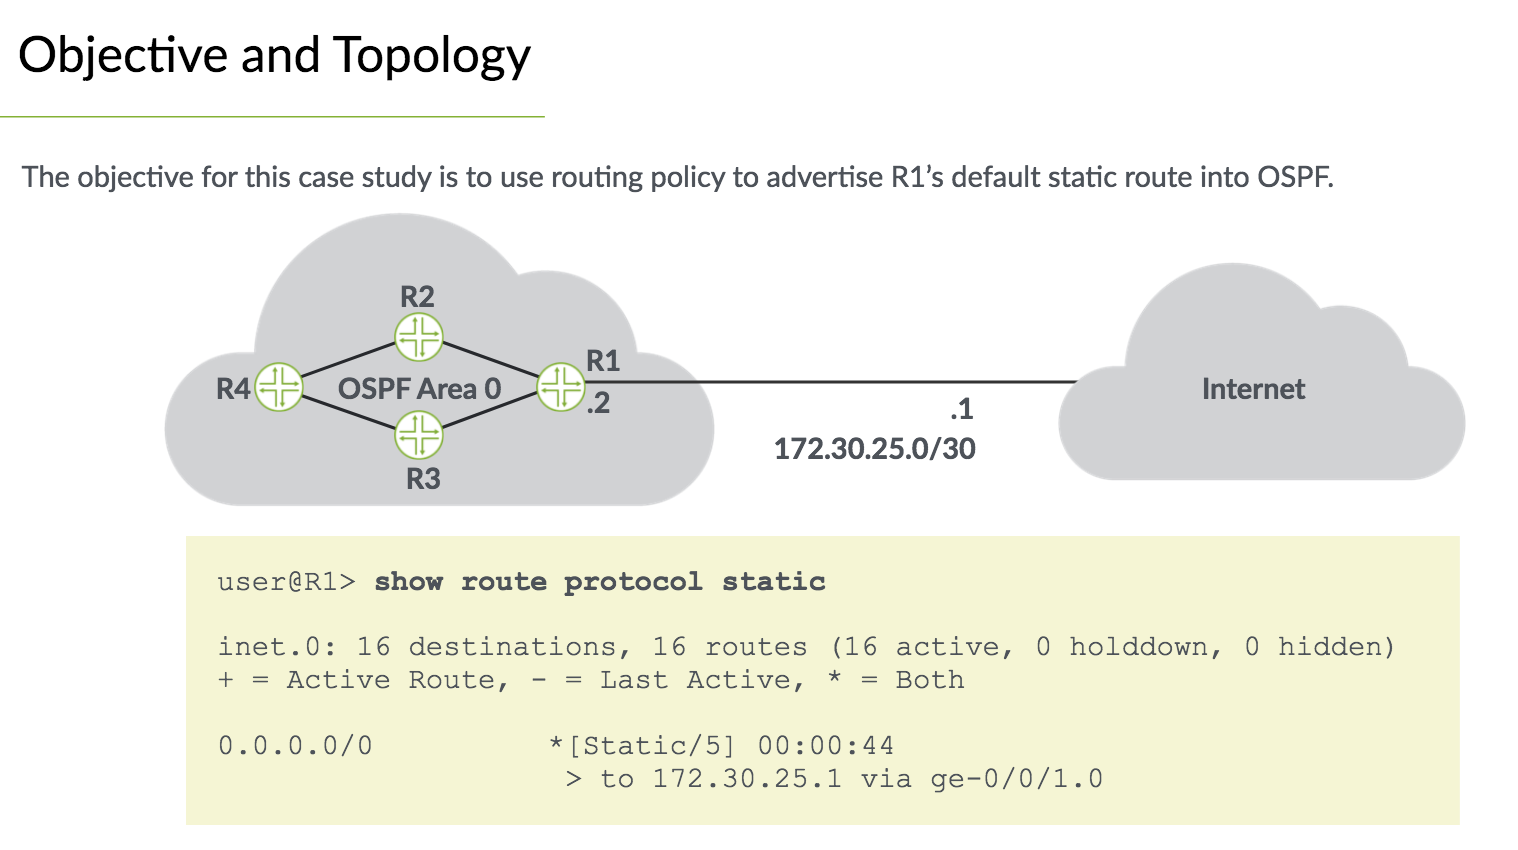
Create the policy:
edit policy-options
policy default-static {
    term accept-default-static {
        from {
            protocol static;
            route-filter 0.0.0.0/0 exact;
        }
        then accept;
    }
}
Apply the policy:
edit protocol ospf

export default-static;
Monitoring the results
show route protocol ospf exact 0/0
Lab#
Ensure routes are no longer learned via ospf and use static instead
edit protocols ospf
delete area interface ge-0/0/4.0
commit
top edit routing-options
set static route 192.168.1.2/32 next-hop 172.20.101.10
set static route 172.21.0.0/24 next-hop 172.20.101.10
set static route 172.21.1.0/24 next-hop 172.20.101.10
set static route 172.21.2.0/24 next-hop 172.20.101.10
view routes
show route protocol static
Ping check reachability
ping 172.21.0.1 rapid count 25
ping 172.21.1.1 rapid count 25
ping 172.21.2.1 rapid count 25
See ospf neighbor
show ospf neighbor
Routing Policy
View the routing instances
show configuration routing-instances
See the routes learnd via ospf
show route protocol ospf table inet.0
Create a policy to match existing static routes
edit policy-options
edit policy-statement default-route
set term match-default-static-route from protocol static
set term match-default-static-route from route-filter 0/0 exact
set term match-default-static-route then accept
Apply as ospf export policy
top edit protocol ospf
set export default-route
commit
Show 0/0 exact
show route 0/0 exact
show route 0/0 exact table inet.0
More stuff in second part of the lab…
11. Firewall Filters#
Firewall filters let you control packets transitting the device and packets sent to or from the device. Preventing unauthorised access.
Referred to as ACl’s by other vendors
Restict certain traffic and perform monitoring tasks
Types of firewall filters:
- Stateless Firewall Filters - Examine a packet individually and have no concept of connection - traffic in both directions must be explicitly allowed
- Stateful firewall filters - track connections and allow you to set the action to take for a flow
Common structure to route filters
Junos firewall filters require at least 1 term.
terms evaluated sequentially - if no match all traffic matches the firewall filter term. All firewall filters contain an implicit default action to discard traffic
Match Criteria#
Matches can be made on most Header fields (of packets)
Firewall filters are not smart - they aren’t aware of the type of packet from match criteria.
Match criteria categories:
- numeric range
- address
- bit field
Text synonym match condition:
tcp-established==tcp-flagortcp-flag rst
Firewall filter action types:
- terminating actions -
accept,discard,reject(no ICMP),tcp-reset - flow control -
next-term - action modifiers -
count,log,syslog,forwarding-class,loss-priority,policer
action modifiers give an implicit
accept- you must continue evaluation withnext-term
Implementing Firewall Filters#
-
Defining a firewall filter -
edit firewall family inetfilter filter-in { from { source-address { 10.10.10.0/24; } } then { count spoof-in; discard; } }
-
Applying a firewall fitler -
edit interfaces <interface-name> unit <unit-num> family inet filterfamily inet { filter { input filter-in; output filter-out; } }
use
commit confirmedespecially with firewall filters
- policer - allows you to invoke a traffic policer
- loss-priority - specifies class-of-service information
- next term - set policer and still have traffioc evaluated
- syslog - record information about packets
Filtering Local Traffic#
Transit firewall filters act on packets flowing from 1 interface to another.
Prevents unauthorized access.
A filter must also be applied to protect the Routing Engine (RE) - the PFR applies these filters before traffic ever reaches the ontrol plane.
You must explicitly allow routing protocol and other control traffic along with management traffic to reach the RE. The lo0 does not have automatic holes.
Example: limit-ssh-access
The software is put as an input filter (ingress traffic destined to the RE)
Accept all ssh traffic from trusted prefixes, reject everything not trusted.
else-acceptallows other types of traffic - so control and management traffic is allowed
filter limit-ssh-access {
    term ssh-accept {
        from {
            source-prefix-list {
                trusted;
            }
            protocol tcp;
            destination-port ssh;
        }
    }
    term ssh-reject {
        from {
            protocol tcp;
            destination-port ssh;
        }
        then {
            discard;
        }
    }
    term else-accept {
        then accept;
    }
}
edit policy-options:
prefix-list trusted {
    172.27.102.0/24;
}
Policing#
Police or rate limit traffic - limit traffic in and out of an interface. Thwart DDOs attacks.
Normal match conditions: addresses, protocols and ports
If the first term in a firewall filter lacks a from clause and contains a policer - all input and output packets on an interface are subject to rate policing
Interface based policers - on logical unit of interface.
Accomodate:
- layer 2 VPN
- MPLS
- IPv6
token bucket algorithm - enforce limit on average bandwidth but allowing bursts
Rate limits:
- bandwidth - number of bits permitted per sond on average
- maximum burst size - total number of bytes allowed in burst (speed of interface x time you want to allow)
Example: police all TCP traffic exceeding 10Mbps with a 62500 burst size
firewall {
    policer class-example {
        if-exceeding {
            bandwidth-limit 10m;
            burst-size-limit 62500;
        }
        then forwarding-class best-effort;
    }
    family inet {
        filter example1 {
            term policer example1 {
                from {
                    protocol tcp;
                }
                then {
                    policer class-example;
                    forwarding-class assured-forwarding;
                    accept;
                }
            }
        }
    }
}
bandwidth-limit 400k;- in bits per secondburst-size-limit 100k;- in bytes - minimum should be 10 x MTU (or bandwidth x 3-5ms)
policer can be referenced in any firewall filter term
k- kilebits/kilobytesm- megabit/megabytesg- gigabit/gigabytes
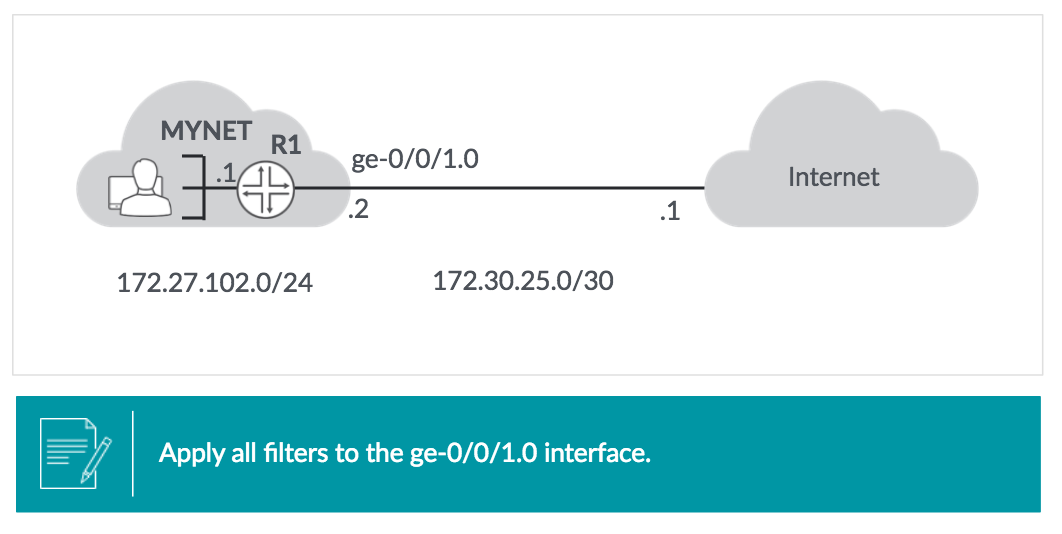
Firewall Filter Case Study#
Out:
- Discard and log outbound traffic with any source address not in
172.27.102.0/24 - Allow and count any other traffic
In:
- Discard and log inbound traffic with a source address in
172.27.102.0/24 - Allow all return traffic from internet on TCP sessions initiated from MYNEt
- Allow ICMP traffic : echo replies, time exceeded and destination unreachable
- Discard and count all other traffic
Output filter [edit firewall family inet filter output-ff]:
term deny-spoofed {
    from {
        source-address {
            0.0.0.0/0;
            172.27.102.0/24 except;
        }
    }
    then {
        log;
        discard;
    }
}
term else-accept {
    then {
        count outbound-accepted;
        accept;
    }
}
Input filter [edit firewall family inet filter input-ff]:
term deny-spoofed {
    from source-prefix-list{
        internal-prefixes;
    }
    then {
        log;
        discard;
    }
}
term allow-established-sessions {
    from {
        protocol tcp;
        tcp-established;
    }
    then accept;
}
term allow-some-icmp {
    from {
        protocol icmp;
        icmp-type [ echo-reply time-exceeded unreachable];
    }
    then accept;
}
term else-discard {
    then {
        count inbound-discarded;
        discard;
    }
}
[edit policy-options]:
prefix-list internal-prefixes {
    172.27.102.0/24;
}
Applying the filter:
configure
edit interface ge-0/0/1
show

unit 0 {
    family inet {
        input input-ff;
        output output-ff;
    }
    address 172.30.25.2/30;
}
Monitoring the results:
show firewall
show firewall counter filter input-ff inbound-discarded
show firewall counter filter output-ff outbound-discarded
show firewall log
Action Modifiers#
count: maintain cumulative packet and byte count (reset withclear firewall filter <name>)log: packets are logged
Unicast RPF Checks#
- Reverse Path Forwarding
- automate antispoofing filters
strict mode (default) - if a device receives packet with source-address of 10.10.10.10 on interface ge-0/0/1 unicast RPF will check the route table for best route to 10.10.10.10 if it return route for 10.10.10.0/24 with next hop of ge-0/0/1 the unicast RPF check passes.
The RPF check increases the PFE memory usage
loose mode - checks that a valid route to the source address exists - does not make sense in networks with a default route (where a valid route to every ip address exists)
Unicast TPF caveats#
- considers only active routes toa destination
- in networks where perfectly symmetrical routing exists - only active paths are fine
-
in asymmetric networks - where forward and reverse apths differ - legit traffic can be dropped (enable all
feasible-paths)routing-options { forwarding-table { unicast-reverse-path feasible-paths; } }
typically only the edge device will have RPF checks enabled - ie. the one connected to the internet. Checks must be done on all interfaces.
- fails are discarded by default
fail-filter- packet will be processed before discarding (can do same things as other firewall fitlers)-
DHCPandBOOTP(Bootstrap protocol) - fail the RPF checks you can enable them with the below:firewall { family inet { filter rpf-dhcp { from { source-address { 0.0.0.0/32; } destination-address { 255.255.255.255/32; } } then accept; } } }
assigning:
unit 0 {
    family inet {
        filter {
            rpf-check fail-filter rpf-dhcp;
        }
    }
}
Lab#
Attempt to ssh into other device using the virtual router
ssh routing-instance vr101 lab@192.168.1.1
Attempt to start a telnet session
telnet routing-instance vr101 lab@192.168.1.1
Issue the edit family command:
edit family ?

    Possible completions:
> any                  Protocol-independent filter
> bridge               Protocol family BRIDGE for firewall filter
> ccc                  Protocol family CCC for firewall filter
> evpn                 Protocol family EVPN for firewall filter
> inet                 Protocol family IPv4 for firewall filter
> inet6                Protocol family IPv6 for firewall filter
> mpls                 Protocol family MPLS for firewall filter
> vpls                 Protocol family VPLS for firewall filter
Create a new ipv4 firewall filter protect-host:
edit family inet filter protect-host
Create a term that permits inbound ICMP packets from the management subnet only:
firewall {
    term limit-icmp {
        from {
            protocol icmp;
            source-address {
                172.25.11.0/24;
            }
        }
        then {
            accept;
        }
    }
}
Permit only SSH from 172.25.11.0/24:
firewall {
    term limit-ssh {
        from {
            protocol tcp;
            port ssh;
            source-address {
                172.25.11.0/24;
            }
        }
        then {
            accept;
        }
    }
}
Allow telnet only from the management subnet:
firewall {
    term limit-ssh {
        from {
            protocol tcp;
            port telnet;
            source-address {
                172.25.11.0/24;
            }
        }
        then {
            accept;
        }
    }
}
Apply the protect-host filter on lo0:
top edit interfaces lo0
set unit 0 family inet filter input protect-host
Deactivate the filter
deactivate unit 0 family inet filter
Ensure to allow other traffic and include a counter
edit firewall family inet filter protect-host

term limit-icmp {
    from {
        source-address {
            172.25.11.0/24 except;
            0.0.0.0/0;
        }
        protocol icmp;
    }
    then {
        count count-limit-icmp;
        discard;
    }
}
Reactivate
activate unit 0 family inet filter
Show the firewall:
show firewall
12. Class of Service#
- Prioritise network traffic
- Real time audio and video can be prioritised - lower jitter and delay
- Critical data processed during periods of network congestion
Categorising traffic and meeting performance requirements
- By default, junos treats all transit traffic equally
- First come, first served - best effort traffic processing
Put traffic in different categories - forwarding classes - treat each forwarding class in a unique manner. Then can mark packet with category so other devices can classify easier.
COS:
- Bandwidth gauranteee
- latency
- packet loss
Can control ordering of forwarding using Cos. Even a brief delay on queued packets - for latency sensitive traffic - like Voip.
Meeting Performance Requirements#
RED - Random Early Detection
- Selectively drops random packets before congestion becomes critical
- TCP sessions go into slow start mode
- Higher bandwidth data streams are the most likely to be affected - lower bandwidth are the least likely to be affected
- Queue is monitored and packets are dropped based on statistical proberbilities rather than when the queu is full - TCP global synchronisation is avoidable
Forwarding Classes#
- Identify traffic that should receive common treatment
- Assigning traffic to a specific output queue
Loss Priority#
Tell system the priority should be given to dropping a packet during congestion
How does Cos meet performance requirements:
- Prioritising latency sensitive traffic
- Controlling congestion to ensure SLA maintenance
- Allocating bandwidth for different classes of traffic
Cos Processing#
Ingress
- BA Classifier - set forwarding class and loss priority based on header fields
- Policing (Ingress)
- Mulifield Classifying
- Forwarding Policy - reset loss priority or forwarding class based on packets destined to specific prefixes
- Policing (Egress)
- Multifield Classifying
- Scheduler / Shaper / RED
- Rewrite marker
Egress
Deployment Models#
- In-the-box model - single device classifies in multifield classifier
- Across-network model - classified on edge device and then push that classification through the network (marked with BA classifier)
Use of BA:
- Consistent Cos treatment of traffic throughout the network
- Simplifies management and classification
- Cos ethernet switches (setting the 802.1p bits) enables differentiated traffic
Multified Classifiers#
- Configured just like regular firewall filters
Put forwarding class and loss priority in the then clause of each term
Multified classifiers are applied after BA classifiers - they always override forwarding class and loss priority of the BA
Behaviour Aggregates (BA)#
edit class-of-service interfaces
By default - the Layer 3 BA header fields are not modified - setting it is only needed once.
It does not keep layer 2: MPLS EXP and IEEE 802.1p - must configure to reapply on every appropirate interface
edit class-of-service
interfaces {
    ge-0/0/.3 {
        unit 0 {
            rewrite-rules {
                inet-precedence default;
            }
        }
    }
}
Downstream devices can read BA markers and automatically assign the correct forwarding class and loss priority.
edit class-of-service
interfaces {
    ge-0/0/.3 {
        unit 0 {
            classifiers {
                inet-precedence default;
            }
        }
    }
}
Custom classifiers and rewrite rules must be applied to all devices in the network
Multified classifier - configured like regular firewall filter in [edit firewall family inet]
Behaviour aggregate classifier - configured by applying read write rule to outbound interface in [edit class-of-service interfaces]
Policers#
Certain traffic to set certain traffic to bandwidth and burst size
Set forwarding-class and loss-priority in the then clause of the policer
Queuing#
Traffic forwarding class has its own queue.
> show class-of-service forwarding-class
Forwarding class                       ID      Queue  Restricted queue  Fabric priority  Policing priority   SPU priority
LOW-FC                                0       0          0             low                normal            low
MedHIGH-FC                            1       1          1             low                normal            low
MedLOW-FC                             2       2          2             low                normal            low
HIGH-FC                               3       3          3             low                normal            low
- routing protocol and keepalives - queue 3
- All other is best effort - queue 0
Scheduler defines how traffic should be processed from each queue
Assign a forwarding class with a queue:
edit class-of-service
set forwarding-classes queue 0 general-traffic
set forwarding-classes queue 2 critical-traffic
This is basically just changing the name
Scheduling Overview#
Parameters in how to service a queue
- Priority - ordering, higher priority over lower priority
- Transmission rate - bandwidth associated with each queue. 95% is best effort 5% to queue 3 (network control)
- Buffer size - size of each queue
- RED - as buffer fills RED will likely drop packets
Queue Priority#
- Strict-High
- High
- Medium-High
- Medium-Low
- Low
Defining Schedulers#
edit class-of-service schedulers

set sched-best-effort transmit-rate percent 40
set sched-best-effort buffer-size percent 40
set sched-best-effort priority low
Scheduler maps associate schedulers with forwarding classes
set sched-map-example forwarding-class best-effort scheduler sched-BE

edit class-of-service scheduler-maps
show
Applying scheduler map - assocate with outbound interface
edit class-of-service interfaces
set ge-0/0/0 scheduler-map sched-map-example
Case Study#
Example topology of professors and students
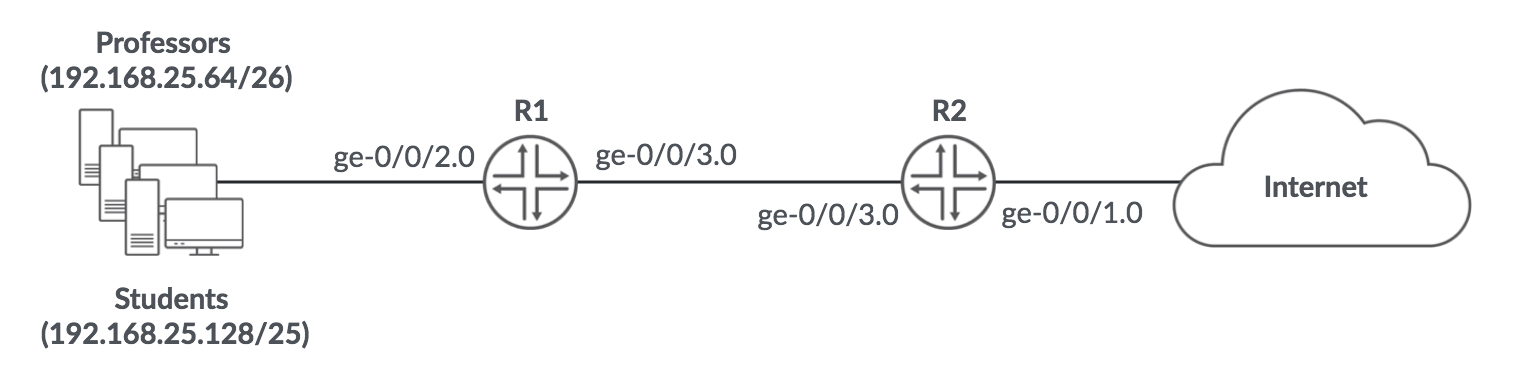
Objectives:
classifying
- place traffic to and from professors in the professors forwarding class
- place traffic to and from students in the students forwarding class provided it is not above 100Mbps
- place traffic in excess of 100Mbps in the
best-effortforwarding class
sceduling
- give network control traffic high priority and 5% of available bandwidth
- give traffic from professors medium-high priority and 45% of bandwidth
- give traffic from stuents medium-low and 40% of bandwidth
- give best effort low priority and 10% of bandwidth (prohibit overuse)
R1 Ingress Multifield Classifier#
[edit firewall family inet filter apply-cos-markings]
term from-professors {
    from {
        source-address {
            192.168.25.64/26;
        }
    }
    then {
        forwarding-class professors;
        accept;
    }
}
term from-students {
    from {
        source-address {
            192.168.25.128/25;
        }
    }
    then {
        policer student-policer;
        forwarding-class students;
        accept;
    }
}
term default {
    then accept;
}

[edit firewall policer student-policer]
if-exceeding {
    bandwidth-limit 100m;
    burst-size-limit 625k;
}
then forwarding-class best-effort;

[edit interfaces ge-0/0/2]
unit 0 {
    family inet {
        filter {
            input apply-cos-markings;
        }
        address 192.168.25.1/24;
    }
}
R2 Ingress Multifield Classifier#
[edit firewall family inet filter apply-cos-markings]
term to-professors {
    from {
        destination-address {
            192.168.25.64/26;
        }
    }
    then {
        forwarding-class professors;
        accept;
    }
}
term to-students {
    from {
        destination-address {
            192.168.25.128/25;
        }
    }
    then {
        forwarding-class students;
        accept;
    }
}
term default {
    then accept;
}

[edit interfaces ge-0/0/1]
unit 0 {
    family inet {
        filter {
            input apply-cos-markings;
        }
        address 172.22.13.2/30;
    }
}
Forwarding Class and Scheduler (For both routers)#
[edit class-of-service forwading-class]
queue 1 students;
queue 2 professors;

[edit class-of-service schedulers]
sched-network-control {
    transmit-rate percent 5;
    buffer-size percent 5;
    priority high;
}
sched-professors {
    transmit-rate percent 45;
    buffer-size percent 45;
    priority medium-high;
}
sched-students {
    transmit-rate percent 40;
    buffer-size percent 40;
    priority medium-low;
}
sched-best-effort {
    transmit-rate percent 10 exact;
    buffer-size percent 10;
    priority low;
}

[edit class-of-service scheduler-maps]
professor-student-scheduler {
    forwarding-class network-control scheduler sched-network-control;
    forwarding-class professors scheduler sched-professors;
    forwarding-class students scheduler sched-students;
    forwarding-class best-effort scheduler sched-best-effort;
}
BA and Scheduler Application (On both routers)#
[edit class-of-service interfaces]
ge-0/0/2 {
    scheduler-map professor-student-scheduler;
}
ge-0/0/3 {
    scheduler-map professor-student-scheduler;
    unit 0 {
        classifiers {
            inet-precedence default;
        }
        rewrite-rules {
            inet-precedence default;
        }
    }
}
Monitoring Cos Configuration#
show class-of-service interface <interface-name>
show class-of-service interface ge-0/0/3
or
show interfaces detail
show interfaces extensive
or
show interface ge-0/0/3 detail | grep "Egress queues"
Monitoring Queue Statistics#
show interface queue ge-0/0/3
What does a scheduler and scheduler map do?
- Associate parameters with various queues
- Define Cos parameters for queue servicing
Components of scheduling?
- Priority
- RED Configuration
Lab#
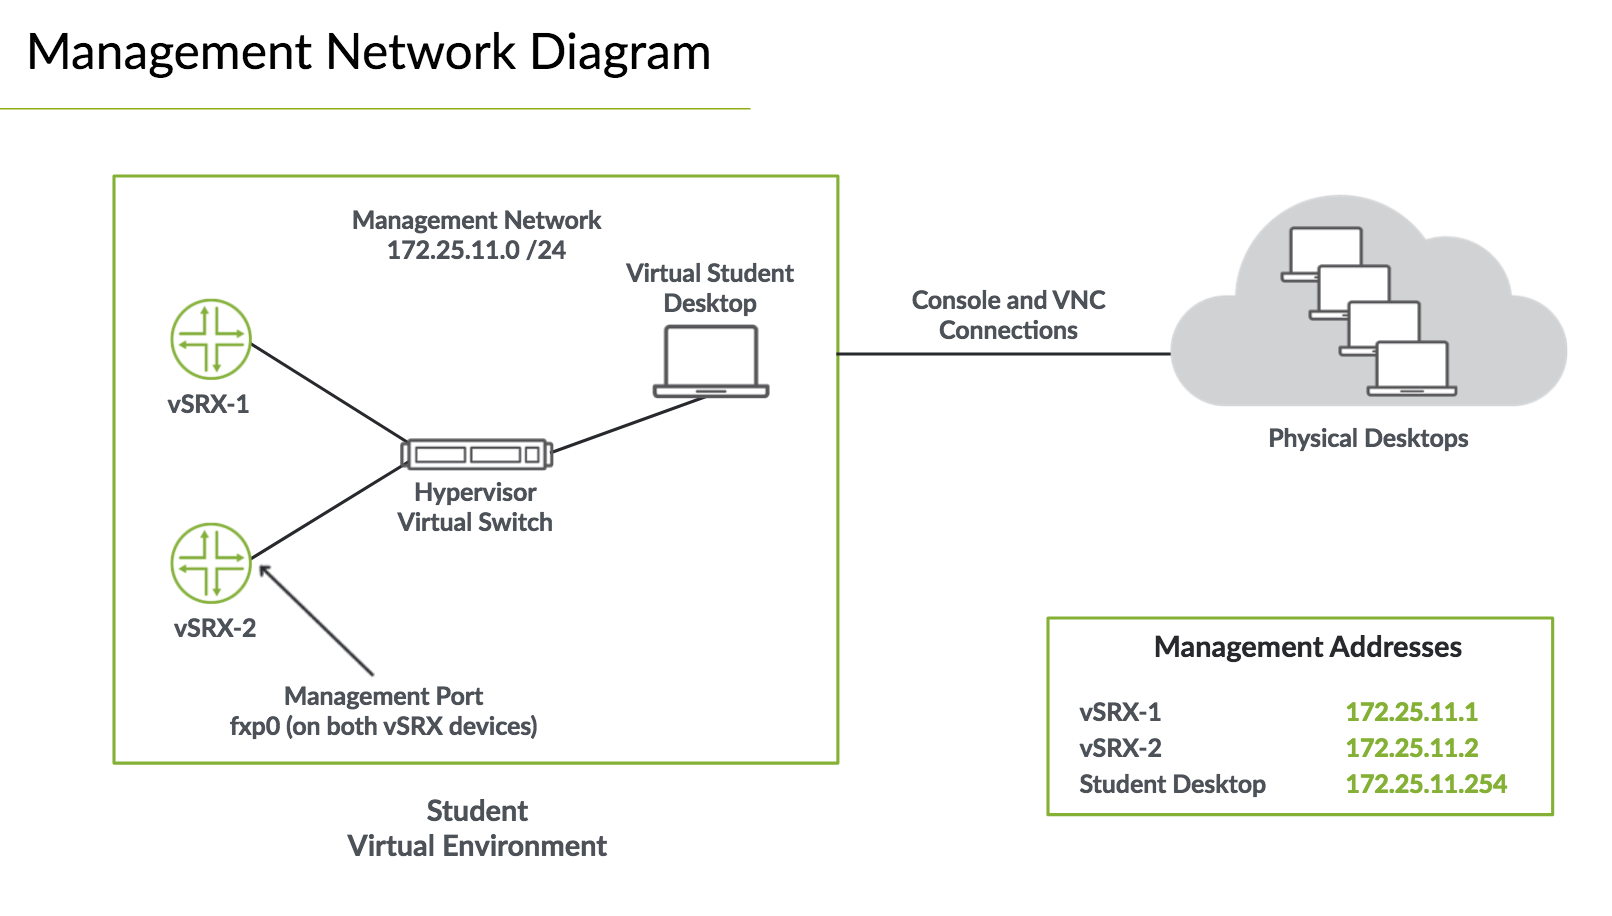
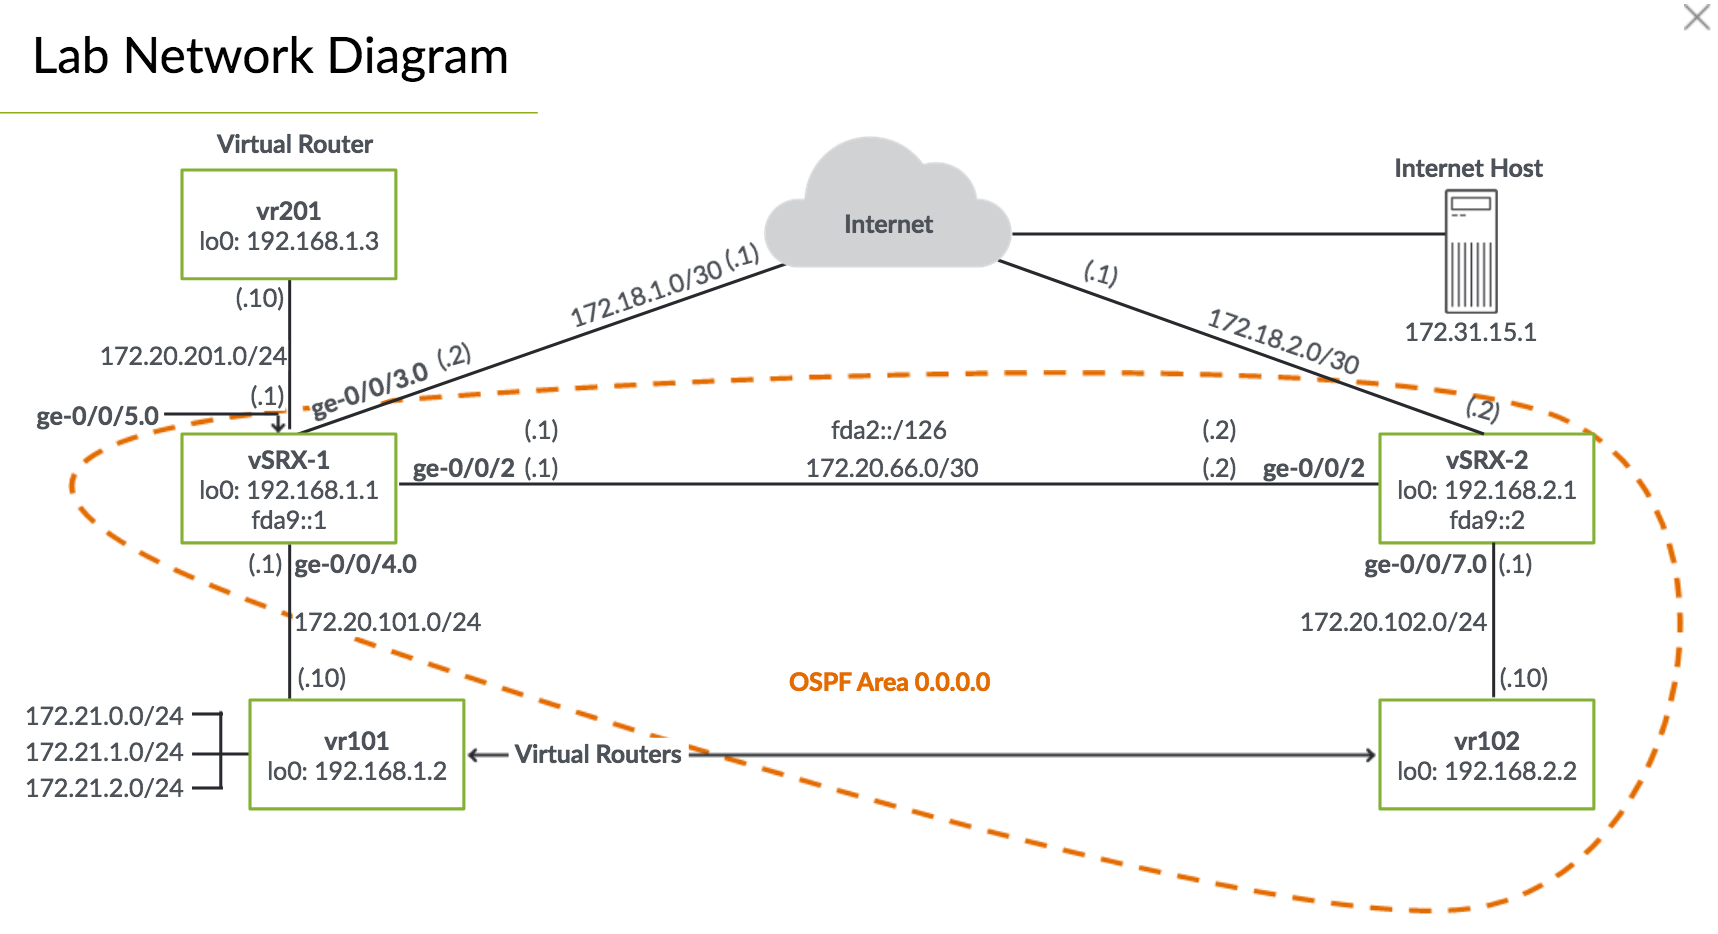
Preparing the System and verifying proper operation#
Disable the ge-0/0/1 interface so there is only a directy path between vSRX-1 and vSRX-2
edit interfaces
set ge-0/0/1 disable
Configure ge-0/0/5 to connect to the vr201 virtual router.
Define a stiatic route for the loopback address for vr201
[edit interfaces]
set ge-0/0/5 unit 0 family inet address 172.20.201.1/24
top edit routing-options
set static route 192.168.1.3/32 next-hop 172.20.201.10
commit
Use ping to verify connectivity
ping 172.20.101.10 rapid count 25
ping 172.20.201.10 rapid count 25
Add the new route filter match-interface-routes term for new subnet on ge-0/0/5
[edit policy-options policy-statement-ospf-export]
set term match-interface-routes from route-filter 172.20.201.0/24 exact
verify current ospf state
show ospf neighbor
show route protocol ospf
Verify routing on SRX2 and virtual router vr102
show route protocol ospf table inet.0
show route protocol ospf table vr102.inet.0
ping to verify
ping routing-instance vr101 192.168.2.2 rapid count 25
ping routing-instance vr201 192.168.2.2 rapid count 25
Configuring Queues and Scheduelr map#
By default junos devices assign all traffic to
best-effortornetwork-control
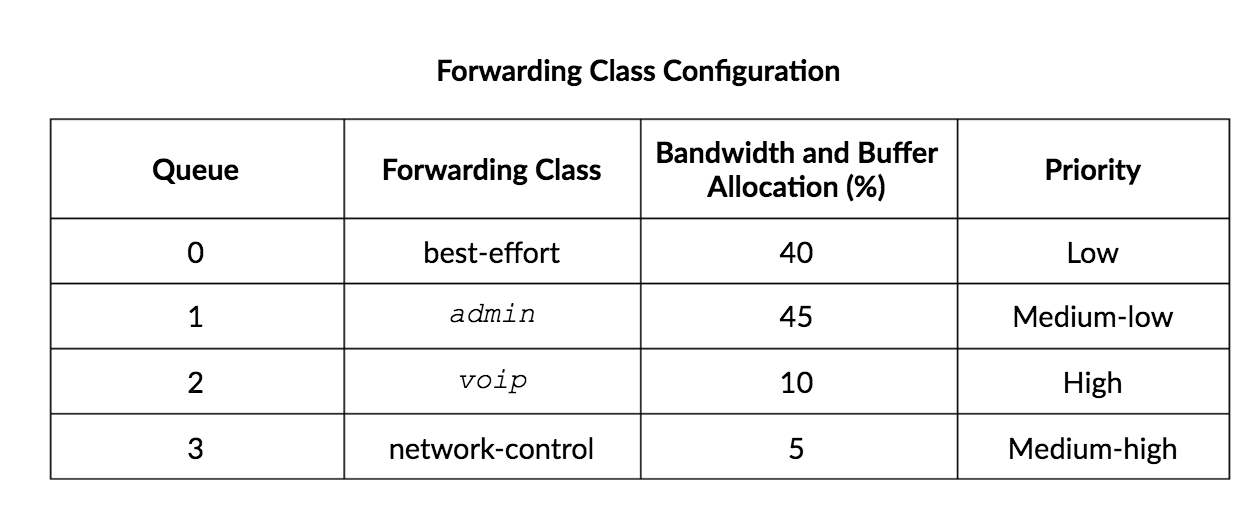
Configure the forwarding classes
top edit class-of-service forwarding-classes
set queue 1 admin
set queue 2 voip
Configure the scheduler for each forwarding class
edit schedulers best-effort-sched
set buffer-size percent 40
set transmit-rate percent 40
set priority low
up
edit admin-sched
set buffer-size percent 45
set transmit-rate percent 45
set priority medium-low
up
edit voip-sched
set buffer-size percent 10
set transmit-rate percent 10
set priority high
up
edit network-control-sched
set buffer-size percent 5
set transmit-rate percent 5
set priority medium-high
Configure the sceduling map to map forwarding-class with scheduler
edit scheduler-maps my-sched-map
set forwarding-class best-effort best-effort-sched
set forwarding-class admin admin-sched
set forwarding-class voip voip-sched
set forwarding-class network-control network-control-sched
Assign the scheduler map to all configured network interfaces
top edit class-of-service interfaces
set ge-0/0/2 scheduler-map my-sched-map
set ge-0/0/3 scheduler-map my-sched-map
set ge-0/0/4 scheduler-map my-sched-map
set ge-0/0/5 scheduler-map my-sched-map
Configure Multifield Classification#
Place traffic into forwarding-classes
Create a classify-traffic firewall filter. Create a term sip that puts SIP traffic from locally attached subnets assocated with vr101 into the voip forwarding class. SIP is UDP or TCP on port 5060.
top edit firewall family inet filter classify-traffic
set term sip from source-address 172.20.101/24
set term sip from protocol [tcp udp] port 5060
set term sip then forwarding-class voip
set term sip then accept
Create term rtp that puts local traffic associated with vr101 into the voip forwarding class. RTP uses UDP 16284 - 32767.
top edit firewall family inet filter classify-traffic
set term rtp from source-address 172.20.101.0/24
set term rtp from protocol [udp] port 16284-32767
set term rtp then forwarding-class voip
set term rtp accept
Create the term admin that places traffic from locally attached subnet associated with vr102 into the admin forwarding class
set term admin from source-address 172.20.201.0/24
set term admin then forwarding-class admin
set term admin then accept
Create a term accept-all and put traffic in defualt forwarding class
set term accept-all then accept
Apply the classify-traffic filter to to ge-0/0/4 and ge-0/0/5 to process inbound traffic fromdirectly attached virtual routers
top edit interfaces
set ge-0/0/4 unit 0 family inet filter input classify-traffic
set ge-0/0/5 unit 0 family inet filter input classify-traffic
commit and-quit
Verify the operation of multifield classifier#
Clear interface statistics
clear interface statistics all
Show queuing stats for ge-0/0/2:
show interface queue ge-0/0/2
Send ICMP traffic from vr101 to vr102 loopback address:
ping routing-instance vr101 192.168.2.2 rapid count 100
Ensure stats have incremented
show interface queue ge-0/0/2
Send ICMP traffic from vr201 to vr102
ping routing-instance vr201 192.168.2.2 rapid count 100
Simulate SIP traffic from vr101 to vr102
telnet routing-instance vr101 192.168.2.2 port 5060
Configuring BA rewrite rules and Classifiers#
Clear the interface and check the queue
clear interface statistics all
show interfaces queue ge-0/0/7
Ensure ge-0/0/2 uses the default ip precedence
configure
edit class-of-service
set interfaces ge-0/0/2 unit 0 rewrite-rules inet-precedence default
commit and-quit
Send ICMP from vr201 to vr102
ping routing-instance vr201 192.168.2.2 rapid count 100
Show stats
show interfaces queue ge-0/0/7
Simulate SIP from vr101 to vr102
telnet routing-instance vr101 192.168.2.2 port 5060
13. JTAC Procedures#
Recommended procesure to open Juniper Network Technical Assistance Centre
- Only offered to customers with a valid maintenance contract
- A chassis serial number is required when opening a case
Get the serial number with:
show chassis hardware
Opening a Case#
Use web https://casemanager.juniper.net/casemanager/ or make a phone call
Get support info:
request system information
4 priority levels:
- 1 (Critical) - catestrophic impact - customer loss of service
- 2 (High) - intermittant impact to customer
- 3 (Limited) - limited impact to business operations
- 4 (No Impact) - informatino requests
Need a valid juniper login at https://support.juniper.net/support/
Requirements to open a case:
- customer support login
-
chassis serial number
-
A valid maintenance contract
Use the servicer CM tool https://my.juniper.net/#dashboard/servicer
PR - Problem Report
- PR opened and assigned
- JTAC ensures engineering has all required info
- Engineering solves problem - JTAX and system tests
- PR moved into closed state
Trigger and workaround can help you fix issue
Additional Support Tools#
- Juos VPN Configuration Tool - site-to-site IPSec
- SRX HA Config
- IOS to Junos Translator
MyJuniper Dashboard https://my.juniper.net/
Transfer large files:
-
More than 10Mb
sftp anonymous@sftp.juniper.net lcd /var/tmp cd /pub/incoming mkdir 2019-0820-1189 cd 2019-0820-1189 mput large-file.tgz bye
14. Juniper Security Concepts#
Security is not a tradeoff
More devices, more policies
Vendors do not work together
High level security challenges:
- Attack frequency and cost
- Threat surface expanding
- Security technology Interaction
Juniper Connected Security#
SRX series device - can protect
- Operational efficiency - open, programmable and central control
- Security efficacy - support advanced security, threat intelligence, fine-grained policy
- Business agility - scale up and out
Focal points:
- Performance
- Efficacy - the quality
- Scalability - when traffic grows
- Automation - how programmable
- Centralised - administered from central location
Next Generation Firewall (NGF):
- App tracking - analyse application data and classifiers based on risk, zones and source.
- App firewall - application control policies based on applicaiton names
- App Qos - meters and marks traffic
- App Routing - packet forwarding for apps
- App SSL Proxy - SSL encryption and decryption between the client and server (neither server nor client can detect its presence)
- IPS - Application linked with infrastrcuture
Unified Threat Management (UTM): combine into single device
- Antimalware - Sophos antivirus - smaller memory footprint
- Antispam filtering - Spamhaus Block Lists
- Web Filtering - Prevent access to inappropriate
- Content filtering - BLock by MIME type, file extension
Sky Advanced Threat Protected (ATP)
Protect against malware and ransomware
- Sandbox
- Machine learning
- Threat Intelligence
ATP integrates with SRX. Juniper deceives malware tricking into identifying itself. Actionable intelligence to compromise hosts are pushed to SRX.
WannaCry detected and blocked in 90 seconds
Free Trial vSRX with advanced security services
Juniper Connected Security#
- Entire network managed as enforement domain
Security Viewpoints:
- Operational efficiency - Centralised Management and Control
- Security Efficacy - Advanced security, integrated threat detetion and fine grained policy
- Business Agility - Scale up and out using a variety of deployment models
16. IPv6 Fundamentals#
What is IPv6?
- Next generation network protocol
- Used in Networks
- Desgined by IETF
- Designed to replace IPv4 (from depletition of IPv4 addresses)
Internet Stream Protocol - experimental procol (IPv5)
IPv4:
- 32-bit (4 byte) 4,294,967,296 addresses (w^32)
- NAT to extend address limitations
- DHCP to assign ip
- IPSec is optional
- Options are integrated into the base header
IPv6:
- 128-bit (12 byte) 2^128
- Does not support NAT
- SLAAC (Stateless address autoconfiguration)
- IPSec is necessary
- Improved support for options and simplified header
Benefits of IPv6#
- More efficient routing
- Quality of Service (Qos)
- Elimination of NAT requirments
- Network layer security with end-to-end IPSec
- Easy of Management using SLAAC
- Reduced Header Overhead
IPv6 header:
- extension headers
-
fixed lenth of 40 bytes
-
version (4) - same as IPv4
- traffic class (8)
- flow label (20) - new field
- payload length (16)
- next header (8)
- hop limit (8)
- source address (128) - same as IPv4
- destination addres (128) - same as IPv4
Header Checksum ,Flads removed
Protocol and TTL (hop limit) renamed
IPv6 Extension Headers#
- hop-by-hop options - options must be examined at each node
- routing - immediate nodes that should be visited
- fragment - indicates when packet fragmented by source
- destination options - options examined only by destination node
- authentication header - used with IPSec to verify authenticity
- encrypted security payload - carries secure info
2^95 addresses for each person on earth
IPv6 Address Types#
- unicast address - unique address identifying an interface or node
- multicast - identifier for many - packet travels to all
- anycast - travels to the cloest node in a group
Address Notation#
- 8 16-bit hexadecimal blocks
-
Can abbreviate
-
0000can be identified as0 -
::can replace consecutive zeros, leading or trailin zeros - but cannot be used twiceipv6 address/prefix length
-
::/128- unspecified ::1/128- loopbackFF00::/8- multicastFE80::/10- link local
Address Allocation#
IPv6 nodes must recieve assignments from their ISP ISP’s get this from regional registries
Rules:
- home network through on demand - 48 bit prefix
- small or large enterprises - 48 bit prefix
- very large subscribers - 47 bit or multiple 48 bits
- mobile networks (vehicles/mobile phones) - 64 bit prefix
- single machine with no additional need to subnet - 128 bit prefix
Special Addresses#
::/16is reserved for special addressing::(same as 0.0.0.0) is the unspecified address - should never be assigned to an interface::1loopback
Address Scope#
Unicast and Multicast support scoping
univast addresses support:
- local scope - used within the same routing domain
- global scope - used between routing domains
link-local unicast addresses are used within a single address
multicast support 16 types of scope
Link Local UNicast Address#
- never routable
FE80:0:0:0::/64- used for neighbor discovery, autoconfiguration and routing protocol traffic
Global Unicast Addresses#
- Globally unique
- Used to connect to and route through the internet
Format Prefix: 001 (3 bits)
Global routing prefix: identify ISP (45 bits)
SID (Subnet Identifier): (16 bits)
Interface ID: (64 bits)
Interface ID#
64 bit field uniquely identify host on subnet permutation of MAC address host can determine subnet it is connected with router advertisement - easy to configure automatically
MAc addresses are only 48 bits long
concatenate first 24 bits with manufacturer extension ID
Stateless Autoconfiguration#
Static and DHCP are stateful config methods
IPv6 nodes can assign IPv6 addresses to neighbor
- EUI (Extended Unique Identifier) - if not set created from MAC address and interface
- Router Advertisement message -
- Router Solicitation message - discover on-link routers
- prefix-list - use prefix to do autoconfiguration
Neighbour discovery (ND)#
- combines and improves ARP and ICMP
- neighbor is reachable if it has responded to soliciation or IP traffic
- IPv6 Hosts A and B generate link-local addresses from their MAC addresses
- Each hosts broadcasts a RS (Router solicitation) - uses link-local as source-address
- IPv6 Router receives RS
- Router transmits RA (Router advertisement) containing the prefix-list
- Hosts use prefix for autoconfiguration
Stateful DHCPv6#
- Specific IPv6 Addressing scheme across network
- Dynamic assignment or updates
-
Exclude MAC address (security reasons)
show interface terse ge-0/0/1
See site-local and local address
Display IPv6 routing table
show route table inet6
Initially all data link-layer addresses of IPv6 neighbours are unknown
You can ping to learn the addresses
show ipv6 neighbors
ping fc00:a088:3bc4:1234::2
show ipv6 neighbors
IPv6 Mulicast Addresses#
- More efficient than broadcast
- All members process the packet
- Can be forwarded over routers
Idenfied by high order bit FF
- Solicited Node multicast addresses - Neighbor solication message (NS)
- All-node multicast addresses - Router advertisement messages (RA)
- All-router multicast adddresses - Router solicitation messages (RS)
IPv6 Anycast#
- Travels to nearest node
- Access one of a collection of servers
- Force routing through a specific ISP
Static IPv6#
edit routing-options
rib inet.0 {
    static {
        route 0::/0
        next-hop fc00:a088:3bc4:1234:2;
        preference 250;
    }
}
Show routes
show route table inet6.0 protocol static
OSPFv3#
Same commands as ospf but with ospf3v
IS-IS Configuration#
edit interfaces
ge-0/0/1 {
    unit 0 {
        family iso;
        family inet6 {
            address fc00:a088:3bc6:1234::1/64;
        }
    }
}
lo0 {
    unit 0 {
        family iso {
            address ...
        }
        family inet6 {
            address fc00:0:0:1001::1/128;
        }
    }
}

top edit protocols
isis {
    interface ge-0/0/1.0;
    interface lo0.0;
}
BGP IPv6#
Specify ipv6 for local and peer addresses
same
show bgp summary
Tunneling IPv6 traffic over IPv4 networks#
Use tunnels to span IPv4 networks until all intermediate routers have been upgraded to support IPv6
encapsulating IPv6 packet into an IPv4 packet
approaches:
- IPv4 compatible addressing
- configured tunnels
- 6to4
- 6over4
Configuring Tunnel#
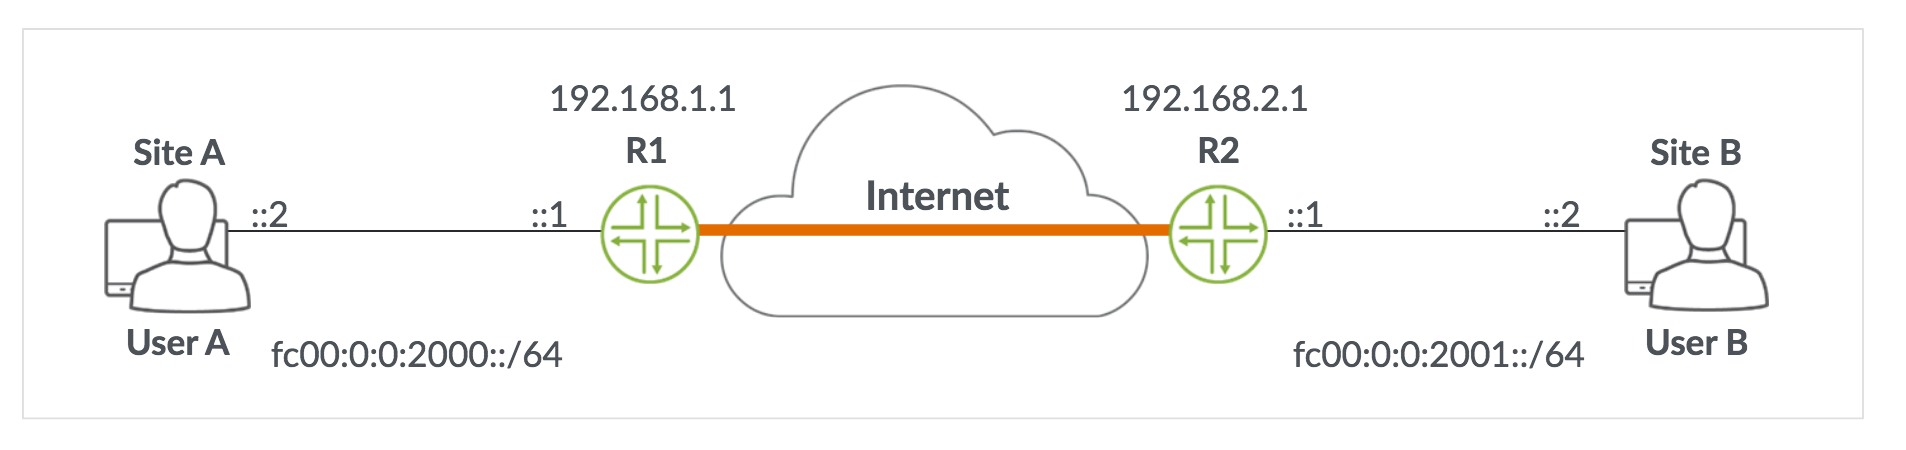
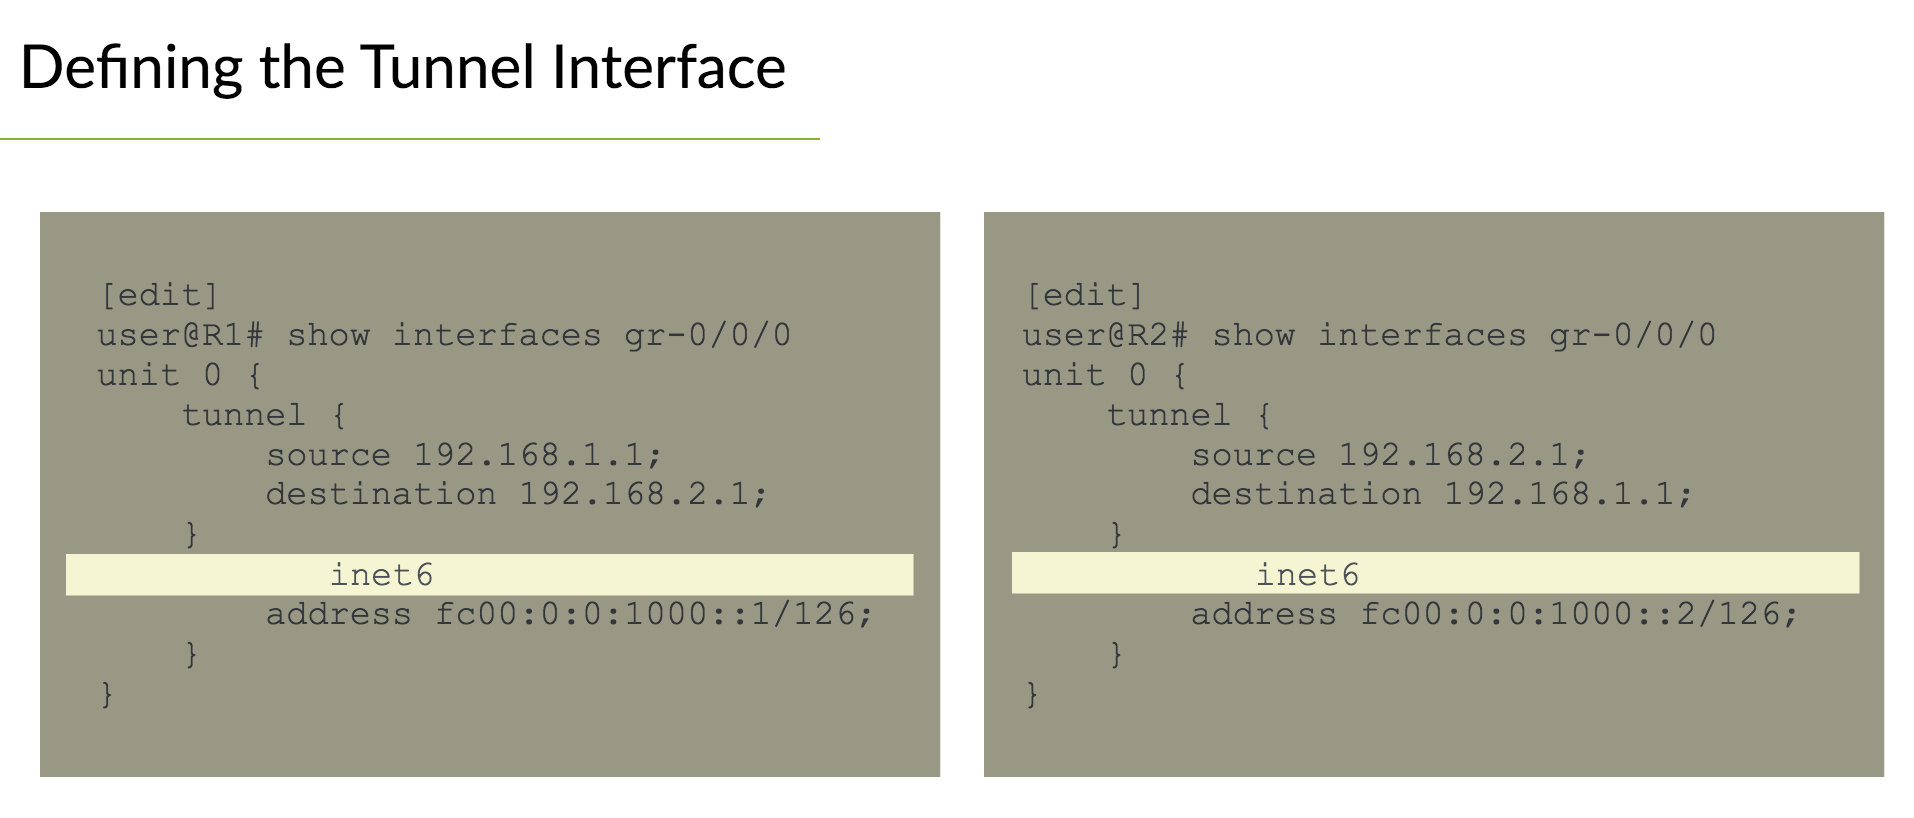
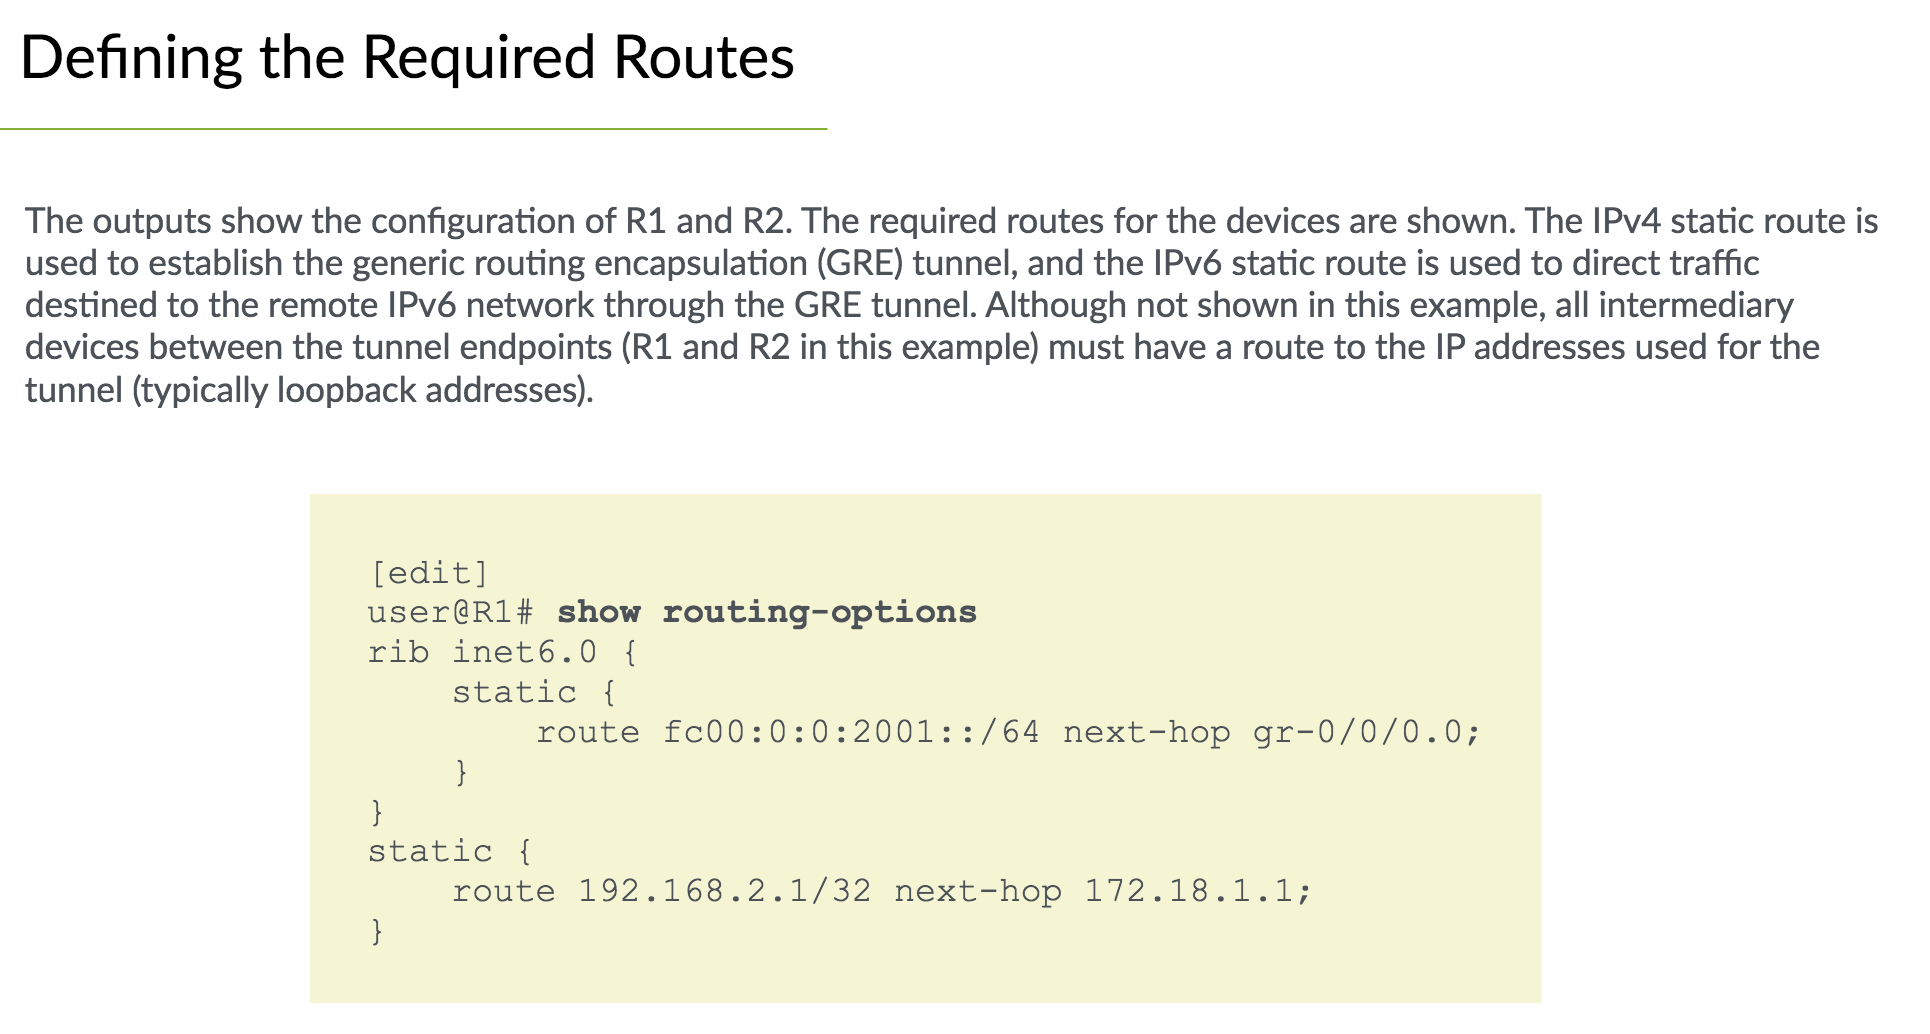
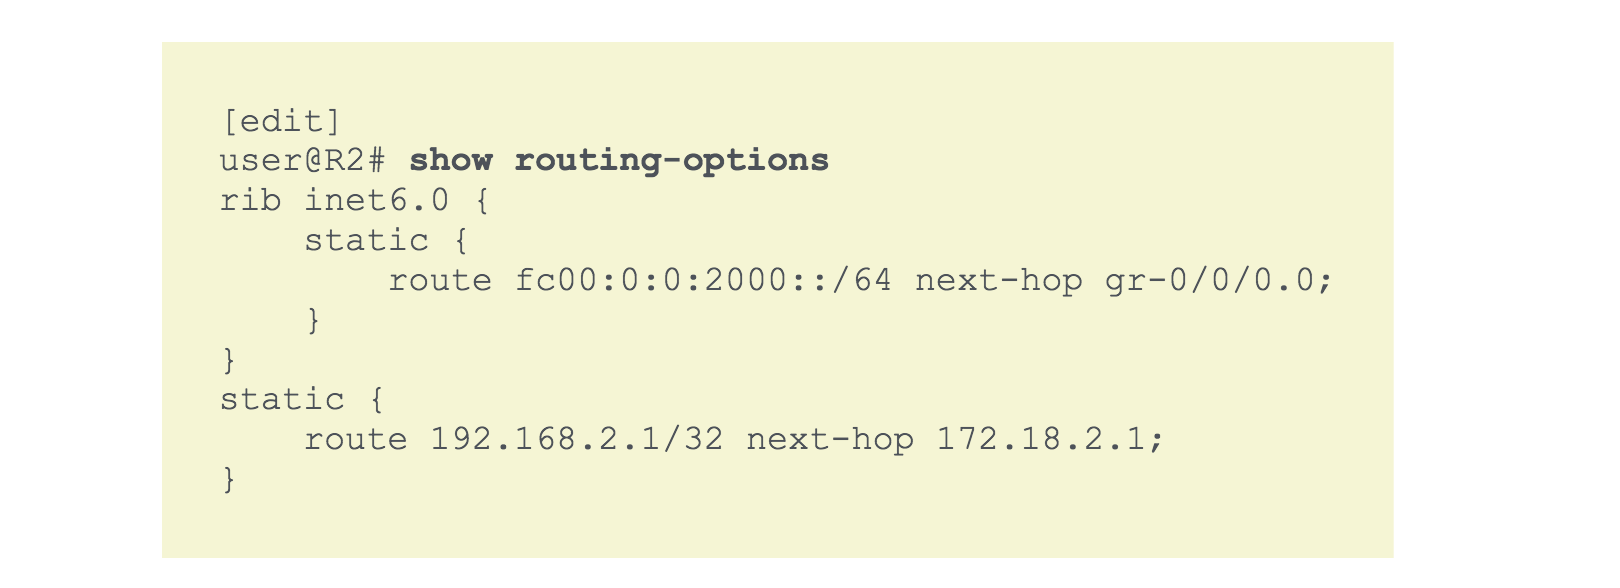
Verification#
Ensure tunnel is up
show interfaces gr-0/0/0 terse
Ensure the routes are installed on endpoints
show route 192.168.2.1
show route table inet6.0 fc00:0:0:2001::/64
Verifying usage status
ping fc00:0:0:2001::2 source fc00:0:0:2000::1 rapid count 25
show interfaces gr-0/0/0 detail | find "traffic statistics"