Mastering KVM Notes
Notes on the Mastering KVM book#
1. Understanding Linux Virtualisation#
Virtualisation:
- IT consolidation - more efficient resource use
- Orchestrations
- virtualised resources mapped to physical resources
KVM: Kernal-based Virtual Machine - part of linux
The hypervisor does the splitting of resources and ensures the VM workloads have enough CPU time.
2004 64-bit CPU’s opened up virtualisation for personal computers.
There are various virtualisation solutions (by 2019):
- Red Hat with KVM
- Microsoft with Hyper-V
- VMware with ESXi
- Oracle with Oracle VM
In 2003, introduction of the first open source Hypervisor for x86 architecture, called Xen. Supporting various CPU architectures and OSes - it is still used as Citrix (XenServer) and Oracle (Oracle VM)
RHEL 5 (Red Hat Enterprise Linux) included Xen virtualisation in 2007. RHEL 6 switched to KVM in 2010.
Reasons:
- Xen is not in the mainline kernel, KVM is.
- KVM uses a different, modular approach that transforms Linux kernels into fully functional hypervisors for supported CPU architectures - a basic requirement for kvm virtualisation: CPUs need to support hardware virtualization extensions, known as AMD-V or Intel VT
Types of Virtualisation#
- Desktop Virtualisation (VDI) - users not dependent on a physical device - connect from anywhere simplified managing of base image, compliance and monitoring.
- Server virtualisation - consolidating physical servers, easier to backup and more energy efficient moving of workloads across hosts
- Application virtualisation - streaming or remtoe protocol technology - VMware vapps or microsoft app-V
- Network virtualisation - SDN (software defined network) - a virtual network independent of physical devices.Making the network easier to manage.
- Storage Virtualiation - SDS (Software Defined Storage) - Creates virtual storage devices out of pooled physical storage. Abstracting storage from the hardware.
How we virtualised a virtual machine as an object:
- partitioning - CPU divided into different parts (IBM Logical Partitions LPARS)
- paravirtualisation - guest OS knows it is being virtualised and doesn’t need CPU virtualisation extensions (Xen)
- Hybrid Virtualisation - Guest OS can be run unmodified (full) and insert paravirtualised drivers (I/O intensive memory) into the virtual machine (Xen and ESXi)
- Container based virtualisation - Use containers (not a virtual machine or hypervisor) (Docker, podman and LXD)
Using the Hypervisor Virtual Machine Manager#
The VMM (Virtual Machine Manager) or hypervisor monitors and controls guest OSes.
- Provides virtual hardware
- virtual machine lifecycle management
- migrating virtual machines
- allocating resources in real time
- defining policies
-
memory translation and I/O mapping to VMs
-
Type 1 - VMM/hypervisor runs directly on system hardware (no host OS is installed on bare metal)
- Type 2 - VMM/hypervisor has an OS present and VMM operates as a seperate layer
Type 1 Examples:
- oVirt-node
- Vmware ESXI/vSphere
- RHEV-H (Red Hat Enterprise Virtualisation Hypervisor)
Type 2 Examples:
- Vmware Player, workstation, fusion
- Oracle virtualbox
Open source virtualisation projects in linux:
- KVM (Kernal-based virtual machine) - Full Virtualisation
- Virtualbox - Full Virtualisation
- Xen - Full and ParaVirtualisation
- Lguest - ParaVirtualisation
- UML (User Mode Linux) - First
- Linux-vServer - First
Xen#
First released in 2003. On April 2013 entered linux foundation.
building blocks:
- hypervisor - hardware and virtual interaction
- Dom0 - control domain - controls virtual machine’s environment. QEMU - emulates a regular computer system. A seperate entity controlling other virtual machines.
- Management utilities - cli and gui
- Virtual machines - guest / unprivileged domains
Can use the cli tool: virsh to manage.
KVM#
Modern hypervisor leveraging modern hardware (VT-x, AMD-V) KVM turns a linux kernel into a hypervisor when you install the KVM kernel module. For I/O emulations, KVM uses a userland software, QEMU; this is a userland program that does hardware emulation.
Can use oVirt to manage.
Linux Virtualisation in the Cloud#
AWS and EC2 (Elastic compute) launched in 2006 Google cloud platform launched in 2008 Other Iaas (Infrastructure as a Service): IBM cloud, Vmware cloud, oracle cloud and alibaba cloud
Amazon uses Xen and KVM, Google uses KVM.
Linux Iaas solutions for private and hybrid cloud:
- Openstack - open source cloud OS
- Cloudstack - open source cloud OS (apache)
- Eucalyptus - Open source private cloud for AWS compliancy
Openstack supports various virtualisation:
- KVM
- Xen (via Libvirt)
- LXC (Linux COntainers)
- Microsoft Hyper-V
- Vmware ESXI
- Citrix Xenserver
- User Mode Linux (UML)
- PowerVM
- Virtuozzo
- z/VM (IBM Z and IBM LinuxONE)
2. KVM as a Virtualisation Solution#
Virtualisation is implemented with:
- KVM
- QEMU (Quick Emulator)
- Lib-virt
Virtualisation Concept#
Physical Environments: A hypervisor (kvm) and virtual machines on top of that hypervisor.
Some applications cannot run on virtualised machines because their operating system is not on the supported list of the virtualisation vendor. Sometimes it is the virtualised network or storage adapter.
AMD and Intel couldn’t improve the single core much any more - so they added more cores. Operating systems and applications had to be reworked for multicore servers. Additional CPU registers - for specialised intstructions. VMX (Virtual Machine Extension) for Intel, AMD-V (AMD Virtualisation)
End result is CPUs had alot more features and power.
Requirements:
- Second Level Address Translation (SLAT), Rapid virtual indexing (RVI), EPT (Extended Page Tables) - a map of virtual to physical memory addresses.
- Intel VT or AMD-V Support
- Long-mode support: 64Bit support So can allocate more than 4GB memory
- Input Output Memory Management Unit (IOMMU): AMD-Vi or Intel VT-d - allow direct access to peripherals: gfx, storage, network
- Single Route Input Output Virtualisation (SR/IOV) - Share Virtual functions to physical
- PCI Passthrough: Present a gfx card as if connected
- Trusted Platform Module (TPM) - Cryptographic support
Important for graphic intense applications
Software Requirements#
Protection rings - privileges protecting data loss or faults.
- Ring 0: Kernel (Most privileged)
- Ring 1: Device drivers
- Ring 2: Device drives
- Ring 3: Application
Most only use 2 rings: Kernel mode and User mode
The OS (Guest OS) runs in ring 0 - in a normal environment. Applications run in Ring 3 (user space).
The Virtual Machine Monitor/Hypervisor needs access to CPU, IO and memory of the host - so it needs to live in ring 0. Blocking the virtual machines access to ring 0 - so it must live in ring 1.
Giving rise to full virtualisation and paravirtualisation
- Full virtualisation: performance overhead, guest kernel lives in ring 1 and does not know it is virtualised
- Paravirtualisation: modified Guest OS can live in ring 0 (Guest kernel knows it has been virtualised)
- Hardware assisted virtualisation: ring -1 introduced - direct access to hardware without guest OS manipulation - modern virtualisation use thing (Intel VT and AMD SVM - secure virtual machine)
Internal Workings#
Libvirt#
Link to Libvirt
- The API.
- Daemon and management tool for different hypervisors
The most common tool used to interface with libvirt is GNOME based virt-manager
Libvirts CLI utility is called virsh
It is also part of ovirt a KVM management tool
A management layer for virtual machine provision, creation, modification, monitoring, control, migration.
Daemonised process called libvirtd
Connecting to a remote system:
virsh --connect qemu+ssh://root@remoteserver.yourdomain.com/system list ––all
Libvirt source code can be acquired with:
git clone git@gitlab.com:libvirt/libvirt.git
Mainly C programming language, but with bindings for other programming languages
Uses driver based architecture - meaning it has internal drivers to communicate with:
- LXC
- Xen
- QEMU
- Virtualbox
- bhyve
- Hyper-V
- OpenVZ
Driver implementations: hypervisor, interface, network, nodeDevice, nwfilter, secret, storage, and so on.
Refer to driver.h
The readme gives info about the supported drivers
The hypervisor is the primary driver. Secondary drivers are: cpu, interrface, network etc.
Once a virConnectPrt is opened access opes to:
- virNetworkPtr -
- virStorageVolPtr - storage volumes
- virStoragePoolPtr - virtual network
- virDomainPtr - virtual machine
For QEMU/KVM the qemu_driver.c probes for the qemu-kvm binary and the /dev/kvm device to ensure fully virtualised guests are available.
Otherwise the QEMU emulator without KVM is verified by checking system binaries :qemu, qemu-system-mips etc.
The qemu-capabilities.c file looks for binaries and paths in different distributions.
There is a misconception that libvirt directly uses the device file
/dev/kvmexposed by KVM kernel modules to do virtualisation viaioctl()- it doesn’t! Libvirt spawns a QEMU-KVM process and QEMU talks to KVM kernel modules.
A different QEMU-KVM process is launched for each virtual machine by libvirtd
Properties of each virtual machine xml (cpu, memory etc) are in /etc/libvirt/qemu
Libvirt issues requests via AF_UNIX socket /var/run/libvirt/libvirt-sock
QEMU#
- written by Fabrice Bellard (creator of FFMpeg)
- open source machine emulator and virtualiser
- It is a hosted hypervisor performing hardware emulation
- Uses dynamic binary translation techniques - can run different guest architectures
- The binary translator is called the Tiny Code Generator (TCG)
- Virtualised mode: using QEMU without binary translation
- The processor and all peripherals are emulated
- Initialises different posix threads for each vCPU
- Provides framework to emulate user space
- Also does IO emulation and migration
QEMU-KVM Internals#
git clone git://git.qemu-project.org/qemu.git
goes into detail…buy the book
Threading Models in QEMU#
A multithreaded, event-driven application
- Main thread
- worker threads for virtual disk IO and network packets
- One thread for each vCPU
Guest RAM is assigned inside the QEMU process’s virtual address space Physical RAM of the guest is inside the QEMU process address space
iothread- event loop threadmain_loop_wait()- QEMU main event loop
KVM#
A common kernel module kvm.ko and hardware related modules:
kvm-intel.ko- intel based systems -vmxflagkvm-amd.ko- amd based systems -svmflag
This turns the linux kernel into a hypervisor.
KVM exposes a device file called /dev/kvm to applications so they can use ioctl()
KVM is not a full hypervisor but with the help of QEMU it can become one.
KVM allows guest mode - to execute guest system code.
More info on KVM from redhat
Questions#
- What is paravirtualization?
- What is full virtualization?
- What is hardware-assisted virtualization?
- What is the primary goal of libvirt?
- What does KVM do? What about QEMU?
3. Installing KVM, Loibvirt and Ovirt#
Ovirt is a free management stack for KVM - completely seperate.
four pillars of virtualisation
- network
- storage
- memory
- CPU
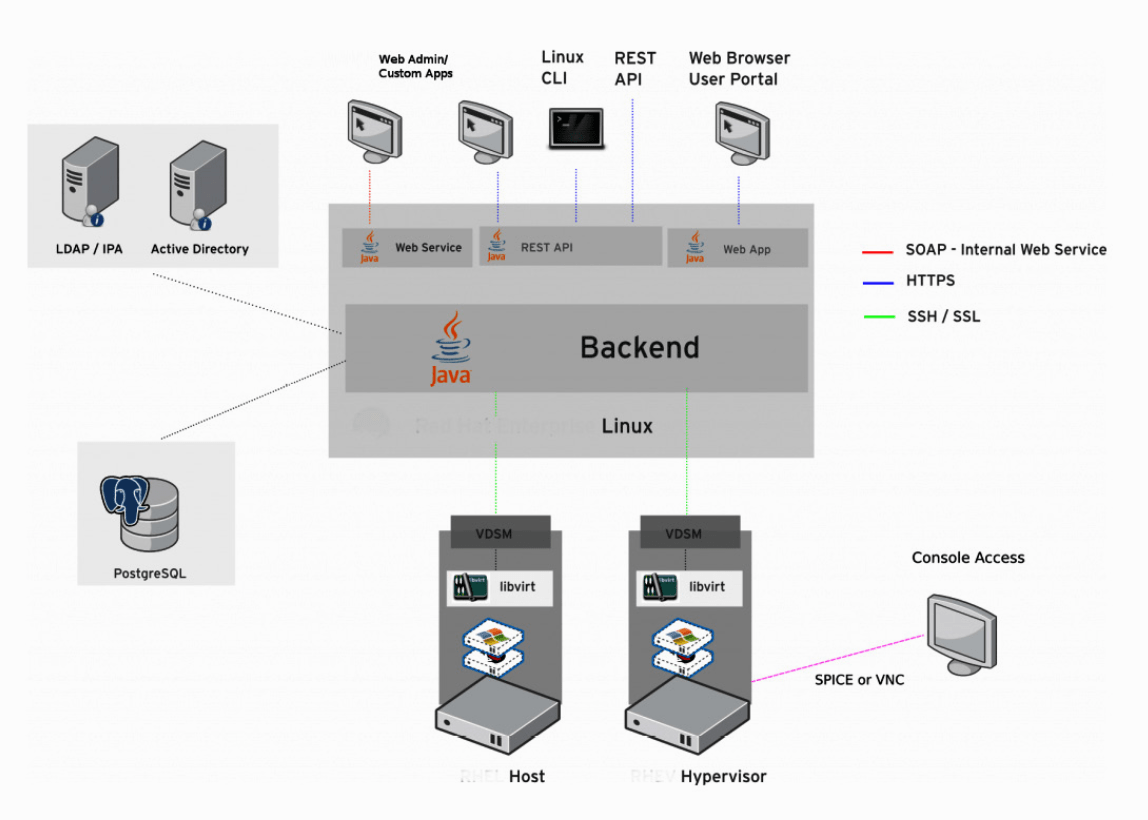
Ovirt is the GUI tool humans can interact with - running on Java Wildfly (JBOSS) Management of KVM environments from a centralised place.
2 Parts of Ovirt:
- engine - which we connect to with the GUI - management + vm lifecycle
- agents - communicate with hosts
Ovirt engine functionality:
- Live migration of virtual machines
- Image management
- Export and import (OVF format)
- Virtual-2-virtual conversion?
- high availability - restart virtual machines on other hosts
- resource monitoring
VDSM - python based agent that ovirt engine uses to connect directly with a kvm host through libvirt. VDSM also has memory overcommitment manager (MOM)
The install is happening on a single physical server with 16 physical cores and 64 GB of memory.
A HP ProLiant DL380p Gen8
Process:
The installation process is based on centOS 8 and is hence down the toilet as centOS 8 ends 31 December 2021. So better to get a guide for ubuntu…
4. Libvirt Networking#
Instead of a physical network card of each - costs reduced and management is easier.
A virtual switch:
- software based layer 2 switch
- use uplinks o connect to physical network cards
- connect to virtual machines
Without a virtual switch you need 20 phsyical network ports for 20 vms
Virtual Networking#
vNIC - virtual Network Interface Card - gives the vm the ability to connect to a virtual switch.
The uplink port on a switch is used to connect a device or a smaller local network to a larger network
If you have 50 virtual machines connected to the same virtual switch that uses the same physical network card as an uplink and that uplink fails (due to a network card issue, cable issue, switch port issue, or switch issue), your 50 virtual machines won’t have access to the physical network. How do we get around this problem? By implementing a better design and following the basic design principles that we’d use on a physical network as well.
Specifically, we’d use more than one physical uplink to the same virtual switch.
Types of Networking Interfaces:
- Bridge: Layer 2 interface for vm networking
- Bond: Combining network interfaces into a single logical interface - for balancing and failover reasons
- Team: Creates a single interface - not logical
- MACVLAN: Multiple MAC addresses on a single physical interface
- IPVLAN: Same MAC address, multiplexes on on layer 3
- IPVTAP: Combining TUN, TAP and bridge into a single module.
- VXLAN: Cloud overlay network concept
- VETH: Virtual ethernet interface
- IPOIB: IP over infiniband, supported by linux kernel
On top - tunneling interfaces:
- GRETAP - Generic Routing Encapsulation protocol
- GENEVE - Converge protocol for cloud overlay networking - fuse VXlan and GRE. eg. Open vSwitch, NSX
- IPIP - Ip over Ip tunnel connecting internal IPv4 subnets via a public network
- SIT - Simple Internet Translation - interconnecting IPv4 and IPv6
- ip6tnl
- IP6GRE
The most important thing for cloud networks is VXLan and GENEVE.
Basic types:
- NAT - default - vms have private ips behind a public ip gateway eg. 192.168.0.0/24. Virtual machine can connect to anything on hosts network but not the other way around. Simplifies endpoint routing.
- Routed - all virtual mahcines sit in the same network segment as the physical device.
- Isolated - virtual switch with no uplinks - cannot send traffic to a physical network. Cannot connect to anything outside the host they are running on. Example is your standalone database server is isolated from your wordpress frontend vm.
The default is a virtual switch with NAT, DHCP server active and guest operating systems preconfigured with DHCP networking.
Info on CLI commands to create the above is in the book…
Using Userspace networking with TAP and TUN devices#
The virt-host-validate command checks if these devices exist:
/dev/kvm- not having this device means vms cannot access physical hardware/dev/vhost-net- interface for configuring virtual network/dev/net/tun- Used for creatingTUN/TAPdevices for network connectivity of vms
TUN/TAP provide packet flow for userspace programs - a bridge or virtual switch on userspace would being additional overhead
It is a virtual network supported by the kernel - you can set routes and ips to route through it and not via a regular network.
TUN emulates an L3 device by creating a tunnel like point-to-point tunnel. The device is usually used for testing, development and debugging.
TAP emulates a L2 Ethernet device. Layer 2 raw ethernet packages inlcuding ARP/RARP - a virtualised Layer 2 Ethernet connection.
Using TUN/TAP we can create a connection to the host without a virtual switch or libvirt bridge.
Implementing Linux Bridging - read the book to get the info…
Configuring OpenvSwitch#
Imagine you work for a company with 3 to 4 KVM hosts, a couple of network attached storage (NAS) devices to host their 15 vms. You were there from the start where the company was buying servers, network switches, cables and storage devices. Everything works and is simple to setup.
Now imagine a friend at a big corporate: 400 kvm hosts and 2000 vms to manage.
THe friend cannot manage the env the same as you: xml files for network switch config, deploying servers from bootable USB and manually configuring everything.
2 problems:
- scale makes management done differently
- company policy: compliance
We need a centralised networking object across multiple hosts and offer configuration consistency. Every change is replicated on the host.
We use open vswitch (OVS). OVS is for KVM based environment like vSphere distributed switch is for vmware based environments.
OVS supports:
- VLAN isolation (IEEE 802.1Q)
- Traffic Filtering
- NIC bonding
- Overlay networks: VXLAN, GENEVE, GRE, STT
- 802.1ag support
- Netflow, sFlow
- (R)SPAN
- OpenFlow
- OVSDB
- Traffic Queuing and shaping
- Linux, FreeBSD and Windows support
Open vSwitch architecture:
- Open vSwitch Kernel Module (data plane)
- User space tools (control plane)
Since processing of packets must be as fast as possible - dataplane is pushed to kernel space.
Open vSwitch does not have a SDN controller for management purposes - unlike a vsphere distributed switch and NSX.
With OVS another open source SDN must be used that interacts with ovs-vswitchd using Openflow protocol.
The ovsdb-server maintains the switch table database and can be communicated with using JSON-RPC.
Modes:
- Normal mode - switching and forwarding is handled by OVS bridge. Acts as a L2 learning switch good for config of overlays.
- Flow mode - Flow table is used to decide where packets forward. The flows are managed by an external SDN. Allows greater abstraction and automation.
Information for setting up OVS on centOS is in the book…
Other OpenVswitch Use Cases#
- Connecting datacenters and extending cloud overlay networks across coundaries
- disaster recovery
- microsegmentation
- varying vpn technology, distributed firewalls and guest introspection (antivirus)
- for load balancing up to layer 7 - TLS offload, session persistence, high availability
An ISP needs to be able to extended vcloud director out to openstack (hybrid cloud of a customer) or AWS.
NSX-T actually uses openvSwitch.
Understanding and using SR-IOV#
…more in the book
Understanding macvtap#
…more in the book
5. Libvirt Storage#
- Storage internal to the host
shared storage- storage space that multiple hypervisors can have access to
Shared storage is achieved using:
- share-level storage - NFS
- block-level storage - Internet Small Computer System Interface (iSCSI), Fiber Channel (FC)
- object-level storage - Ceph
Introduction to Storage#
LUN - Logical Unit Number
Shared storage is usually the most expensive part of the environment. Can also have the most significant negative impact on virtual machine performance - while being the most oversubscribed resource.
Every powered on vm is going to hammer our storage device with IO operations. 500 vms on a single storage device is asking too much.
You can avoid a SPOF (Single Point of Failure) if the shared storage environment is designed properly.
Apples to oranges comparison:
the shiny new 1 TB NVMe SSD in my laptop has more than 1,000 times more IOPS and more than 5 times more performance than your $50,000 storage device, while costing 100 times less! You have no idea what you’re doing!
Storage Pools#
A storage device box will ask you to do some configuration:
- RAID level
- configure hot spares
- SSD Caching
Hypervisors are picky when it comes to storage:
- Microsoft Hyper-V: Supports SMB not NFS
- VMware vSphere: Supports NFS not SMB
The HBA controllers vendors (Intel, Mellanox, Qloigic) must develop drivers and decide which storage protocols they are going to support.
Storage Pool Types:
- Logical volume manager (LVM) based
- Directory-based
- Partition-based
- Gluster-FS
- iSCSI
- Disk
- HBA which uses iSCSI devices
From libvirt perspective a storage pool can be a directory, storage device or a file that libvirt manages.
OVirt can centrally manage these storage pools:
- Network File Systems (NFS)
- Parallel NFS (pNFS)
- iSCSI
- FC
- local storage (attached diretly to hosts)
- GlusterFS exports
- POSIX-compliant file systems
Terminology:
- Brtfs: file systems that supports snapshots, RAID, LVM-like functions: compression, defrag, online resizing. deprecated after it saw RAID5/6 leading to data loss
- ZFS: Supports everything BrtFS does plus read and write caching.
CentOS has their own version of ZFS called Stratis. ZFS is not part of the linux kernel - red hat does not support that.
Local Storage Pools#
Stratis also supports XFS.
Stratis supports block storage devices:
- Hard disks and SSDs
- iSCSI LUNs
- LVM
- LUKS
- MD RAID
- a device mapper multipath
- NVMe devices
More info on the book setting up stratis
Libvirt Storage Pools#
Libvirt manages its own storage pools for Vm disks. It uses the udnerlying operating systems so its supports alot of pools:
- dir - filesystem directory
- disk - physical disk device
- fs - pre-formatted block device
- gluster - Gluster file system
- iscsi - iSCSI target
- logical - LVM volume group
- mpath - Multipath device emulator
- netfs - Network Exported directory
- rbd - RADOS block device / ceph
- scsi - SCSI Host Adapter
- sheepdog - Sheepdog filesystem
- zfs - ZFS pool
The default storage pool on libvirt: /var/lib/libvirt/images
NFS Storage pool#
Been around since 1985 - originally developed by sun microsystems. NFS version 4.2 came out in 2016, a big update adding: server side copy, sparse files and space reservation and application data block support.
Installing NFS:
yum -y install nfs-utils
systemctl enable --now nfs-server
Next is configuring what we are going to share with the NFS server.
We have to export a directory, we set using /etc/exports
For example we share /exports then share it to 192.168.159.0/255.255.255.0
The etc/exports file should look like:
/mnt/packtStratisXFS01 192.168.159.0/24(rw)
exportfs -r
It tells which directories to export to which clients and what options to use rw
Other options:
ro- read onlysync- Synchronous I/Oroot_squash- All i/o operations from UID 0 and GID 0all_squash- All I/O operations are mapped to anonymous UID and GIDno_root_squash
Another example:
/mnt/packtStratisXFS01 192.168.159.0/24(rw,sync,root_squash)
Now how to configure libvirt to use the NFS server - write an xml file with the pool definition and import it into our kvm host with:
virsh pool-define --file
contents:
<pool type="netfs">
    <name>NFSPool1</name>
    <source>
        <host name="192.168.159.144" />
        <dir path="/mnt/packtStratisXFS01" />
        <format type="auto" />
    </source>
    <target>
        <path>/var/lib/libvirt/images/NFSpool1</path>
        <permissions>
            <mode>0755</mode>
            <owner>0</owner>
            <group>0</group>
            <label></label>
        </permissions>
</pool>
The above could also have been done with Virtual Machine Manager GUI
When would NFS storage pools be used? Anything related to storage of installation media - ISO files and virtual machine files
VMware introduced virtual volumes in ESXi 6.0 - object based storage that can use block and NFS.
iSCSI and SAN#
Using iSCSi for vm storage is the common thing to do.
Efficiency is compomised on it because:
- iSCSI encapsulates SCSI commands into regular IP packets
- It is TCP based - sequence numbers and retransmissions - leading to queuing and latency.
It is easier to deploy as it uses the ethernet stack
It is difficult to explain to customers that using the same network switches for VM traffic and iSCSI traffic is not a good idea.
FC and iSCI need a target and an initiator. The target is the server and the initiator is the client. The initiators identity is sued to limit what it can see on the target.
The iSCSI initiators identity can be defined by 4 different properties:
- iSCSI Qualified Name (IQN) - unique name like MAC or IP
- IP Address - Every initiator has a seperate IP address
- MAC Address - Every initiator has a different mac
- FQDN (Fully qulified domain name) - Name of the server as it’s resolved by a DNS service
Using the above we create a mask which we pair to a LUN
LUNs are raw block capacities we export via iSCSI target to initiators. LUNs are indexed or numbered from 0 onwards.
For example:
Single iSCSI target with 3 LUNs:
- LUN0: 20GB
- LUN1: 40GB
- LUN2: 60GB
We can then configure a IQN to see all LUNs and another IQN to only see LUN1 and LUN2
Configuring an iSCSI target service:
yum -y install targetcli
systemctl enable --now target
Allow 3260/tcp on your firewall - the port that iSCSI target uses.
firewall-cmd --permanent --add-port=3260/tcp
firewall-cmd --reload
In linux there are 3 options for an iSCSI device:
- Regular filesystem (XFS)
- A block device (hard drive)
- LVM (Logical Volume Manager)
For our example:
- LUN0 (20GB) XFS on /dev/sdb
- LUN1 (40 GB) hard drive on /dev/sdc
- LUN2 (60GB) LVM on /dev/sdd
Run targetcli from command line
-
Partition the disk to /dev/sdb
fdisk /dev/sdb
-
Format the partition XFS, use a directory called
/LUN0to mount the filesystem and serve theLUN0image.mkfs.xfs /dev/sdb1 ; mkdir /LUN0; mount /dev/sdb1 /LUN0
-
Configure
target-clito create LUN0target-cli /iscsi create /backstores /backstores/fileio create LUN0 /LUN0/LUN0.img 20000M write_back=false ls
-
Create
LUN1from the block devicetarget-cli /backstores/block create name=LUN1 dev=/dev/sdc1
-
prepare a physical volume for LVM - display info about that volume
pvcreate /dev/sdd; vgcreate iSCSI01 /dev/sdd; vgdisplay iSCSI01
-
Create the logical volume
/backstores/block create name=LUN2 dev=/dev/iSCSI01/LUN2
-
Install the iSCSI initiator on KVM
yum -y install iscsi-initiator-utils
-
Configure the IQN - usually IQN should remind of the hostname
vim /etc/iscsi/initiatorname.iscsi
InitiatorName=iqn.2019-12.com.packt:PacktStratis01
-
Now on the iSCSI create a ACL (Access Control List)
cd
cd acls create iqn.2019-12.com.packt:PacktStratis01 -
Publish the block and file based devices to the iSCSI target LUNS
cd luns create /backstores/fileio/LUN0 create /backstores/block/LUN1 create /backstores/block/LUN2
-
Go back to KVM and define a storage pool to use the LUNs the easiest way is with an XML file:
vim iSCSIPool.xml
MyiSCSIPool /dev/disk/by-path Tell libvirt to use iscsi
virsh pool-define –file iSCSIPool.xml virsh pool-start –pool MyiSCSIPool virsh pool-autostart –pool MyiSCSIPool
Get available LUNs with:
virsh vol-list --pool MyiSCSIPool
Storage Redundancy and Multipathing#
Avoiding the single point of failure
Redunancy can be combined with multipathing for higher throughput.
Connecting a host to FC storage with 2 controllers with 4 ports each - we can use 4 paths if it is active-passive or 8 if it is active-active.
iSCSI multipathing is complex - configuration issues, blank spots in documatentation.
Some products that use KVM support iSCSI out the box oVirt and RHEV-H (Red Hat Enterprise virtualisation Hypervisor)
More info on setting it up with ovirt
Gluster and Ceph as a Storage Backenf for KVM#
Gluster#
- A distributed filesystem - used for high availability.
- Scalable.
- Can use replication and snapshots
- Used for shared storage: NFS and SMB
- A file storage service (not block or object based storage)
- At least 3 gluster servers are need for high availability
Example: 3 machines host the gluster filesystem - then the filesystem is mounted on the hypervisor as a local directory. We can use glusterFS directly from libvirt - but is better using gluster client services - mounting it directly and using a storage pool in libvirt.
Object-based storage for block-based devices means direct, binary storage, directly to a LUN? No filesystems involved.
Basic setup for gluster:
yum -y install epel-release*
yum -y install centos-release-gluster7.noarch
yum -y update
yum -y install glusterfs-server
systemctl reboot
Deploy repos and packages, format disks and configure firewall:
mkfs.xfs /dev/sdb
mkdir /gluster/bricks/1 -p
echo '/dev/sdb/gluster/bricks/1 xfs defaults 0 0' >> /etc/fstab
mount -a
mkdir /gluster/bricks/1/bricks
systemctl disable firewalld
systemctl stop firewalld
systemctl start glusterd
systemctl enable glusterd
Make sure 3 hosts can resolve each other
vim /etc/hosts
192.168.159.147 gluster1
192.168.159.148 gluster2
192.168.159.149 gluster3
Log into first server and make it the de facto management server for our gluster infrastructure
gluster peer probe gluster1
gluster peer probe gluster2
gluster peer probe gluster3
gluster peer status
Now we can create a glsuter distributed filesystem
gluster volume create kvm-gluster replica 3 \
gluster1:/gluster/bricks/1/brick
gluster2:/gluster/bricks/1/brick \
gluster3:/gluster/bricks/1/brick

gluster volume start kvmgluster
gluster volume set kvmgluster auth.allow 192.168.159.0/24
gluster volume set kvmgluster allow-insecure on
gluster volume set kvmgluster storage.owner-uid 107
gluster volume set kvmgluster storage.owner-gid 107
Then we mount gluster as an NFS directory for testing purposes. A distributed namespace kvmgluster to all member hosts gluster1, gluster2 and gluster3.
echo 'localhost:/kvmgluster /mnt glusterfs \ defaults,_netdev,backupvolfile-server=localhost 0 0' >> /etc/fstab
mount.glusterfs localhost:/kvmgluster /mnt
The gluster part is ready - now we need to look at KVM to mount the filesystem:
wget \ https://download.gluster.org/pub/gluster/glusterfs/6/LATEST/CentOS/gl\ usterfs-rhel8.repo -P /etc/yum.repos.d
yum install glusterfs glusterfs-fuse attr -y
mount -t glusterfs -o context="system_u:object_r:virt_image_t:s0" \ gluster1:/kvmgluster /var/lib/libvirt/images/GlusterFS
Now add this directory as a libvirt storage pool:
vim gluster.xml

<pool type='dir'>
  <name>glusterfs-pool</name>
  <target>
    <path>/var/lib/libvirt/images/GlusterFS</path>
    <permissions>
      <mode>0755</mode>
      <owner>107</owner>
      <group>107</group>
      <label>system_u:object_r:virt_image_t:s0</label>
    </permissions>
  </target>
</pool>
import using libvirt:
virsh pool-define --file gluster.xml
virsh pool-start --pool glusterfs-pool
virsh pool-autostart --pool glusterfs-pool
We should mount this pool automatically so libvirt has access to it:
vim /etc/fstab
gluster1:/kvmgluster       /var/lib/libvirt/images/GlusterFS \ glusterfs   defaults,_netdev  0  0
Using directory-based approach is better than the libvirt (and GUI interface virt-manager) approach:
- We can use gluster’s failover cabability - automatically managed by the glsuter utilities.
- We will avoid creating virtual machine disks manually
The failover config happens automatically - when the mount command is issued - gluster’s built in modules connect it to the first glsuter server which connects it to the others.
You can set the failover to be more aggressive:
gluster volume set kvmgluster network.ping-timeout number
for example - 2 seconds:
gluster volume set kvmgluster network.ping-timeout number
GLuster is a file based backend.
Ceph#
Ceph can act as file, block and object based storage.
Open Source software designed to work on any server or vm. It runs a algorithm called CRUSH (Controlled Replication under Scalable Hashing)
You scale ceph by adding nodes.
An internal ceph component RADOS (Reliable Autonomic Distributed Object Store) is used for snapshots, replication and thin provisioning.
Main services:
ceph-mon- cluster monitoring, CRUSH, OSD (Object Stored Daemon) mapsceph-osd- actual data storage, replication and recoveryceph-mds- metadata server
All data nodes must have the same configuration: same amount of memory, same storage controllers - plain HBA without RAID if possible. Placement groups split objects and place them in OSD’s in the optimal way.
You need at least 5 servers:
- 1 for administration
- 1 for monitoring
- 3 for OSDs

Make sure the hosts can resolve eachother with DNS or in /etc/hosts and configure to use the same NTP source
Install:
rpm -Uhv http://download.ceph.com/rpm-jewel/el7/noarch/ceph-release-1-1.el7.noarch.rpm
yum -y install ceph-deploy ceph ceph-radosgw
useradd cephadmin
echo "cephadmin:ceph123" | chpasswd
echo "cephadmin ALL = (root) NOPASSWD:ALL" | sudo tee /etc/sudoers.d/cephadmin
chmod 0440 /etc/sudoers.d/cephadmin
Get rid of selinux and firewall:
sed -i 's/SELINUX=enforcing/SELINUX=disabled/g'
/etc/selinux/config
systemctl stop firewalld
systemctl disable firewalld
systemctl mask firewalld
Add the hostnames to /etc/hosts:
echo "192.168.159.150 ceph-admin" >> /etc/hosts
echo "192.168.159.151 ceph-monitor" >> /etc/hosts
echo "192.168.159.152 ceph-osd1" >> /etc/hosts
echo "192.168.159.153 ceph-osd2" >> /etc/hosts
echo "192.168.159.154 ceph-osd3" >> /etc/hosts
Make sure admin can connect to all hosts:
On `ceph-admin` run `ssh-keygen`
Copy SSH public key to other nodes:
ssh-copy-id cephadmin@ceph-admin
ssh-copy-id cephadmin@ceph-monitor
ssh-copy-id cephadmin@ceph-osd1
ssh-copy-id cephadmin@ceph-osd2
ssh-copy-id cephadmin@ceph-osd3
Configure to use ceph-admin by default, in ~/.ssh/config:
Host ceph-admin
        Hostname ceph-admin
        User cephadmin
Host ceph-monitor
        Hostname ceph-monitor
        User cephadmin
Host ceph-osd1
        Hostname ceph-osd1
        User cephadmin
Host ceph-osd2
        Hostname ceph-osd2
        User cephadmin
Host ceph-osd3
        Hostname ceph-osd3
        User cephadmin
Configure ceph-monitor:
cd /root
mkdir cluster
cd cluster
ceph-deploy new ceph-monitor
Create a config file in the cluster directory ceph.conf:
public network = 192.168.159.0/24
osd pool default size = 2
configure ceph:
# Start the deployment process
ceph-deploy install ceph-admin ceph-monitor ceph-osd1 ceph-osd2 ceph-osd3
# configure monitor host
ceph-deploy mon create-initial
ceph-deploy gatherkeys ceph-monitor
# Clear disks and create partitions
ceph-deploy disk list ceph-osd1 ceph-osd2 ceph-osd3
ceph-deploy disk zap ceph-osd1:/dev/sdb  ceph-osd2:/dev/sdb  ceph-osd3:/dev/sdb
# Prepare filesystems for use and activate ceph
ceph-deploy osd prepare ceph-osd1:/dev/sdb ceph-osd2:/dev/sdb ceph-osd3:/dev/sdb
ceph-deploy osd activate ceph-osd1:/dev/sdb1 ceph-osd2:/dev/sdb1 ceph-osd3:/dev/sdb1
Expose Ceph as an object pool to the kvm host:
ceph osd pool create KVMpool 128 128
Create a key for authnetication so anon cannot access the pool:
ceph auth get-or-create client.KVMpool mon 'allow r' osd 'allow rwx pool=KVMpool'
Create the secret on the kvm host:
vim secret.xml

<secret ephemeral='no' private='no'>
   <usage type='ceph'>
     <name>client.KVMpool secret</name>
   </usage>
</secret>
define the secret:
virsh secret-define --file secret.xml
Use that uuid and secret
virsh secret-set-value 95b1ed29-16aa-4e95-9917-c2cd4f3b2791 AQB9p8RdqS09CBAA1DHsiZJbehb7ZBffhfmFJQ==
Now create the pool with ceph.xml:
<pool type="rbd">
     <source>
       <name>KVMpool</name>
       <host name='192.168.159.151' port='6789'/>
       <auth username='KVMpool' type='ceph'>
         <secret uuid='95b1ed29-16aa-4e95-9917-c2cd4f3b2791'/>
       </auth>
     </source>
</pool>
Import the pool and make it available permanently:
virsh pool-define --file ceph.xml
virsh pool-start KVMpool
virsh pool-autostart KVMpool
virsh pool-list --details
Virtual Disk Images, formats and basic KVM Operations#
Disk images are standard files stored on the hosts’s filesystem. They are as virtualised hard drives for guests.
dd if=/dev/zero of=/vms/dbvm_disk2.img bs=1G count=10
dd- duplicate data- from the
ifinput file of/dev/zerointo the output of/vms/dbvm_disk2.imgusing blocks ofbsblock size 1G and repeat this once10- naturally
dd is a resource hungry command - can use bs=1M count=10000 instead.
You use this space as boot disk or second disks for vms.
Formats:
preallocated- allocates the space right away - faster write speeds than thin provisionedthin provisioned- space allocated as needed - allowing for storage over-commit.
To create a thin provision - use the seek option with dd:
dd if=/dev/zero of=/vms/dbvm_disk2_seek.imgbs=1G seek=10 count=0
For IO performance go with preallocated but if you have non-IO intensive use thin-provisioned
To check the method you can use qemu-img.
# qemu-img info /vms/dbvm_disk2.img
image: /vms/dbvm_disk2.img
file format: raw
virtual size: 10G (10737418240 bytes)
disk size: 10G

# qemu-img info /vms/dbvm_disk2_seek.img
image: /vms/dbvm_disk2_seek.img
file format: raw
virtual size: 10G (10737418240 bytes)
disk size: 10M
The thin provisioned disk only has a size of 10M
Attaching the disk to the virtual manager#
More info in the book…
Creating an ISO image library#
Although the Guest OS can be installed form physical media by carrying a passthrough of the CD/DVD drive - it is not the most efficient way. Store ISO files in a file based storage pool.
Create an ISO image library:
mkdir /iso
chmod 700 /iso
semanage fcontext -a -t virt_image_t "/iso(/.*)?"
virsh pool-define-as iso_library dir - - - - "/iso
virsh pool-build iso_library
virsh pool-start iso_library
Verify it was created
virsh pool-info iso_library
Copy the iso’s into the library and refresh:
virsh pool-refresh iso_library
virsh vol-list iso_library
Deleting a Storage Pool#
You can do it with the virt-manager gui or virsh:
virsh pool-destroy MyNFSpool
virsh pool-undefine MyNFSpool
Creating Storage Volumes#
Can create it from the from virt-manager -> Storage
Disk formats supported by virsh: raw, cow, qcow, qcow2, qed, and vmdk
virsh vol-create-as dedicated_storage vm_vol1 10G
virsh vol-info --pool dedicated_storage vm_vol1
Deleting a volume with virsh
virsh vol-delete dedicated_storage vm_vol2
The latest developments in storage NVMe and NVMeOF#
A big disruption has been solid state drives.
Although a lot of people use them in mid-range storage devices and/or handmade storage devices that host ZFS pools (for cache).
Lower latency, faster and different protocol
Advanced Host Controller Interface (AHCI) are not good enough to handle the performance that SSD’s have - they were designed for spinning disks. Non-Volatile Memory Express (NVMe) bridges the gap with what SSDs can really do.
The best device to make our point is Dell/EMC’s PowerMax series of storage devices. If you load them with NVMe and SCM SSDs, the biggest model (8000) can scale to 15 million IOPS(!), 350 GB/s throughput at lower than 100 microseconds latency and up to 4 PB capacity.
6. Virtual Display Devices and Protocols#
Read this in the book…
7. Virtual Machines: Installation, Configuration and Life Cycle Management#
Creating a New VM with virt-manager#
virt-manager is a GUI tool for managing vms and virt-install is a commandline utility for managing vms.
You can create, stop, start and delete
virt-manager is the go to GUI tool to manage VMs
You connect to more KVM hosts with add connection...
You need username, hostname/ip and SSH key on the host.
Right click a host and select New VM
Install methods:
- Local install (ISO)
- Network install (HTTPS or FTP)
- Network boot (PXE)
- Import existing disk image
Usually Network install and network boot is used as local install requires lots of space of the disk images and are better stored in a central location on the network.
To install from network you need the URL (uniform Resource Locator), an internet connection and a kickstart option (.ks)
Then set CPU and memory. Then storage - ensure it is correct, migrating is a tedious and time consuming process. If you select create a disk image it will create it at /var/lib/libvirt/images
Creating from Command Line#
virt-viewer
Connect to a host:
virt-viewer --connect qemu:///system MasteringKVM01
SSH into a VM:
virt-viewer --connect qemu+ssh://username@remote-host/system VirtualMachineName
If no ssh key was added it will ask a password for the hypervisor, then a password for the vm Virtual Network Computing (VNC) session
virt-xml is used to change VM config
virt-xml MasgteringKVM04 --edit --boot bootmenu=on
then add a thin provisioned disk to the vm:
qemu-img create -f qcow2 /var/lib/libvirt/images/04-2.qcow2 1G
virt-clone is used to clone an existing vm
virt-clone --original VirtualMachineName --auto-clone
This will produce a vm name: VirtualMachineName-clone
virt-clone --connect qemu:///system --original MasteringKVM04 --name MasteringKVM05 --file /var/lib/libvirt/images/MasteringKVM05.qcow2 --file /var/lib/libvirt/images/05-2.qcow2
virt-convert convert from one virtualisation technology to another - the bulk of the work is converting the vm disk format
VMware uses a vmdk virtual disk and a .vmx file
If we want to convert it to qcow2
qemu-img convert -f vmdk -O qcow2 MasteringKVM06.vmdk MasteringKVM06.qcow2
A 1 TB file may take hours to convert
May need to edit config file as vmx to kvm format is not 100%
The default directory for KVM VM config files is /etc/libvirt/qemu in xml
They represent vm names from virsh list output
The cockpit web interface is also a good tool to do basic vm management on a KVM host
More info in the book on setting up cockpit…
Creating a New VM using oVirt#
Click Compute -> VMs -> New
It is a centralised management solution as opposed to vm installations on hosts. There are always a lot more options.
Configure at a minimum: name, network and vm network interface
Select the boot options with a virtual disk and attach a cd (iso)
Post installation can be customised with sysprep or cloud-init
oVirt is good if you have more than 2 hosts.
Important aspects are CPU topology (Sockets/Cores/Threads) and non-uniform memory access (NUMA). This becomes important if your vms host I/O intensive applciations - such as databases.
Boot options: can set the vm to boot with the host
VirtIO Disk 1 options:
Disk bus- vmware esxi, hyper-V and KVM have different virtual storage controllers. VMware hasBusLogic,LSI,Logic,Paravirtual…hyper-V hasIDE - Intergrated Drive Electronics,SCSI - Small Computer System Interface. It defines the storage controller the vm is going to use inside the guest OS.Storage Format-qcow2andraw/ddformat -qcow2offers the most flexibility: thin provisioning and snapshotsCache mode- 6 types:writethrough,writeback,directsync,unsafe,noneanddefault. How data gets written from I/O to the storage underlay. Generallynoneis the best for vm maangement.IO mode- eithernativeorthreads. Withqcow2it is generally accepted thatqcow2is better.Discard mode- 2 modes calledignoreandunmap. When you delete files theqcow2disk file will shrink.Detect zeroes-off,onorunmap
Adding and Removing Virtual Hardware from your VM#
You can add more hardware - for example an additional Network interface card.
Migrating VMs#
Migration enables moving a vm from one host to another host - with minimal or no downtime. We can also migrate vm storage.
Types of migrations:
- Offline (cold)
- Online (live)
- Suspended migration
You can move:
- The compute part to another host
- The storage part from one storage pool to another storage pool
- Both
A live storage migration can’t be done on a KVM host directly, but can be done if the VM is shut down. If you need a live storage migration you need to use oVirt or Red Hat Virtualisation.
You can’t live migrate vms that use SR-IOV (Single root input output virtualisation), PCI (Peripheral Component Interconnect) and vGPU (virtual graphics processing unit) passthrough.
Migrations need to be performed as root or as libvirt
Benefits of VM Migration#
- Increased uptime and reduced downtime
- Saving energy and going green - move and power off unused hypervisors during offpeak hours
- Easy hardware and software upgrade process
Requirements for migrations
- VM should be using a storage pool that is on shared storage - ie. not local
- The name of the storage pool should remain teh same on both hypervisors (hosts)
If there is an unmanaged virtual disk attached to a VM that uses a Fiber Channel (FC), an Internet Small Computer Systems Interface (iSCSI), Logical Volume Manager (LVM), and so on, the same storage should be available on both hypervisors.
A few otehr requirements in the book: DNS, NTP etc.
Setting Up the Environment#
Set up the shared storage: NFS (Network File System)
NFS is simple to setup. In production you would use FC (Fibre channel) or iSCSI based storage pools.
NFS is not a good choice with large files and heavy I/O.
Gluster is a good alternative.
We are creating an NFS share on centOS hosted in /testvms folder which we will export via NFS.
Name of the server: nfs-01 at 192.168.159.134
-
Create the directory and export it
mkdir /testvms echo ‘/testvms *(rw,sync,no_root_squash)’ >> /etc/exports
-
Allow NFS service in the firewall
firewall-cmd –get-active-zones firewall-cmd –zone=public –add-service=nfs firewall-cmd –zone=public –list-all
-
Start the NFS service
systemctl start rpcbind nfs-server systemctl enable rpcbind nfs-server showmount -e
-
Confirm the share is accessible
mount 192.168.159.134:/testvms /mnt
-
Unmount once confirmed successful
umount /mnt
-
On both hosts create a storage pool
mkdir -p /var/lib/libvirt/images/testvms/ virsh pool-define-as –name testvms –type netfs –source-host 192.168.159.134 –source-path /testvms –target /var/lib/libvirt/images/testvms/ virsh pool-start testvms virsh pool-autostart testvms
Next step isolate the migration and vm traffic
Freeing up the congested network
The migraiton of a vm uses full bandwidth
Here is how the isolation is created:
PacktPhy01 -- ens36 (192.168.0.5) <--switch------> ens36 (192.168.0.6) -- PacktPhy02
ens37 -> br1 <-----switch------> ens37 -> br1
ens192on those 2 hosts are used for migrations and administrative tasks - they have an ip and are connected to a network switch- A
br1bridge is created usingens224on both hosts br1does not have an ip address assigned and is used only for VM traffic
Security reasons - keep management network and virtual network isolated - you don’t want users to mess with the management network
Offline Migration#
VM has to be shut down or suspended.
Libvirt copys the vm’s xml file from source to destination host.
The hosts must be able to access each other over SSH and use the same storage pool.
Disable selinux, set /etc/sysconfig/selinux from enforcing to permissive
Format of migration is:
virsh migrate migration-type options name-of-the-vm-destination-uri
eg.
virsh migrate --offline --verbose –-persistent MasteringKVM01 qemu+ssh://PacktPhy02/system
On PacktPhy02:
virsh list --all
virsh start MasteringKVM01
You might have a situation where the same vm is on 2 hypervisors - it happens when manually managing KVM hosts without a centralized control plane like ovirt.
Accidently starting the same guest on 2 different hosts can lead to VM filesystem corruption - especially when the filesystem is not cluster aware.
In the book - how to use lockd to fix this problem…
Live or Online Migration#
Migrating while the vm is in use. KVM does not need support from the VM - so regardless of operating system the VM can be migrated. On KVM it works on AMD and Intel.
5 steps complex process:
- Preparing the destination
- Transferring the VM
- Stopping the VM on the source
- Transferring the VM state
- Continuing the VM
Alot more info in the book…
Red Hat more info on Migrating
8. Creating and Modifying VM Disks, Templates and Snapshots#
Modifying VM images using libguestfs tools#
libguestfs - cli library for working with vm disks
guestfish- accessing and modifying vm filesvirt-buildervirt-builder-repositoryvirt-copy-invirt-copy-outvirt-customizevirt-dfvirt-editvirt-filesystemvirt-rescuevirt-sparsifyvirt-p2v- convert a physical machine to a vmvirt-v2v- convert from virtualisation (hyper-V, VMware, Xen) to Virtualisation (KMV, Ovirt, RHEV, OPenStack)virt-sysprep- prep vm before templating and cloning
VM Templating#
A prebuilt outline od the vm:
- CPU
- Memory
- IP Configuration
- VLAN configuration
- Windows vms and licenses
- Linux vms and SSH, config and license
We can avoid repetition of craeting vms, installing OS, installing required packages.
- Full clone - complete copy uses the same amount of capacity as the original vm
- Linked clone - Uses template as the base image in readonly mode, links additional copy on write (COW) to store newly generated data. Heavily used in Virtual Desktop Infrastructure (VDI) - save money
Creating templates:
- Install requirements and customise the vm
- Remove all system specific properties - SSH host keys, network configuration, user accounts, MAC address, license info
- Mark the vm as a template with naming (eg. VMware .vmtx file)
Setting up:
- Software install
- Enabling services
- Setting up firewall
- Security: mysql_secure_installation
- Expire root password to change on first login:
passwd --expire root
Shut down the vm:
virsh shutdown LAMP
sleep 10
virsh list
Prep:
virt-sysprep -d LAMP
Check operations:
virt-sysprep --list-operation

virt-sysprep --operations ssh-hostkeys,udev-persistent-net -d LAMP
Set the name as template now, backup the xml and undefine the vm from libvirt. This vm template should never be started
virsh domrename LAMP LAMP-Template
More info in the book for windows template…
Deploy VM Templates#
- Open
virt-managerand selectLAMP-Template - right click and say clone VM
- Set the name and clone
That is full cloning
Linked cloning will save alot of disk space…info in the book
Virt-builder and virt-builder repos#
If you don’t want to build a vm from scratch
virt-builder --list | grep -i ubuntu

virt-builder centos-8.0 --size=10G --root-password password:packt123

virt-install --import --name VBuilder-Test-Ubuntu --ram 2048 --disk path=ubuntu-16.04.img,format=raw --os-variant ubuntu16.04
Snapshots#
VM snapshot is a file-based representation of the system state at a particular point in time. Including config and disk data.
With a snapshot you can revent a vm to a point in time. Before doing a dangerous task - better to take a snapshot.
You can snapshot while the vm is running - but if very I/O intensive it is better to shut down and suspend.
2 types of snapshots:
- Internal snapshot: Based on
qcow2files, vm paused while taking snapshot, Doesn’t work with LVM storage pools. GUI support. -
External snapshot: original disk becomes read only, new overlay disk used for reads and writes. Overlay is always
qcow2. No GUI support.virsh snapshot-list LAMP01
virsh has a few options:
snapshot-create- Use xml file to create snapshotsnapshot-create-as- Use argument list to createsnapshot-current- Get or set the current snapshotsnapshot-delete- Delete vm snapshotsnapshot-dumpxml- Dump snapshot config as xmlsnapshot-edit- Edit xml for snapshotsnapshot-info- Get snapshot informationsnapshot-list- List VM snapshotssnapshot-parent- Get snapshot parent name-
snapshot-revert- Revert to specific snapshotvirsh snapshot-create LAMP01
virsh snapshot-create-as LAMP01 –name “Snapshot 1” –description “First snapshot” –atomic
See parent child relationship:
virsh snapshot-list LAMP01 --parent
Get more info about snapshot:
qemu-img info /var/lib/libvirt/qemu/LAMP01.qcow2

qemu-img check /var/lib/libvirt/qemu/LAMP01.qcow2
Revert to a snapshot after messing up:
virsh snapshot-revert <vm-name> --snapshotname "Snapshot1”
Delete a snapshot
virsh snapshot-delete LAMP01 Snapshot 2
More on external snapshots in the book
Best Practices using Snapshots#
- Snapshots are not backups - they are a point in time not to be relied upon
- Don’t keep a VM with a snapshot associated with for a long time - delete it once used
- Use external snapshots where possible - lower chance of corruption
- Limit the snapshot count - hits vm and host poerformance - qemu has to trawl through images
- Better to have the guest agent on the vm
- Always use the
--quiesceand--atomicoptions while taking snapshots
More on Libguestfs
9. Cloud-init#
Initialising more than 3 vms becomes difficult, repetitive and prone to failure. There are too many combinations of config for it to be managed in templates.
Another problem is compatability - every distro has its own way of doing things.
- CentOS has kickstart
- ubuntu/debian has preseed
- Suse has AutoYast
Another tool would be to use ansible - to deploy templates and then do the customisation. However is does not solve mass deployment?
Cloud-init#
Uses boot stages - it needs fine grained control over the boot process.
The prerequisite for cloud-init is a cloud-init image.
Five stages of boot:
generator- determine whether cloud-init is enabled.local- Locates local data sources and applies networking configurationnetwork- brings up the previously configured network and sets settings. Disks will be formatted and partitioned. Mount points will be created.config- configures the rest of the system. Add repos, SSH key.final- runs things that belong in userland - installing packages, plugins and user scripts
The advantage is a single image (template) with many cloud-init configuration files
Usually managed by puppet or ansible - using yaml files.
It supports:
- Ubuntu
- OpenSUSE
- CentOS/RHEL
- Fedora
- Gentoo
- Debian
- Arch Linux
- FreeBSD
cloud-init can automatically detect.
cloud-init works with any other virtualisation platform without customisation.
Installing and Configuring Cloud-init at boot time#
Cloud-init runs as a service.
Cloud Init Images#
Cloud init images have a semi-installed image.
https://cloud-images.ubuntu.com/
Cloud-init Data Sources#
- user data
- meta data
Everything is put into /run/cloud-init/instance-data.json at runtime.
Passing Meta Data and User Data to Cloud-init#
We need to create an iso image connected to the cloud template via virtual CD-ROM.
- Create config files
- Create the image that contains teh data in the right place
- We need to associate the image with the template at boot time
The packages used in all distributions to enable cloud-init support are:
cloud-init- things needed to reconfigure during bootcloud-utils- used to create a configuration that is applied to a cloud image
OpenStack, oVirt, or RHEV-M have direct ways to speak to cloud-init
There are dozens of cloud-init modules available:
- SSH
- yum
- apt
- hostname
- password
- locale
Cloud-init has a puppet package and some ditribution specific packages like yum and apt
Cloud-init is first and foremost cloud-agnostic - not distribution agnostic
Examples#
Download the cloud images and resize them to ensure the disk size is big enough to accomodate all the files put on it
Download the image and get info about it
qemu-img info bionic-server-cloudimg-amd64-vagrant.box

qemu-img resize bionic-server-cloudimg-amd64-vagrant.box 10G
Store the images in: /var/lib/libvirt/images
Use our images as base images:
qemu-img create -f qcow2 -o backing file=/var/lib/libvirt/images/bionic-server-cloudimg-amd64-vagrant.box
Name the file meta-data:
local-hostname: deploy-1
In user-data:
# cloud-config
users:
    - name: cloud
      ssh-authorized-keys:
        - ssh-rsa AAAA...
      sudo: ['ALL=(ALL) NOPASSWD:ALL']
      groups: users
      shell: /bin/bash
runcmd:
  - echo "AllowUsers cloud" >> /etc/ssh/sshd_config
  - restart ssh
Create an ssh key with:
ssh-keygen
You can set a password with passwd: - better to use hashes of passwords instead of cleartext
We configure sudo permission for the user
runcmd defines what happens after installation finishes.
Connecting the files can be done:
cdromiso method- host the files on the network
For the cdrom way (ensure the meta-data, user-data and image are in the directory):
genisoimage -output deploy-1-cidata.iso -volid cidata -joliet -rock user-data meta-data
Now to deploy:
virt-install --connect qemu:///system --virt-type kvm --name deploy-1 --ram 2048 --vcpus=1 --os-type linux --os-variant generic --disk path=/var/lib/libvirt/images/deploy-1/centos1.qcow2,format=qcow2 --disk /var/lib/libvirt/images/deploy-1/deploy-1-cidata.iso,device=cdrom --import --network network=default --noautoconsole
You can view what happened in a log:
/var/log/cloud-init.log
For more instances - you still need to change the hostname?
virt-install --connect qemu:///system --virt-type kvm --name deploy-2 --ram 2048 --vcpus=1 --os-type linux --os-variant generic --disk path=/var/lib/libvirt/images/deploy-2/bionic.qcow2,format=qcow2 --disk /var/lib/libvirt/images/deploy-2/deploy-2-cidata.iso,device=cdrom --import --network network=default –noautoconsole
Check ip address:
virsh domifaddr deploy-1
More on cloud-init
10. Automated Windows Guest Deployment and Customization#
Read about this in the book
11. Ansible and Scripting for Orchestration and Automation#
The main one is the fact that Ansible Tower uses specific release versions while AWX takes a more what OpenStack used to be approach – a project that’s moving forward rather quickly and has new releases very often.
Provisioning a virtual machine using the kvm_libvirt module#
Disable host key checking on many machines
Ad hoc commands:
ansible all -m ping
hostnames:
ansible all -m shell -a "hostname"
Make sure lighthttpd is uninstalled:
ansible all -m yum -a "name=lighttpd state=absent
Repo for installing kvm on centOS 7
This is a more recent role to install kvm
Cloud-init and Ansible#
You can also use cloud-localds to create the image:
cloud-localds config.iso config.yaml
So the folder /cloud-deploy should contain:
ubuntu-image.qcow2config.iso
In the playbook the iso and image is copied with copy to /var/lib/libvirt/images/cloudsrv1
Then a command to run virt-install
Get dhcp info:
ansible cloudhosts -m shell -a "virsh net-dhcp-leases –-network default
List vms:
ansible cloudhosts -m shell -a "virsh list –all”
Get cloud info:
ansible cloudhosts -m virt -a "command=info
12. Scaling out KVM with Openstack#
Openstack#
Openstack is a cloud operating system. Controls a large number of different resources.
The need is for creating private and public clouds independent of any commercial cloud platform.
All the info on openstack is on their website
Every service in openstack has its own project name
Swift - Openstack Object Store
Basic cloud provider problems:
- Compute problems: CPU + memory. If tenants need more computer - buy more servers. If a SLA (service level agreement) is needed we look at resource pools
- Storage problems: As you scale storage capacity, management and monitoring of performance becomes messy. Performance is measured by read and write throughput and read and write IOPS. As you grow performance bottlenecks will arise - more storage device capacity but requires more configuraiton and money.
- Network problems: AS it grows you need thousands and thousands of isolated networks - so that tenants cannot communicate with one another. Also multiple networks implemented with VLANs in non-cloud networks per tenant. Key in this problem is the SDN.
Software Defined Networking#
Virtual LAN ID
Using vlan id the network administrator can divide a physical network into seperate logical networks. The vlan part of an ethernet header can have up to 12 bits. allowing for 4096 - where 0, 1 and 4095 are reserved.
We are left with 4093 seperate logical networks.
Not enough for public cloud providers.
If we have 5000 tenants that each need 5 logical networks - seperated, isolated or fenced. They need to be routable and scalable.
The problem was competed to be solved - called cloud overlay networks. There are multiple standards to solve this problem: VXLAN, GRE, STT, NVGRE, NVO3
THe best in the context of today (VXLAN) and the best in the context of tommorow (GENEVE)
What is an overlay network?
Networks built on top of other networks - in the same infrastructure. To disentangle the physical parts from the logical parts.
Understanding VXLAN#
(IETF RFC 7348) is an extensible overlay network standard that enables us to aggregate and tunnel multiple Layer 2 networks across Layer 3 networks
It encapsulates a layer 2 packet inside a layer 3 packet - in UDP on port 4789
The requirement is your physical network must support MTU of 1600 up to expensive switches supporting a MTU of 9000
VXLAN use tunneling between 2 VXLAN endpoints called VTEPS - VXLAN Tunneling Endpoints that check Vxlan Network Identifiers (VNIs)
The VNI field to VXLAN is same as VLAN ID is to VLAN. VNI field is 24 bits.
Why is UDP used?
TCP’s three-way handshakes and retransmissions - means too much latency and overhead at scale
VTEP’s are 2 interfaces that can encapsulate and decapsulate traffic based on VNIs
VTEPs map a tenant’s vms and devices to VNIs
A cloud overlay network can be implemented with Openstack Neutron or Open vSwitch.
There is a gentleman’s agreement to not use VXLANs from 1-4999 - because we still want vlans in the reserved range of 0 to 4095
VNIs start at 5000
VXLAN allows:
- stretching layer 2 across sites
- layer 2 bridging - bridging a vlan to a cloud overlay network (like vxlan) - used to physically insert a hardware device into a vxlan. Without this people running proprietary oracle database appliance could not connect it to the cloud infrastructure
- offloading technologies - load balancing, antivirus, vulnerability scanning
Stretching layer 2 across sites (or different continents) would force to use a layer 2 VPN or MPLS based technology.
Service providers aren’t happy with “give me MPLS” or “give me layer 2 access” requests - especially when including mutlicast.
VTEPS can talk to each other.
Understanding GENEVE#
The problem is different cloud overlay technologies from different vendors don’t work well with each other.
The authors of GENEVE learnt from BGP, IS-IS, and LLDP
Embraced in Open vSwitch and NSX-t
Openstack Components#
First formed as 2 services:
- computing service to run virtual machines (Openstack Compute or Nova)
- storage service for large scale object storage (openstack Object Store or Swift)
Later joined by:
- Glance or Openstack Image Service
- Neutron - SDN or Network-as-a-Service
Swift#
Swift is a highly available, distributed, eventually consistent object/blob store. Organizations can use Swift to store lots of data efficiently, safely, and cheaply. It’s built for scale and optimized for durability, availability, and concurrency across the entire dataset. Swift is ideal for storing unstructured data that can grow without bounds.
Objet stores are not accessible through any filesystem - we manipulate as objects and must use the API.
Swift is not a solution for low latency - synchronous data storage.
Eventual consistency means swift will eventually reconcile the differences not immediately.
Swift Daemons:
swift-account- accounts and meta dataswift-container- map data into containersswift-object- manages mapping to actual objects - tracks location and availability
Nova#
An orchestration service that is used for providing both provisioning and management for computing instances at a large scale
An API to allocate, create, reconfigure, destroy.
Complex distributed system written in python. It is a WSGI (Web server gateway interface) - a python web app. It also has a database and message queue.
Nova uses RabbitMQ.
Reporting tools and debugging exist.
Consists of:
nova-api- API task intiatorscheduler- goes through queue and determines where and when a request should run by simple, chance or zone scheduling.nova-network- daemon - all network stuff but has come obsolete afterNewtonlaunchnova-volume- handles storage volumes and connections such as iSCSI, AoE targetted at the protocols: Sheepdog, LeftHand and RBD which conver connections to things like Ceph and HP Lefthandnova-compute- create and destroy virtual machines - supports KVM, Xen, QEMU, LXC and UML (User Mode Linux) - can also support Esxi and hyper-V
Glance#
Image registry.
NFS is okay to use but Swift and Amazon S3 can also be used.
Every disk format is supported by Glance: raw, vhd, vmdk, qcow2, vdi, ami
Horizon#
GUI dashboard
security, networking, access rights, users, containers, volumes
Plugin marketplace
Designate#
Name resolution - DNS.
Keystone#
Identify management. User management will scale. Now we are talking domains of thousands of users - seperated by groups and roles.
- Users, groups and roles
- OpenIDC
- SAML
- Local DB of users
- LDAP
Neutron#
Cloud networking backend Similar to NSX
plugins:
- Open vSwitch
- Cisco UCS
- Brocade neutron plugin
- IBM SDN-VE
- Vmware NSX
- Juniper OpenContrail
- Linux Bridging
- ML2 - Modular Layer 2 - VLAN, GRE, VXLAN - with vendor based plugins: Arista, Cisco, Avaya, Mellanox, Vmware
Supported network categories:
- Provider networks: external connections on a physical level - flat (untagged) or 802.1q tagged vlans
- Tenant networks, self service networks, project networks - isolated and backed by overlay: GRE or VXlan
Tenant networks usually use SNAT - implemented by virtual routers.
- First, when designing a cloud, you must try and get all the information about possible loads and your clients as soon as possible, even before a first server is booted.
Packstack (POC)#
Packstack is a utility that uses Puppet modules to deploy various parts of OpenStack
More info in the book on setup and administration
13. Scaling out KVM with AWS#
More in the book…
We compared probably every possible metric that made any sense, from IOPS, through GHz, to PPS on the network side, but the cloud is not only a technical problem – when you have to put it in use, someone has to pay for it.
Eucalyptus is a IaaS tool that mimics AWS on a local environment. Has no multi tenancy - not suitable for service providers.
14. Monitoring KVM#
ELK (Elasticsearch, Logstash and Kibana)
Info in the books for setting this up
You can use kvm’s dommemstat to send the data to elasticsearch
15. Performance Tuning and Optimisation for KVM Vms#
Info on design and hardware choices in the book:
- Hardware design and planning
- SQL database setup
- CPU pinning - setting affinity between vCPU and physical CPU
- Memory tuning
- VirtIO device tuning
- Block I/O tuning
- Network I/O tuning
16. Troubleshooting Guidelines#
Important info - if you are a KVM admin it is important to read this book