Deploying To Openshift
Deploying to Openshift#
Openshift is a platform for deploying web applications and services, using containers and SE Linux.
Secure multitenant environment for enterprise
It can be deployed on your own infrastructure or on public cloud’s. Openshift online is red hat’s own hosting service.
It uses the industry standard Kubernetes from the Cloud Native Computing Foundation (CNCF) for running and managing containers at scale. Any applications can be run that adheres to the OCI (Open container initiative) - except those that use the root user to build an image.
You can use the image of predefined images or bring your own container image.
With support in OpenShift for features such as persistent volumes, you are not limited to just running stateless 12-factor or cloud-native applications
You can also deploy databases and many legacy applications that you otherwise would not be able to run on a traditional Platform as a Service (PaaS) offering
1. The Openshift Container Platform#
- Launched May 2011
- Always implemented on top of containers
- In June 2013 a major rewrite began
- In June 2015 - Openshift Origin: based around Kubernetes and the docker container runtime was released.
It is a platform to help you develop and deploy applications
The only requirement is that the application can run in a container
Openshift has other security related requirements
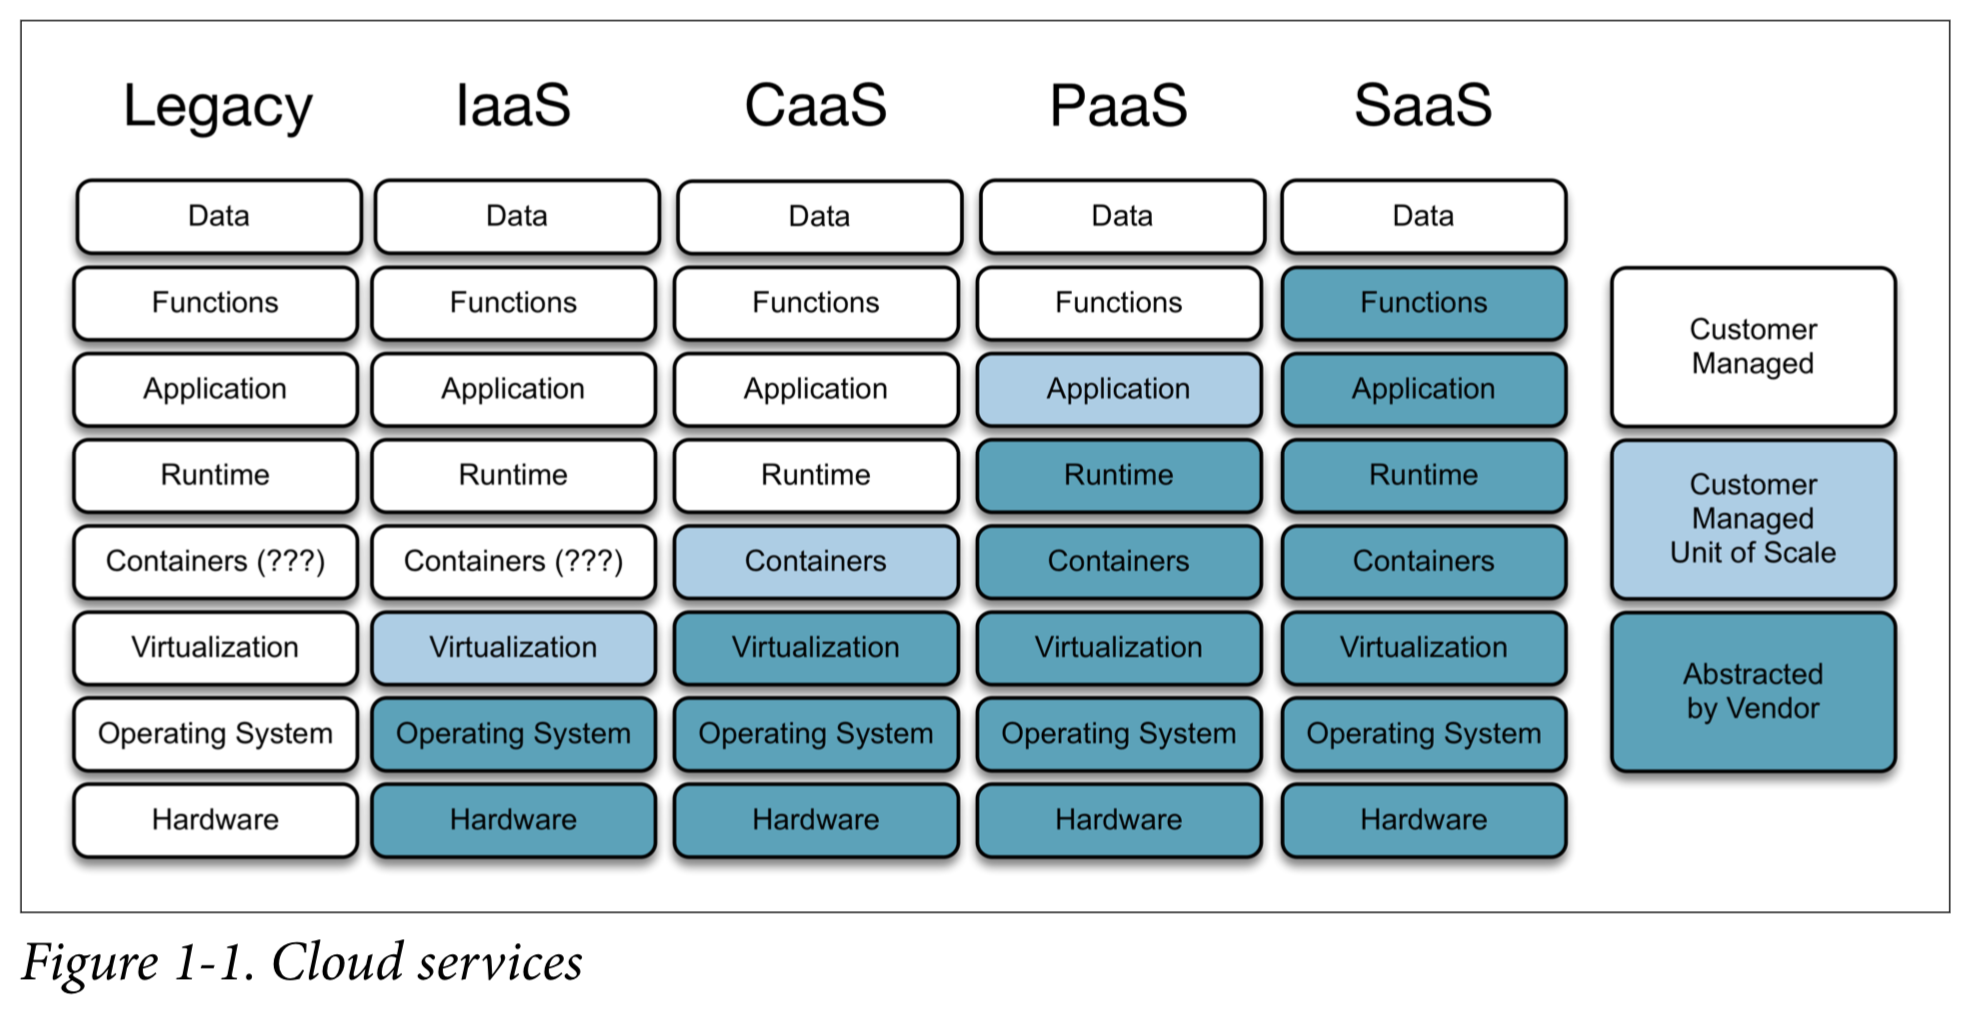
Service Models of Cloud Computing#
- Saas (Software as a service) - consumer use provider’s application in the cloud with a thin client interface
- Paas (Platform as a service) - consumer can deploy programming languages, libraries and services onto the cloud infrastructure of the provider
- Iaas (Infrastruture as a service) - consumer can provision processing, networks and storage. Consumer controls operating system and perhaps firewall (networking components)
Openshift is Paas
In 2013 DotCloud announced the docker tool, it addressed 2 issues:
- a common packaging format for an image
- tooling for building the image
This made it possible to create applications that could be easily moved between systems, to be run in a container with a higher confidence that it would work.
Orchestrating at Scale#
Docker made it easy to build application images and run single applications in a container on a single host
Scaling the application required additional software - which did not exist, so companies had to create their own.
In mid-2014 Google announced Kubernetes - an open source system for automating deployment, scaling, and management of containerized applications. Openshift had been implementing its own orchestratino layer. After Kubernetes was announced Red Hat dropped it and adopted Kubernetes.
Kubernetes 1.0 was released in July 2015, it has since become the de facto standard for container orchestration.
Container as a Service#
Kubernetes does not fit existing service models (Saas, Paas and Iaas). So it is called Caas - Container as a service. Similar to Iaas but instead of getting a VM you get a Container.
To run your application in a CaaS, you need to provide the application image you have built, which contains your application and any operating system libraries and programs you require. Although an application image contains a copy of these operating system libraries and programs, it is only your application process that is run.
Platform as a Service#
Kubernetes alone does not pro‐ vide any support for building the container image
You need to run a build tool to create your application image on a separate system and push that to an image registry from which it can be deployed.
In a Paas you would just provide the source code and the Paas would setup libraries and versions on programming languages.
To provide traditional Paas capabilities:
OpenShift can take your application source code and, using a builder for the programming language you are using, create your appli‐ cation image. You as a developer do not need to provide instructions on how to create the container image; the platform will do this for you.
OpenShift can also accept source code that includes a set of instructions to create the application image in a Dockerfile. YOu have to do this yourself using docker, but Openshift can do this for you.
- Openshift will cache the application image in an image registry that it provides
- The application will be deployed from this internal registry
ie. You don’t need to have the docker tool on your own system - nor do you need a seperate image registry.
So Openshift can pull the source code from a remote git repo - gitlab, github or bitbucket. You configure git to notify openshift of repo changes which can trigger a new build and deployment of your application.
Meaning you don’t need to interact with openshift directly.
Deploying your Application#
Openshift is both a Caas and a Paas. A general purpose container orchestration platform. So you can deploy your own bespoke applications or third party applications and db’s.
2. Running an Openshift Cluster#
Various options for using openshift:
- Openshift Online by Redhat (public cloud)
- Run on your own Infrastructure (Openshift OKD)
Using Openshift Online#
- Publicly hosted openshift
- Free starter tier for testing and development
Installing Openshift OKD (Previously Origin)#
- Recommended install is a set of ansible playbooks
- Info on Planning and Clustering your Installation for Advanced Install
- You can run your own instance but have access to professional support with Openshift Container Platform licensing
Launching using Minishift#
Minishift: Develop applications locally in a containerised OKD Cluster
- Prebuilt in a VM
- Not a distribution itself - it is a tool to setup a VM containing openshift.
- requires a different hypervisor per OS (xhyve, KVM or Hyper-V)
Minishift installation instructions
There is alot more info about setting this up in the book.
3. Accessing the Openshift Cluster#
To deploy your applications to Openshift you either use:
- Openshift web console
- the
occommand-line client
You first have to login to the cluster
It is a multitenant environment
You will need to be familiar with the openshift command line tool: oc
Always use an oc version that matches the version of openshift you are using
You will typically login with:
oc login https://api.starter-us-east-1.openshift.com --token=Sbqw....T3UU
You can also login with username and password if you are not using an external identity provider
Using the Openshift Rest API#
The web console or oc client communicates with the REST API endpoint.
You can access this rest api directly with an HTTP client
It has a Swaagger (Open) API Spec
The same access token can be used for the Rest API
curl -H "Authorization: Bearer 1CFH...ND5o" "https://api.starter-us-east-1.openshift.com/oapi/v1/users/~"
You can get your token with:
oc whoami -t
To view the rest api calls made from the oc tool use --loglevel 9:
oc whoami --loglevel 9
4. Adding Applications to a Project#
You always work in the context of a project
Any application you deploy within a project is only visible to other applications running in the same project - unless you make it public.
You would deploy multiple applications in the same project if they are tightly coupled.
- the name must be unique across the whole openshift cluster
- lower case letters, numbers and undercore
Projects can also be created from the command line
oc new-project myproject --display-name "My Project"
List all projects
oc projects
The openshift project is a special project that acts as a repository for images and templates available for use by everyone in the OpenShift cluster
Adding a collaborator#
admin- project manager - right to view any project any resource and delete. Cannot modify quota.edit- can modify most objects but cannot view or modify roles or bindingsview- cannot modify but can view
To add another user:
oc adm policy add-role-to-user edit <collaborator>
To remove a user from a project:
oc adm policy remove-role-from-user edit <collaborator>
You can view project membership from the web console from the projects listing and clicking the 3 dots and selecting View Membership
Deploying Applications#
Main methods for deploying an application:
- From an existing container image on a remote image registry (dockerhub)
- From an existing container image imported into openshift’s internal image registry
- From application code in a git repo - which would be built into an image with the
S2Ibuilder - From image source code in a git repo using the
Dockerfile - From application code pushed to Openshift from the local filesystem using the
occlient - build withS2Ibuilder - From image source code pushed to openshift using
oc, using theDockerfile
So essentially:
- An existing container image (docker image)
- Application code
- Image source code
Openshift provides templates for creating applications.
yaml and json can also be used for maximum configurability
Deploying from the Catalog#
Browse catalog
The
openshiftproject acts as a global repository for builder images and templates. If an administrator wants to make available a builder image or application template to the whole OpenShift cluster, this is where they should add them
Get a list of available templates
oc get templates --namespace openshift
Get a list of images
oc get imagestreams --namespace openshift
To view available templates and images
oc new-app -L
Search for an image or template
oc new-app -S django
Deploying an Image#
To deploy an image from within openshift use Image Stream Tag
To use an external image select Image Name and enter the iamge name including the registry (if not on dockerhub)
Deploying a Set of Resources#
Switch to the import YAML/JSON tab.
It can be uploaded or entered directly into the webpage
Info on creating raw resource definitions or templates, or how to deploy an application using them is not in this guide. For more info, check the developer guide
User accounts and the additional level of isolation between namespaces provided by the multitenant capabilities of OpenShift are key features that distinguish OpenShift from how a standard Kubernetes environment works
This makes openshift more secure and suited to enterprise environments
5. Deploying Applications from Images#
Lets use the openshi katacoda/blog-django-py image
oc new-app openshiftkatacoda/blog-django-py --name blog
the format is:
oc new-app <image_repo/imagename> --name <name_of_container>

--> Found Docker image 927f823 (4 months old) from Docker Hub for "openshiftkatacoda/blog-django-py"

    Python 3.5
    ----------
    Python 3.5 available as container is a base platform for building and running various Python 3.5 applications and frameworks. Python is an easy to learn, powerful programming language. It has efficient high-level data structures and a simple but effective approach to object-oriented programming. Python's elegant syntax and dynamic typing, together with its interpreted nature, make it an ideal language for scripting and rapid application development in many areas on most platforms.

    Tags: builder, python, python35, python-35, rh-python35

    * An image stream tag will be created as "blog:latest" that will track this image
    * This image will be deployed in deployment config "blog"
    * Port 8080/tcp will be load balanced by service "blog"
    * Other containers can access this service through the hostname "blog"

--> Creating resources ...
    imagestream.image.openshift.io "blog" created
    deploymentconfig.apps.openshift.io "blog" created
    service "blog" created
--> Success
    Application is not exposed. You can expose services to the outside world by executing one or more of the commands below:
    'oc expose svc/blog'
    Run 'oc status' to view your app.
A series of resource objects are created: imagestream, deploymentconfig and service:
imagestream- record of the image you want deployeddeploymentconfig- captures the details of how the deployment should be doneservice- maintains a mapping to instances of your application
Some resources have aliases:
svc-servicedc-deploymentconfigis-imagestream
You can get resources in a project with:
oc get svc
oc get dc
oc get is
YOu get all the types with the deprecated:
oc types
Types#
Kubernetes and OpenShift help developers and operators build, test, and deploy applications in a containerized cloud environment. Applications may be composed of all of the components below, although most developers will be concerned with Services, Deployments, and Builds for delivering changes.
Concepts:
* Containers:
    A definition of how to run one or more processes inside of a portable Linux
    environment. Containers are started from an Image and are usually isolated
    from other containers on the same machine.

* Image:
    A layered Linux filesystem that contains application code, dependencies,
    and any supporting operating system libraries. An image is identified by
    a name that can be local to the current cluster or point to a remote Docker
    registry (a storage server for images).

* Pods [pod]:
    A set of one or more containers that are deployed onto a Node together and
    share a unique IP and Volumes (persistent storage). Pods also define the
    security and runtime policy for each container.

* Labels:
    Labels are key value pairs that can be assigned to any resource in the
    system for grouping and selection. Many resources use labels to identify
    sets of other resources.

* Volumes:
    Containers are not persistent by default - on restart their contents are
    cleared. Volumes are mounted filesystems available to Pods and their
    containers which may be backed by a number of host-local or network
    attached storage endpoints. The simplest volume type is EmptyDir, which
    is a temporary directory on a single machine. Administrators may also
    allow you to request a Persistent Volume that is automatically attached
    to your pods.

* Nodes [node]:
    Machines set up in the cluster to run containers. Usually managed
    by administrators and not by end users.

* Services [svc]:
    A name representing a set of pods (or external servers) that are
    accessed by other pods. The service gets an IP and a DNS name, and can be
    exposed externally to the cluster via a port or a Route. It's also easy
    to consume services from pods because an environment variable with the
    name <SERVICE>_HOST is automatically injected into other pods.

* Routes [route]:
    A route is an external DNS entry (either a top level domain or a
    dynamically allocated name) that is created to point to a service so that
    it can be accessed outside the cluster. The administrator may configure
    one or more Routers to handle those routes, typically through an Apache
    or HAProxy load balancer / proxy.

* Replication Controllers [rc]:
    A replication controller maintains a specific number of pods based on a
    template that match a set of labels. If pods are deleted (because the
    node they run on is taken out of service) the controller creates a new
    copy of that pod. A replication controller is most commonly used to
    represent a single deployment of part of an application based on a
    built image.

* Deployment Configuration [dc]:
    Defines the template for a pod and manages deploying new images or
    configuration changes whenever those change. A single deployment
    configuration is usually analogous to a single micro-service. Can support
    many different deployment patterns, including full restart, customizable
    rolling updates, and fully custom behaviors, as well as pre- and post-
    hooks. Each deployment is represented as a replication controller.

* Build Configuration [bc]:
    Contains a description of how to build source code and a base image into a
    new image - the primary method for delivering changes to your application.
    Builds can be source based and use builder images for common languages like
    Java, PHP, Ruby, or Python, or be Docker based and create builds from a
    Dockerfile. Each build configuration has web-hooks and can be triggered
    automatically by changes to their base images.

* Builds [build]:
    Builds create a new image from source code, other images, Dockerfiles, or
    binary input. A build is run inside of a container and has the same
    restrictions normal pods have. A build usually results in an image pushed
    to a Docker registry, but you can also choose to run a post-build test that
    does not push an image.

* Image Streams and Image Stream Tags [is,istag]:
    An image stream groups sets of related images under tags - analogous to a
    branch in a source code repository. Each image stream may have one or
    more tags (the default tag is called "latest") and those tags may point
    at external Docker registries, at other tags in the same stream, or be
    controlled to directly point at known images. In addition, images can be
    pushed to an image stream tag directly via the integrated Docker
    registry.

* Secrets [secret]:
    The secret resource can hold text or binary secrets for delivery into
    your pods. By default, every container is given a single secret which
    contains a token for accessing the API (with limited privileges) at
    /var/run/secrets/kubernetes.io/serviceaccount. You can create new
    secrets and mount them in your own pods, as well as reference secrets
    from builds (for connecting to remote servers) or use them to import
    remote images into an image stream.

* Projects [project]:
    All of the above resources (except Nodes) exist inside of a project.
    Projects have a list of members and their roles, like viewer, editor,
    or admin, as well as a set of security controls on the running pods, and
    limits on how many resources the project can use. The names of each
    resource are unique within a project. Developers may request projects
    be created, but administrators control the resources allocated to
    projects.
A container won’t be visible outside the openshift cluster, to expose it use:
oc expose service/<name>
this creates a route resource object
Get all resources in a project
oc get all
Scaling up an Application#
Get deployment config
$ oc get dc
NAME      REVISION   DESIRED   CURRENT   TRIGGERED BY
blog      1          1         1         config,image(blog:latest)
You can scale up the number of instances using oc scale. You scale up the deployment config.
oc scale --replicas=3 dc/blog
OpenShift will automatically reconfigure the router through which it is exposed to the public to load-balance between all instances of the application
You can see the new pods with
oc get pods
You can also enable autoscaling on the pods based on CPU and memory utilisation
Runtime Configuration#
Configuration for your application can be supplied by setting environment variables in the container or by mounting configuration files into the container
You set required environment variables with the --env flag sent to oc new-app
oc new-app openshiftkatacoda/blog-django-py --name blog --env BLOG_BANNER_COLOR=green
Optional environment variables can be set later
oc set env dc/blog BLOG_BANNER_COLOR=green
You change the deployment config
The application will be redeployed with the new configuration
To view what environment variables can be set use:
oc set env dc/blog --list
Deleting the Application#
You delete an application using its label
oc delete all --selector app=blog
Importing an Image#
When you deploy an application from an existing container image hosted on an external image registry, a copy of the image is downloaded and stored into an image registry internal to OpenShift. The image is then copied from there to each node in a cluster where the application is run.
An image stream is created
If you need to deploy multiple seperate applications from a single image you should use import-image
oc import-image openshiftkatacoda/blog-django-py --confirm
oc import-image <image_name> --confirm
You can then deploy apps from the imported image
oc new-app blog-django-py --name blog
Note this only imports the image into your project
Pushing to the registry#
You can build an image locally (or remotely) and push it to the internal registry of openshift.
You can get the url of the registry from the cluster console
Login to repo:
docker login -u `oc whoami` -p `oc whoami --show-token` \ registry.my_instance.openshift.com:443
Before pushing an image you can create an empty image stream for it:
oc create imagestream blog-django-py
Tag the image with your image registry, project, name of image and version tag
docker tag blog-django-py registry.my_instance.openshift.com:443/book/blog-django-py:latest
Then push it to the Openshift internal image registry:
docker push registry.pro-us-east-1.openshift.com:443/book/blog-django-py
Images and Security#
Openshift enforces the container is run using a Unix user ID unique within the project
This is done to:
- prevent images being run as root
- as part of multitenant capabilities
Containers usually prevent the applications from accessing the host, if a application run as root accessed the host it would be root on the host
Best practice for images is to design them to be able to run as any Unix user ID
Many images available on public image registries do not adhere to such a practice and need to run as root to work, even though they have no requirement for elevated privileges
In a typical OpenShift environment, not all images you find on pub‐ lic image registries will work
This can be overriden by an admin with:
oadm policy add-scc-to-user anyuid -z default
6. Building and Deploying from Source#
Openshift provides the image building functionality for you.
You would use this when you want ot automate the complete workflow:
- building of the image
- testing of the image
- deployment
Openshift provides 4 build strategies:
- Source - Source-to-image - injects application source and assets into a builder image
- Docker - uses
docker buildto create a runnable image - Pipeline - Uses jenkins and a workflow in
JenkinsFileto create a pipeline - Custom - Uses your own custom image to control the build process
Source build strategy#
Uses the source-to-image tool
A hosted git repo is required
The builder will take your application code and build it (if necessary) and integrate it with the application stack provided with the builder image.
To deploy from source:
oc new-app --name blog python:3.6~https://github.com/openshift-katacoda/blog-django-py
oc new-app --name <name> <s2i builder name>~<git repo url>
An additional resource will be created a buildconfig
To monitor the building of the image:
oc logs -f bc/blog
You can expose the service outside of openshift with
oc expose svc/blog
get the route of the application
oc get routes
Creating a seperate build#
The source build strategy does 2 things:
- Run the build using S2I, source to image
- Deploy the image and start the web app
You can do the build step seperately with:
oc new-build --name <name> python:3.6~https://github.com/openshift-katacoda/blog-django-py
The output is similar but the deployment-config and service resource objects are not created
When the build is complete the image is saved as an imagestream <name>
You can then deploy the app with oc new-app <name>
Trigger a New Build#
If the source code files change, you can trigger a new build by getting the build config and using oc start-build
oc get bc
oc start-build bc/<name>
Building from a local Store#
Once off builds can bypass the repo and use source from a local system - bypassing the repo and using source files from the local source directory
oc start-build bc/blog --from-dir=.
To revert to using the hosted code repo:
oc start-build bc/blog
Useful to develop and not have to push them to a repository
Binary Input Builds#
All builds triggered manually and source files supplied - can iterate without needing to to commit and push.
You supply the --binary option
oc new-build --name blog --binary --strategy=source --image-stream python:3.6
Initial and subsequent builds are triggered with:
oc start-build blog --from-dir=.
The build config is not linked to a source code repo, so oc start-build must be manually run each time.
Testing the Container Image#
If you want to run unit tests on the application source code to verify the image before pushing to the internal image registry - you can use a post-commit hook on the build.
The test is run by launching a new container with the recently built image and running the post-commit hook command inside the container. If the command run by the build hook returns a nonzero exit code, the resulting image will not be pushed to the registry and the build will be marked as having failed.
To specify the command to run:
oc set build-hook bc/blog --post-commit --script "powershift image verify"
The --script option specifies the command without changing the image entrypoint.
The --command options overwrites the image entrypoint.
To remove a build hook use --remove
Avoid contacting other services as the container will be run in the same project as your deployed application. This is to avoid accidentally running tests against production services.
If a database is required for tests - run a local SQlite instance.
Build and Runtime Configuration#
Environment variables can be set with --env
oc new-app --env
If you need to set environment variables for the build step and deploying from source code, use --build-env:
oc new-app --name blog --build-env UPGRADE_PIP_TO_LATEST=1 python:3.5~https://github.com/openshift-katacoda/blog-django-py
with the 2 step approach: build then deploy.
oc new-build --name blog --env UPGRADE_PIP_TO_LATEST=1 python:3.5~https://github.com/openshift-katacoda/blog-django-py
if environment variables need to be added after the build config has been created:
oc set env bc/blog UPGRADE_PIP_TO_LATEST=1